The Pirate Ship: the fairground ride where a boat full of people hangs from a frame and swings higher and higher, one way and then the other.
Every motor you have run so far has gone one way. Wheels forward, wheel round, crank round, worm round — always clockwise, always the same direction. A swing cannot work like that.
By the end your ship will swing back and forth on its own, and you will have found — by testing, not by being told — the one timing that makes the swing grow instead of fighting itself.
In the real world 5 min
Where you have seen it
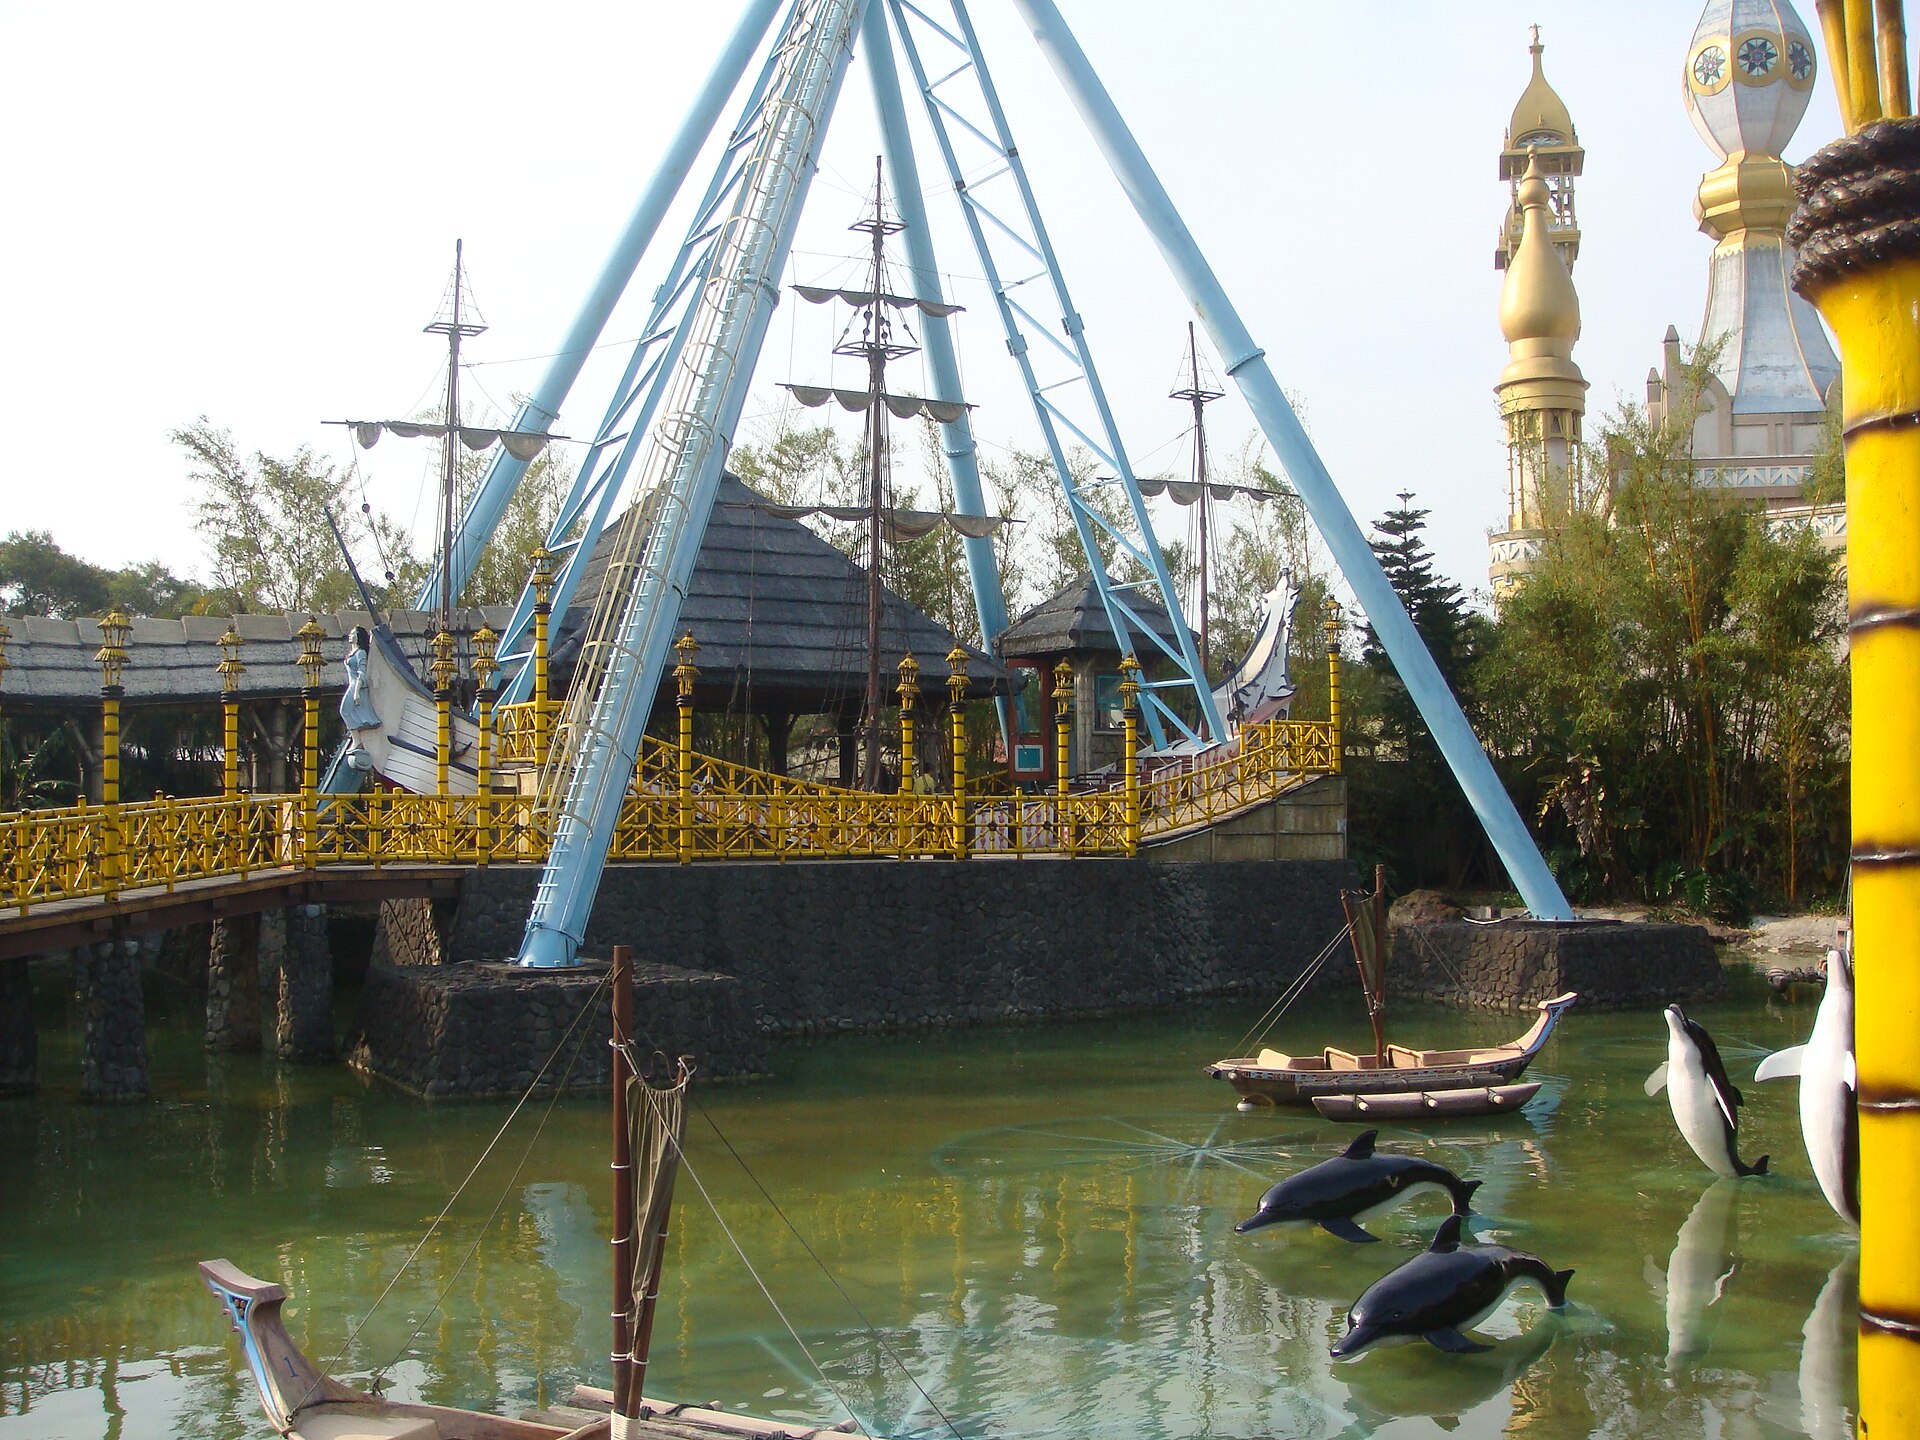
Almost every theme park has one. The ship hangs from a pivot at the top of a tall A-frame, and it does not go round — it swings, further each time, until the people at the ends are nearly upside down.
A swinging-ship ride hanging from its pivot at Leofoo Village Theme Park, Taiwan. Photo: milst1 / Wikimedia Commons (CC BY-SA 2.0).
Why it is built that way
A hanging weight that is pushed to one side and let go is a pendulum, and a pendulum has a timing of its own. It takes the same time to swing across whether the swing is big or small — that timing comes from how long it is, not how hard you pushed.
Which is why the ride does not need a huge motor. It needs a small push, given at the right moment, over and over.
Push in time with a swing and it grows. Push against it and it dies. Same push, same machine — only the timing is different.
You already know this in your body: it is exactly how you get a playground swing going without anyone pushing you.
What would go wrong without it
A ride that tried to force a heavy ship through a big swing by brute strength would need an enormous motor and would shake its frame to pieces. Working with the natural timing is not a clever trick — it is the only affordable way to build the ride.
The main concept — a motor turns both ways 6 min
The block you have used since Lesson 1 has had a direction in it all along, and you have never changed it.
[A v] run [clockwise v] for (2) [rotations v] :: motors
[A v] run [counterclockwise v] for (2) [rotations v] :: motors
The same block twice. Only the dropdown is different.
One way then the other way is a swing. That is the whole mechanism — there is nothing else to it.
Put those two blocks in a loop and the ship goes back and forth for as long as you like. What decides whether the swing grows is not how hard the motor pushes but how long each push lasts compared with the ship’s own natural rhythm.
68travel = twice the crank1 : 1turns to there-and-backs0.00turns so far
the motor sets the rhythmcrank radius sets the travel
A pin on a turning wheel, and a rod from the pin to a slider. The wheel only ever goes one way.The slider goes out, stops, comes back, stops. One full turn of the wheel is one complete there-and-back.It is fastest in the middle and motionless at each end, which is why a crank mechanism never jolts at the turnaround.Finished. One rhythm is set by the motor and the other by the mechanism — knowing which is which is the whole module.
at rest
The wheel turns at a steady rate and the slider does not. Watch the two ends: it stops dead at both of them without the motor ever stopping.
▶Swinging mechanisms, and repeatingThe full reference for both — open it if oscillation or the repeat block are not clear yet.Show meHide
ComponentMechanics4 min
Oscillatory motion
A motor does exactly one thing: it goes round. Everything that wipes, saws, pumps, nods or waves is a mechanism converting that rotation into oscillation — a movement that goes one way, stops, and comes back.
Crank and slider
Put a pin near the edge of a turning wheel and connect a rod from the pin to something that can only slide in a straight line. The wheel keeps turning one way; the slider goes out, stops, comes back and stops, once per revolution.
How far it travels is twice the crank radius — how far the pin is from the centre. Nothing else changes it.
How often is one there-and-back per turn of the wheel, so the motor speed sets the rhythm directly.
How it moves is the interesting part: fastest in the middle, motionless at each end. That is what stops a crank mechanism from jolting when it turns around, and it happens without anything slowing the motor down.
A crank with the rod attached to a pivoting arm rather than a slider gives a rocking motion instead of a sliding one. Same mechanism, and it is how a windscreen wiper works.
68travel = twice the crank1 : 1turns to there-and-backs0.00turns so far
the motor sets the rhythmcrank radius sets the travel
A pin on a turning wheel, and a rod from the pin to a slider. The wheel only ever goes one way.The slider goes out, stops, comes back, stops. One full turn of the wheel is one complete there-and-back.It is fastest in the middle and motionless at each end, which is why a crank mechanism never jolts at the turnaround.Finished. One rhythm is set by the motor and the other by the mechanism — knowing which is which is the whole module.
at rest
The wheel turns at a steady rate and the slider does not. Watch the two ends: it stops dead at both of them without the motor ever stopping.
Pendulums — when the mechanism sets the rhythm
A pendulum swings at a rhythm of its own, and that rhythm is set by exactly one thing you can control: its length. Longer means slower. Specifically the period goes as the square root of the length, so making it four times as long makes each swing twice as slow.
Two things students expect to matter and which do not:
The weight on the end. A heavy bob and a light one on the same string swing at the same rate.
How far you pull it back. Within reason, a wide swing takes the same time as a narrow one — it just travels further, faster.
This is worth meeting because it is the first mechanism in the course whose timing is not yours to program. If a nodding or swinging model has to keep a particular beat, you change its geometry, not its code.
Push a free-swinging thing at its own rhythm and the swings grow — that is resonance, and it is how a child on a swing goes higher without anybody pushing harder. Push at the wrong rhythm and you fight it. A model that has to swing widely is far easier to build by matching the push to the mechanism than by pushing harder.
Why it matters
Engines run this backwards: the up-and-down of a piston becomes the round-and-round of a crankshaft, using exactly the linkage above. Sewing machines, pumps, saws and metronomes are all in the same family, and a clock is a pendulum used as a ruler for time.
ComponentControl5 min
Repeating
Machines repeat. A wiper sweeps, a conveyor runs, a ride goes round — and none of that should mean copying the same blocks over and over. A loop says “do this again” once.
Blocks reference
Block
What it does
repeat (10)
end
Runs the blocks inside a set number of times, then carries on below.
forever
end
Runs the blocks inside over and over, and never carries on below.
repeat until <>
end
Repeats until a condition becomes true — a loop with a sensor as its exit.
Forever really does mean forever
Anything placed after a forever loop will never run. Not “runs late” — never. Both programs below end with the same block: set the status light green.
repeat (3)
repeat 3
A run clockwise for 0.25rotations
set status light to green
forever
forever
A run clockwise for 0.25rotations
set status light to green
↑ this block never runs
0passes · repeat (3)0passes · forever
repeat (3): still goingforever: light never set
Both loops begin. Each pass turns the motor a quarter turn.Pass 1.Pass 2.Pass 3 — and repeat (3) has now done its three.The left program carries on to the block underneath and sets its light green. The right one has jumped back to the top of the loop, and it always will.The left program has finished. The right program has not, and will not.
starting
Both programs contain the same green-light block. Let it run as long as you like — the right-hand ring will never turn green.
The repeat loop counts its three passes, stops, and moves on to the block underneath, so its light turns green. The forever loop reaches the bottom of its own blocks and jumps straight back to the top, so the block underneath is never reached — however long you leave it. If a program seems to stop half way through, look for a forever loop above the blocks that are not happening.
Why a sensor program needs a loop at all
A program is a list, and the Brick works down it once. Every block runs, in order, and when the last one is done the program is over. That is fine for a list of instructions — drive, turn, beep, stop — because each is a thing you do once.
A sensor is not a thing you do once. Asking is 1 pressed? gives you an answer about this instant, and an instant later it may be wrong. Checking a sensor once tells you what the world was like at the moment the program started — which is almost never what you wanted to know.
So a program that has to react must ask again, and again, for as long as it is running. That is the whole job of the loop: not to repeat an action, but to keep the question being asked.
Read, decide, act — and then do it again
Wrap a sensor check and the motor it controls in a forever loop and you have built a closed-loop control system — the pattern behind every line follower, thermostat and cruise control:
Read the sensor.
Decide what that reading means.
Act on the motors.
Go back to 1 — immediately, thousands of times a minute.
It is called closed because the output feeds back round to the input: the motors move the robot, moving the robot changes what the sensor sees, and what the sensor sees changes the motors. Break the circle at any point and the robot stops responding.
when program starts :: events hat
forever
  if <[1 v] is pressed? :: sensors> then
    [A v] start motor [clockwise v] :: motors
  else
    [A v] stop motor :: motors
  end
end
Read it as a sentence and it is almost too simple to need explaining: for ever, if the button is pressed run the motor, otherwise stop it. The motor now follows the button for as long as the program is running.
The same program without the loop
This is the mistake nearly everybody makes first, and it is a hard one to spot because nothing about it looks wrong:
when program starts :: events hat
if <[1 v] is pressed? :: sensors> then
  [A v] start motor [clockwise v] :: motors
else
  [A v] stop motor :: motors
end
The logic is perfect. The ports are right. Nothing is misspelled. And the robot will ignore the button completely — because the Brick reaches that if/else a few milliseconds after you press Run, finds the button not pressed, takes the else branch, stops the motor, runs out of blocks and ends. By the time a finger arrives, there is no program left to notice it.
with forever — a closed loop
when program starts
forever
if 1 is pressed? then
A start motor clockwise
else
A stop motor
without it — the common mistake
when program starts
if 1 is pressed? then
A start motor clockwise
else
A stop motor
↑ running — for the only time
40checks · with forever1checks · no loop
Looped: motor off, matching the buttonNo loop: motor off for ever, whatever you press
Both programs start. The button is not pressed, so both take the else branch and leave the motor off. So far they agree exactly.The right-hand program has already finished. One if/else, checked once, and there were no more blocks after it — the program ended in a few milliseconds.Press the button. The looped program comes round, checks again, sees `pressed`, and starts the motor. The finished program cannot: it is not running.Release. The looped program comes round again and stops the motor. The other one has not looked at the sensor since the instant it started.Press again, and again. Every pass round the loop is another check — that constant read, decide, act is what a closed loop IS.Finished. The looped program answered the button every time. The other answered it once, before anybody had touched it.
button released
Both programs contain exactly the same if/else. The only difference is the forever block around one of them.
Both programs contain exactly the same if/else. The counter is what gives it away: one keeps checking for as long as it runs, the other is stuck on the single check it made before anybody touched anything. A student who has seen this once stops writing it.
The tell on a real robot is a program that ends the instant you start it — the Brick returns to its menu almost immediately. If a sensor program finishes rather than waits, the loop is what is missing.
Choosing the right loop
Known number of times — repeat (n). A wiper that sweeps five times.
Until something happens — repeat until. Drive until the wall is close.
For as long as the machine is on — forever. A fan, a ride, a monitor.
Say this back before moving on: “A swing is one direction then the other, repeated — and the timing of the push decides whether it builds up or dies away.”
What’s in this build 4 min
Look at your model and find the parts with cables. There is a Brick and there is one motor — and this time you have to tell us which motor it is.
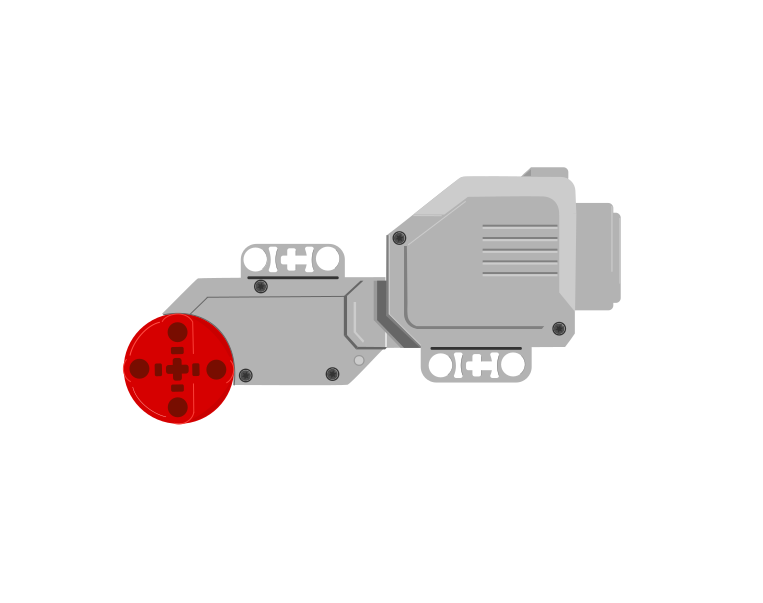
Large Motor
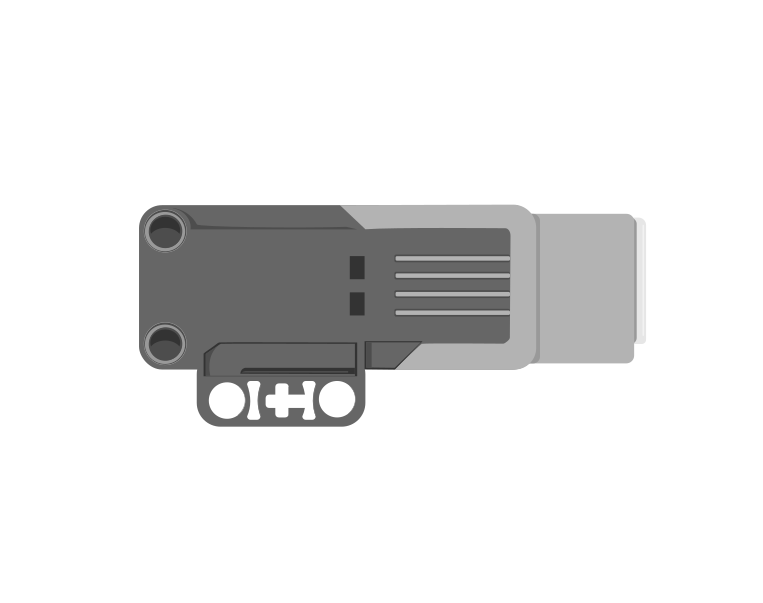
Medium Motor
Which one is in your build? The Large Motor is longer, with cooling slots down the side. The Medium Motor is shorter and squarer, with its axle on the flat face.
This is a real question, not a quiz. This model is built from a video rather than a printed manual, so its parts list has never been written down. Compare the motor in your hand with the two pictures above and write down which it is. Your programs work either way — a motor block names a port, not a kind of motor — but you should know what you are holding.
Find the pivot
Before you switch anything on, find the single point the ship hangs from and swing it by hand. Two things to notice:
It swings for several goes on its own after one push. That is the pendulum doing the work, not you.
Time it roughly. Count how long one complete there-and-back takes. You will want that number in a moment, and it belongs to your model rather than to this page.
Ports — and the rule 4 min
Sensors go in ports 1, 2, 3, 4. Motors go in ports A, B, C, D. They are not interchangeable, and nothing will tell you politely if you swap them.
Part
Port
Why this one
The motor (drives the swing)
A
A single working motor conventionally takes A, and every program on this page says A. If the video put yours somewhere else, either move the cable to A or change the letter in every block — but do not do half of each.
Check your own build now:
Motor cable in port A — a letter, not a number.
Swing the ship by hand through its full range. Does anything catch, rub or hit the frame?
Is the frame steady on the table, or does it walk about when the ship swings? A ride whose tower moves will never build a good swing.
Connect the Brick 4 min
Two routes, and either is fine. USB is the reliable one and the one to fall back on when a room’s Bluetooth is busy; Bluetooth leaves the robot free to move, which some models need.
▶How to connect the BrickUSB and Bluetooth, step by step, with a photograph of every screen. Open it if you have not done this before — or if pairing is not working.Show meHide
USB — the reliable one
Switch the Brick on with the dark grey centre button.
Cable into the Brick’s PC port — the small square socket beside the numbered ports, not one of the numbered ones.
Other end into the computer.
Bluetooth — name it first
Do these in order. Naming the Brick after you go looking for it in the list is how groups end up driving each other’s robots.
Name your Brick. On the Brick: Settings (the spanner) → Brick Name. Type something nobody else will pick, then press the tick. Every Brick is called EV3 until somebody changes it.
Turn Bluetooth on. Settings → Bluetooth. Tick Bluetooth and Visibility. Leave iPhone/iPad/iPod unticked.
Connect from EV3 Classroom. Click the Brick icon at the top of the programming area, find your Brick by name, and click Connect.
Say yes on the Brick. It asks “Connect?” with the computer’s name — choose the tick, then accept the passkey, which is already 1234.
Where to read it. The name sits in the bar across the very top of the screen, on every screen — so you can check which Brick you are holding at any moment without going into a menu. This one is EV3VE. A Brick nobody has renamed says EV3.Step 3, and the reason step 1 exists. Three Bricks in range — read the name before you click Connect. Pairing with the wrong one is not an error: it works perfectly, on somebody else’s robot.
Step 2.Bluetooth switches the radio on; Visibility is what lets the computer find you. With Visibility off your Brick works perfectly and simply never appears in the list.Step 4. Look at the Brick. It asks whether to accept and names the computer. Choose the tick.Then the passkey, already 1234. Press the tick again and you are connected.
The two failures, every class, every time. The Brick has gone to sleep while you were building — press the centre button to wake it. Or you have paired with the group at the next table, which is why the name matters.
The long version, including Port View and how to read the port tiles, is in the Brick & Bluetooth guide.
Keep the motor cable clear of the swinging ship. A cable that catches the ship at one end of its swing will damp it just enough to ruin every measurement you take today, and it will look like a program problem.
Confirm the connection 2 min
Check the Brick icon: connected, or not.
Check the port tiles. A motor on A, and nothing anywhere else.
Note which kind of motor the tile reports, and check it against what you decided in section 5. The software knows.
Turn the drive by hand and watch degrees counted move — up when you turn one way, down when you turn the other.
That last one matters today. Clockwise and counterclockwise are about to be the entire lesson, so make sure you can see the difference on the screen before you rely on it.
Change it and test 8 min
This is a measuring exercise, so measure. Mark on the frame — or just watch against a fixed point behind — how far the ship gets at its highest, and write the number down for every run. Always start the ship hanging still.
Run it at 0.3 seconds each way. How far does it get?
Now 0.6, then 0.9, then 1.2. One run each, same starting position, recording the highest point every time.
Look at your four numbers. One of them is clearly the best, and it is not the biggest or the smallest — it is the one closest to half the natural there-and-back time you measured in section 5.
Now change repeat (5) to repeat (15) at your best timing. Does the swing keep growing for ever, or does it settle at a size and stay there?
Step 3 is the discovery, and you made it rather than read it. The best push is not the hardest or the longest. It is the one that arrives when the ship is already going that way.
If the ship barely moves at any timing, check the frame is not sliding on the table and the cable is not catching the hull. Both of them take energy out of the swing on every single pass, which is exactly the thing you are trying to put in.
Make it move 10 min
Six blocks: push one way, push the other, five times over, then a bell to say the ride is done.
when program starts :: events hat
[A v] set speed to (60) % :: motors
repeat (5)
  [A v] run [clockwise v] for (0.6) [seconds v] :: motors
  [A v] run [counterclockwise v] for (0.6) [seconds v] :: motors
end
play beep (60) for (0.5) seconds :: sound
A push each way, five times. The 0.6 is a guess — your job is to improve on it.
Walk it in the order the Brick runs it:
set speed to 60 % — nothing moves yet.
repeat (5) — the pair of pushes below happens five times.
run clockwise for 0.6 seconds — the push one way. Notice it is measured in seconds, not rotations: a swing is about timing, so time is the natural unit here.
run counterclockwise for 0.6 seconds — the push back. Same block, one dropdown changed.
beep — outside the loop, so it sounds once, at the end of the ride.
What success looks like: the ship rocks back and forth in a steady rhythm. It may not swing very far yet, and that is expected — 0.6 seconds is a guess, and the next section is where you beat it.
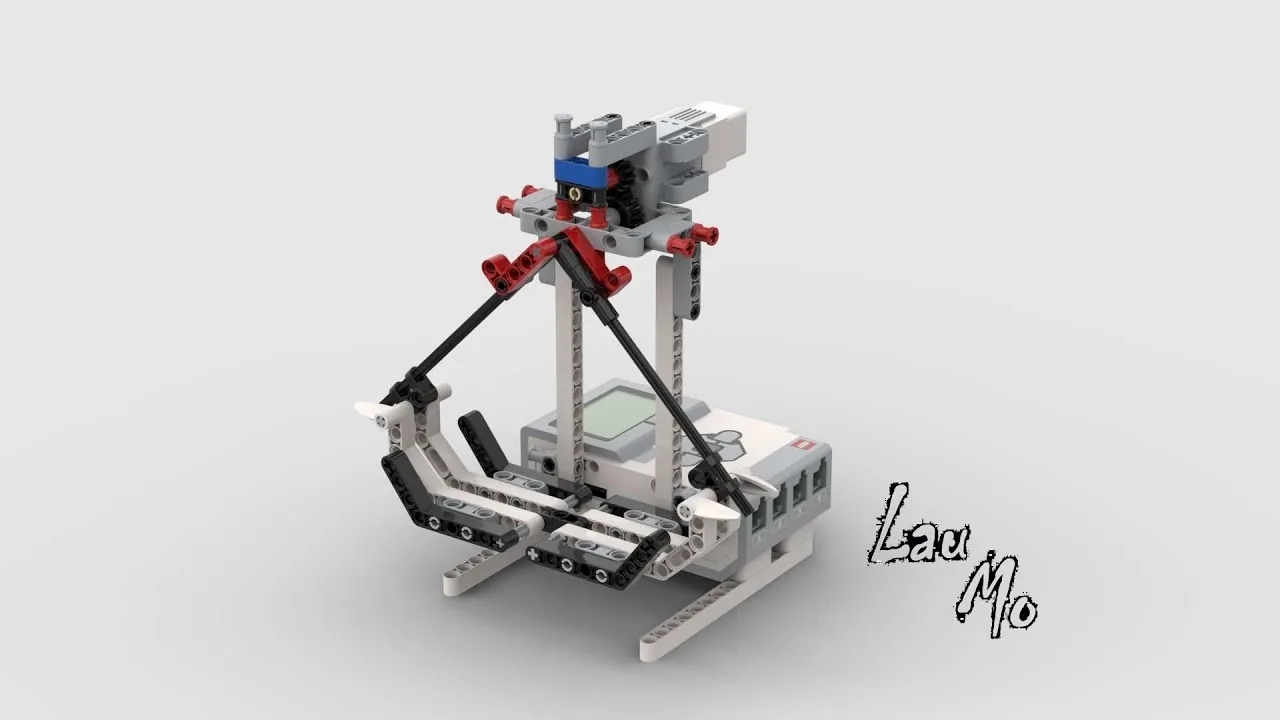
This is what you are building: the Pirate Ship.
Challenges 27 min
Work through them in order — each is harder than the last. The extra challenge comes after all three, and it is meant to make you plan before you build.
Challenge 1
Make the ride swing gently for a long time instead of fiercely for a short one: fifteen swings that never rise above halfway. Keep it steady — a ride that grows and collapses and grows again has not been controlled, it has been left alone.
Challenge 2
Give the ride a proper shape: it must start gently, build to its biggest swing in the middle, and die down again at the end, before sounding a bell. The change must be gradual enough that a person watching would call it one ride rather than three.
Challenge 3
Find and report your model's natural swing time. Push the ship once by hand, let go, and time how long a complete there-and-back takes. Then show that your best pushing timing is close to half of it, using at least four measured timings as evidence. Numbers, not opinions.
Extra challenge
Build the ride an operator would actually be given.
Your Pirate Ship must reach a big swing and then be brought safely back to rest — not switched off mid-swing, but slowed down deliberately until it hangs still enough for passengers to step off. It must then be ready to run again without anyone touching the model.
Plan on paper first. Getting a swing going and stopping one are opposite problems: work out what you have to change about the timing of the pushes to take energy out rather than put it in, and test that idea before you build the whole program.
Two questions when you demonstrate it. What exactly makes a push slow the ship instead of speeding it up? And how long does your ride take to bring the ship to rest — measured, and is that fast enough for a real queue?
Build it 15 min
Build the model before you read any further. Everything after this is about making it do something, and none of it will make much sense with nothing on the table in front of you.
Use the viewer's own controls to zoom and turn pages. Fullscreen makes it big enough to build from.
Check the finished build against the picture before you switch anything on. A motor mounted the wrong way round is far easier to spot now than it is to debug later, when it looks like a program fault.