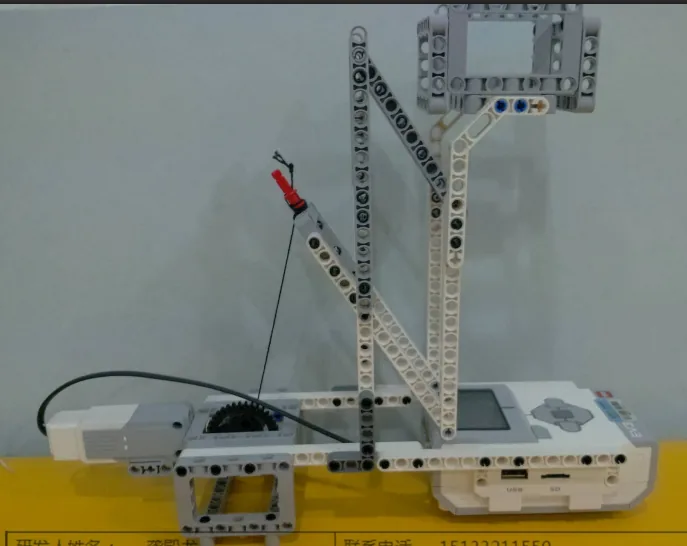
The Folding Fire Escape: a tower with a long arm joined at its base. A motor winds up a string. The string pulls, and the arm swings up and out. It has a hook at its tip.
Let the string back out, and the arm folds down against the tower again. That is the whole machine. One motor, one string, one turning point, and a long reach.
The Brick has told people things before. It showed a picture in Lesson 5. It wrote a line of text in Lesson 6. Each one said one thing at a time. A rescue machine must say several things at once. Today, the screen is not just a message. It becomes a panel.
In the real world 5 min
Where you have seen it
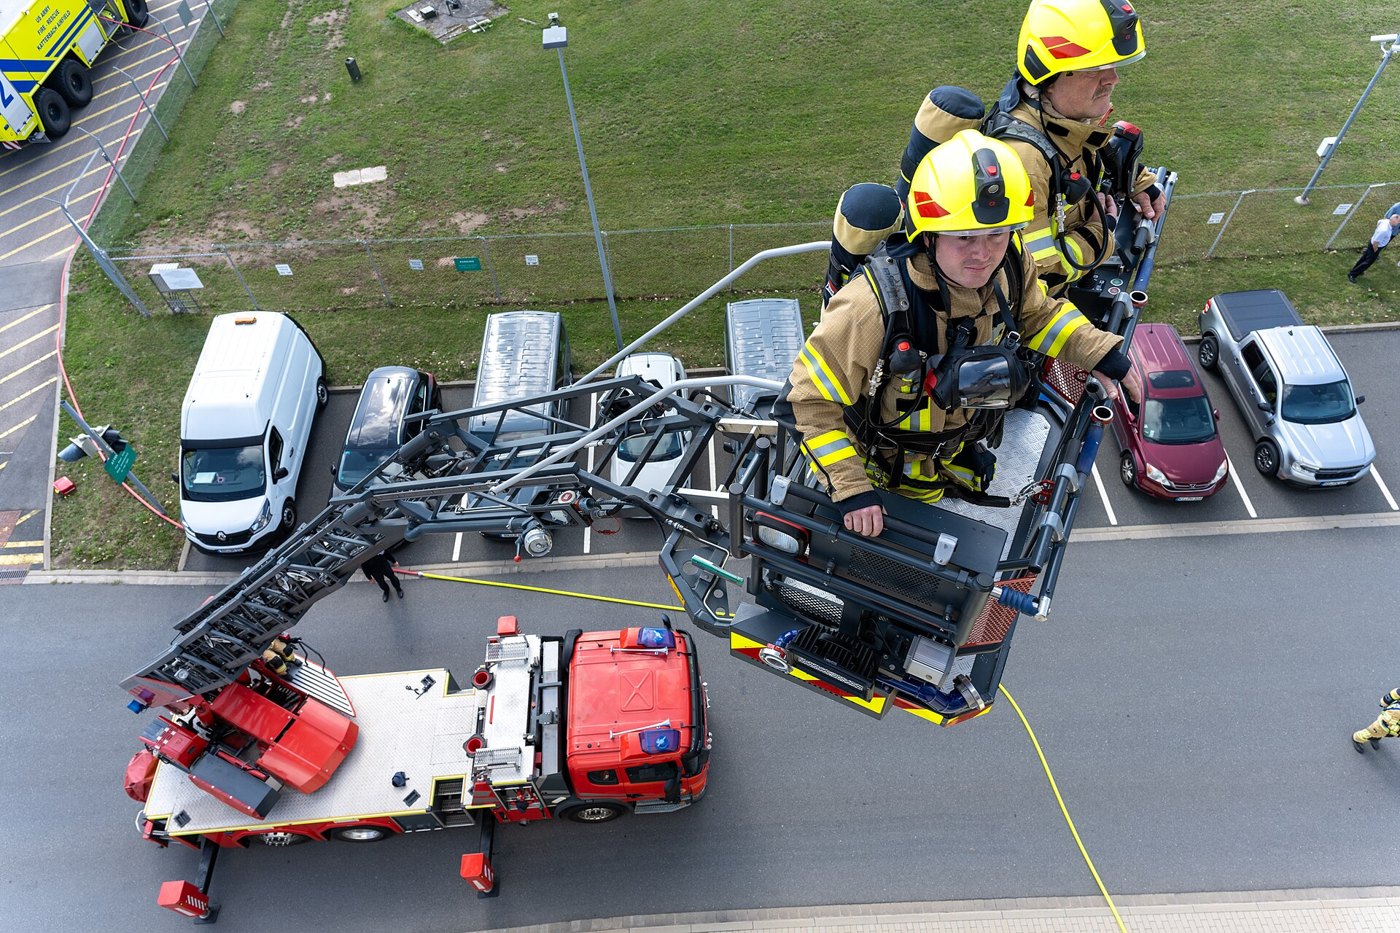
A fire engine with a ladder that unfolds from its roof. It reaches up the side of a building. Fire crews in big towns all over the world use them. They matter more every year, because buildings keep getting taller.
Firefighters in the basket at the top of an extended aerial ladder, with their engine on the ground below. Photo: U.S. Army, USAG Ansbach fire fighters’ readiness exercise (Public domain).
Why it is built that way
The arm turns round a fixed pivot at its base. A pivot is a point that stays still while things turn round it. The arm does not slide out longer. It swings, the way your arm swings from your shoulder. That is what “folding” means here.
Pulling it up with a string is a clever trick. A string can only pull. It can never push. So the motor winds in the string to lift the arm. To lower it, gravity does the work. You get two directions of movement from one pull!
What would go wrong without it
Now think about the fire crew. The person at the controls is at the bottom. They cannot see the top. They need to know several things at the same time. How high is the arm? Which way is it moving? Is it safe to climb?
One thing at a time is no use to them. Imagine a screen that showed the height, then wiped it. Then it showed the direction, and wiped that. A piece of paper would be better!
The person at the controls needs a panel, not a chat. Several facts, all on show at once. Each one always in the same place.
The main concept: eight lines that do not touch each other 6 min
The Brick’s screen holds eight lines of text. Line 1 is at the top, and line 8 is at the bottom. Writing on one line leaves the other seven just as they were.
Block
What it does
write [EV3] at line (1) :: display
Puts text on that line only. Everything else on the screen stays.
write [EV3] at x: (1) y: (1) with font [normal black v] :: display
Puts text at an exact pixel, not on a line. You can also pick the font. More control, but more to get wrong.
clear display :: display
Wipes all eight lines at once. It is the only block that does.
That first row is the big idea. Write a title on line 1 at the start of the program. It will still be there ten blocks later. Nothing you do to line 3 can touch it. So you can plan a layout. Line 1 says what the machine is. Line 3 says what it is doing. Line 5 shows a number that keeps changing.
clear display
write READY at line 1
write READY at x: – y: – with font normal black
the screen is 178 pixels across and 128 down
0x · across0y · down1line
write [READY] at line (1). Line 1 is the top of the screen, hard against the left edge.The same block, with line 4. Same words, three lines further down — the lines are evenly spaced, about ten pixels apart.Line 8 is as far as the line block goes, and that is only part of the way down. The bottom of the screen is out of its reach.So here is the other block: write [READY] at x: (0) y: (0). That has landed in exactly the same place as line 1 — because x: 0 y: 0 IS the top-left corner.x is how far across, from the left. x: 90 moves it towards the middle.y is how far DOWN, from the top. y: 110 is near the bottom — a bigger y means lower, and that is the one that catches everybody.Finished. Two blocks, two ways of saying where — and one of them can reach the whole screen.
line 1
The arrows are the two numbers. The one along the top is x; the one down the side is y, and it counts downwards from the top edge.
Watch out for one trap. It is like the one in Lesson 5. Write a short word over a longer one, and the end of the old word stays. Put DOWN over RISING, and the line says DOWNNG. Add spaces so your words are the same length. Or clear the display first.
Decide what goes on each line before you write a block. If things stay in the same place, you can read the panel at a glance. If they move around, you cannot.
▶The display, in fullBoth write blocks, the picture blocks and clearing. Open it if the screen is not clear yet.Show meHide
ComponentOutput5 min
The Brick display
The Brick’s screen is a small black-and-white whiteboard. You can wipe it, draw one of the built-in pictures on it, or write your own words at a spot you choose. It is how the robot tells a person what it is doing.
The screen sits above the buttons on the face of the Brick. It is small and black-and-white, so short messages work and long ones do not.
Blocks reference
Block
What it does
clear display :: display
Wipes the screen blank, ready for something new.
display [Eyes / Neutral v] :: display
Draws a built-in picture chosen from a list — eyes, faces, arrows, symbols.
display [Eyes / Neutral v] for (2) seconds :: display
Draws the picture, holds the program for that long, and then carries on. Handy when a face should be seen before anything else happens.
write [Hello] at line (1) :: display
Writes your own text on one of the screen’s eight lines.
write [Hello] at x: (10) y: (40) with font [normal black v] :: display
Writes text at an exact spot instead of a line, and lets you choose the size. Use it when a message has to line up with something else on the screen.
Clear it, or write on top of what is there
The screen has no memory of whose writing is whose. It keeps every mark until something wipes it — including the marks left by the last run. Watch the same program with and without its clear display block.
with clear display
when program starts
clear display
display Eyes / Neutral
write GATE OPEN at line 7
without it
display Eyes / Neutral
write GATE OPEN at line 7
1lines · cleared1lines · not cleared1run
Cleared: one message, readableNot cleared: 1 messages on line 7
Both Bricks still show whatever was left on the screen when the last run ended.The left program clears its screen. The right one has no clear block, so the old writing stays where it is.Both draw the eyes.Both write this run's message on line 7 — and on the right it lands on top of the message that was already there.Finished. The right-hand screen keeps everything it has ever been told to write.
drawing
Let it loop two or three times. The left screen still reads cleanly; the right one is the same program with one block missing.
Both Bricks are told exactly the same thing. The left one wipes the screen first, so line 7 holds one message and reads correctly. The right one never wipes, so each new message is drawn over the last and the words turn into a smudge. This is why a program that seems to display nonsense is usually displaying the truth — several times over.
Where the writing goes
There are two blocks for writing text, and they describe where in two completely different ways. Watch one message move around the screen under both of them.
clear display
write READY at line 1
write READY at x: – y: – with font normal black
the screen is 178 pixels across and 128 down
0x · across0y · down1line
write [READY] at line (1). Line 1 is the top of the screen, hard against the left edge.The same block, with line 4. Same words, three lines further down — the lines are evenly spaced, about ten pixels apart.Line 8 is as far as the line block goes, and that is only part of the way down. The bottom of the screen is out of its reach.So here is the other block: write [READY] at x: (0) y: (0). That has landed in exactly the same place as line 1 — because x: 0 y: 0 IS the top-left corner.x is how far across, from the left. x: 90 moves it towards the middle.y is how far DOWN, from the top. y: 110 is near the bottom — a bigger y means lower, and that is the one that catches everybody.Finished. Two blocks, two ways of saying where — and one of them can reach the whole screen.
line 1
The arrows are the two numbers. The one along the top is x; the one down the side is y, and it counts downwards from the top edge.
Writing on a line
write [EV3] at line (1) is the simple one. You give it a line number and it puts the text there, starting hard against the left edge — you do not choose how far across, only how far down.
Line 1 is the top. The numbers count downwards, so line 2 is below line 1, not above it.
There are eight of them, each about ten pixels lower than the last. That means all eight sit in the upper part of the screen and the line block cannot reach the bottom at all.
One message per line. Two messages sent to the same line land on top of each other and turn into a smudge — put them on different lines, or clear the screen in between.
For most robots this is all you need: a status word on line 1, a reading on line 3, a warning on line 5. Pick your lines at the start and keep each one for one job, the way you would keep one colour of status light for one meaning.
Writing at x and y
write [EV3] at x: () y: () with font [] treats the screen as a grid of pixels — 178 across and 128 down — and lets you put the text anywhere on it.
x is how far across, from the left edge. x: 0 is the far left; x: 177 is the far right. Bigger x moves right, which is what everybody expects.
y is how far down, from the top edge. y: 0 is the very top; y: 127 is the bottom. Bigger y means lower — this is the one that catches people out, because on a graph at school a bigger y means higher.
The corner is 0, 0. x: 0 y: 0 is the top-left, and it puts the text in exactly the same place as at line 1 — the two blocks are describing the same screen.
The pair of numbers is the top-left corner of the text, not its middle. The letters go down and to the right from the point you name.
The block ends with a font dropdown, and normal black is the usual choice. A larger font makes the writing easier to read from across the room but takes more room across the screen, so fewer characters fit before the text runs off the edge.
Which one to use
Use lines for ordinary status messages — quick to write, impossible to get wrong, and eight of them is plenty for one robot.
Use x and y when the position itself matters: putting a label and its number side by side, lining a heading up over a reading, filling the lower part of the screen, or moving something across the screen as a value changes.
Putting a number on the screen
The text slot of either block will take a reporter, so a sensor value can be shown directly: drop (4 distance in cm) into the slot and the screen shows the reading. That is the EV3’s version of a print statement, and it is the fastest way to find out what a robot actually thinks it is seeing.
A bare number on its own is hard to read, though. To show DIST: 23 rather than 23, use the operator block join [DIST: ] () to glue the label to the value, and put the join into the write block’s text slot.
when program starts :: events hat
clear display :: display
forever
  write (join [DIST: ] ([4 v] distance in [cm v] :: sensors)) at line (1) :: display
end
Note the forever: a value written once is a value from the start of the program. To watch a reading change, the write block has to be inside a loop.
Advanced — a dashboard, not a number
Once one value is on the screen the rest follows, and the useful trick throughout is join: it glues two pieces of text together and hands the result to the write block. Anything that reports a value can go in either slot — a variable, a sensor, or another join.
A variable with a label on it
Counting is the classic case. A variable counts how many times the Touch Sensor has been pressed, and a bare 5 on the screen tells nobody anything — PRESSED: 5 tells them everything:
when program starts :: events hat
clear display :: display
set [count v] to (0) :: variables
forever
  wait until <[1 v] is pressed? :: sensors>
  change [count v] by (1) :: variables
  write (join [PRESSED: ] (count)) at line (1) :: display
  wait until <not <[1 v] is pressed? :: sensors>>
end
The two wait until blocks are what make it count presses rather than counting as fast as the loop runs while your finger is down. That is the Touch Sensor’s own lesson, but it shows up here because a counter on the screen is where you first notice it going wrong.
Several sensors, one line each
Give every reading its own line and keep it. A line that changes meaning halfway through a program is unreadable at a glance, which is the only speed a screen on a moving robot gets read at.
when program starts :: events hat
clear display :: display
forever
  write (join [DIST: ] ([4 v] distance in [cm v] :: sensors)) at line (2) :: display
  write (join [DEG: ] ([A v] degrees counted :: sensors)) at line (5) :: display
end
degrees counted is worth putting on the screen the first time you use it — it is the fastest way to find out whether a motor is turning as far as you think it is, and it is the block behind every “why did it stop early” question.
Turning a number into a word
Sensors report numbers, and people read words. The Colour Sensor reports 5; the person watching wants RED. A chain of if … then … else blocks does the translation, and it is worth doing once into a variable rather than in every write block:
if <([3 v] color :: sensors) = (5)> then
  set [name v] to [RED] :: variables
else
  if <([3 v] color :: sensors) = (4)> then
    set [name v] to [YELLOW] :: variables
  else
    set [name v] to [OTHER] :: variables
  end
end
write (join [COLOR: ] (name)) at line (4) :: display
The same shape turns a distance into a warning. Here the screen carries the number and what the number means, which is what lets somebody across the room tell whether the robot is about to hit something:
if <([4 v] distance in [cm v] :: sensors) < (10)> then
  set [status v] to [TOO CLOSE!] :: variables
else
  if <([4 v] distance in [cm v] :: sensors) < (30)> then
    set [status v] to [OBSTACLE FOUND] :: variables
  else
    set [status v] to [NOTHING FOUND] :: variables
  end
end
write (status) at line (3) :: display
Drive all four of those at once below. The screen is the real thing — five write blocks, five lines, and every one of them a join.
Drive the sensors and read the screen. Every line is one write block with a join in its text slot.
24 cm
180°
Colour Sensor5 → RED
Touch Sensor3 presses
Line
What goes in the write block
On the screen now
1
join "PRESSED: " (count)
PRESSED: 3
2
join "DIST: " (4 distance in cm)
DIST: 24
3
(status) — set by the if chain
OBSTACLE FOUND
4
join "COLOR: " (name)
COLOR: RED
5
join "DEG: " (A degrees counted)
DEG: 180
Line 4 says COLOR: RED, but the sensor only ever said 5. The if chain in between is what turns a number into a word.
Advanced — stopping the screen from flickering
The moment a reading goes inside a loop, one of two things goes wrong, and which one depends on where the clear display block went.
Almost everybody tries clear inside the loop first. It gives the right text — and a screen that blinks several times a second, because between the clear and the write there is genuinely nothing on the screen and the loop goes round faster than your eye.
So the clear gets moved to the start of the program, the blinking stops, and the words go wrong. Writing text paints only the characters it has and leaves everything past them exactly where it was. Write RED over YELLOW and the LOW is still there: the screen says REDLOW. Go the other way — yellow first, then red — and it looks fine, which is why this bug takes so long to pin down.
when program starts :: events hat
clear display :: display
forever
  write (name) at line (3) :: display
end
YELLOWwhat the sensor says—what the screen says0characters left behind
never blankleftovers survive
The Colour Sensor reads a colour and the name goes on line 3, over and over, inside a forever loop.Rock steady, and wrong. Writing paints only the characters it has, so the tail of the longer word before it is still sitting there.Nothing is misspelled and nothing is broken. Every red character is the tail of a longer word that was never wiped — RED over YELLOW reads REDLOW.Finished. Three programs, one screen, and only one of them is both steady and right.
waiting
Watch the bottom three rows rather than the Brick. They are what the screen is actually doing: old characters, new characters, and whatever survives.
The fix is to make the new text at least as long as the old one, and join already does that: pad it with spaces. RED plus three spaces is six characters — exactly enough to paint over YELLOW. Nothing is left behind, and nothing is ever blank.
write (join (name) [ ]) at line (3) :: display
Pad to the length of the longest thing that line can ever show. Six characters covers RED, BLUE and GREEN but not NOTHING FOUND — count the longest message, and add spaces to match. The same applies to numbers: DIST: 5 after DIST: 40 leaves a stray 0 on the end, so a line that shows a two-digit reading needs a trailing space.
Use clear-inside-the-loop when the whole screen changes at once and a flicker does not matter; use the padding trick whenever a value is being watched.
Advanced — a whole list on the screen
Once several values need showing, the line number becomes a counter and the values come out of a list: write item 1 at line 1, item 2 at line 2, and so on inside a repeat. That needs the list blocks rather than the display blocks, so it lives with them — Lists covers building one and reading it back item by item, and the loop that walks it is the same loop that fills the screen.
Why it matters
Machines in the real world tell you what they are doing: a microwave counts down, a lift shows its floor, a car dashboard warns you. A robot that shows WAITING and then OPEN is far easier to understand — and far easier to debug — than one that moves silently.
Say this back before moving on: “Writing on line 3 does not touch line 1. Only clear display wipes everything.”
What’s in this build 4 min
Two electronic parts, and one piece of string that matters just as much.
Part
What it is doing here
EV3 Intelligent Brick
Runs the program and has the screen. Today, the screen is the control panel.
Medium Motor
Winds and unwinds the string. It is the flat motor. It is not lifting much, so speed matters more than strength.
The string (no cable)
The part that really lifts the arm. It can pull, but it cannot push. Remember that if the arm will not go down.
Wind it by hand first
Turn the motor slowly by hand, and watch the string. Is it winding onto the axle, or off it?
Keep going until the arm is all the way up. About how many turns did that take? Count them.
Now unwind. The arm should fold back down by its own weight. If it sticks halfway, something is catching. Find it now. The motor cannot push it down.
Check the string is not crossing over itself on the axle. If the string piles up on itself, each turn winds a different amount. Then your careful numbers will be no use.
Ports — and the rule 4 min
Sensors go in ports 1, 2, 3, 4. Motors go in ports A, B, C, D. You cannot swap them. If you do, nothing warns you. The robot just will not work.
Part
Port
Why this one
Medium Motor (winds the string)
A
A single motor goes in A, as always.
The screen
none
Part of the Brick. Nothing to plug in.
Check your own build now:
Motor cable in port A. A letter, not a number.
Arm folded down before every run. The string should be straight, but not tight. If the string is loose, the start of every lift does nothing.
Is the screen facing the person at the controls? A panel nobody can see is not a panel.
Is the tower steady on the table? When the tall arm swings out, the weight moves a long way to the side. If the base is light, it will tip over.
Connect the Brick 4 min
Two routes, and either is fine. USB is the reliable one and the one to fall back on when a room’s Bluetooth is busy; Bluetooth leaves the robot free to move, which some models need.
▶How to connect the BrickUSB and Bluetooth, step by step, with a photograph of every screen. Open it if you have not done this before — or if pairing is not working.Show meHide
USB — the reliable one
Switch the Brick on with the dark grey centre button.
Cable into the Brick’s PC port — the small square socket beside the numbered ports, not one of the numbered ones.
Other end into the computer.
Bluetooth — name it first
Do these in order. Naming the Brick after you go looking for it in the list is how groups end up driving each other’s robots.
Name your Brick. On the Brick: Settings (the spanner) → Brick Name. Type something nobody else will pick, then press the tick. Every Brick is called EV3 until somebody changes it.
Turn Bluetooth on. Settings → Bluetooth. Tick Bluetooth and Visibility. Leave iPhone/iPad/iPod unticked.
Connect from EV3 Classroom. Click the Brick icon at the top of the programming area, find your Brick by name, and click Connect.
Say yes on the Brick. It asks “Connect?” with the computer’s name — choose the tick, then accept the passkey, which is already 1234.
Where to read it. The name sits in the bar across the very top of the screen, on every screen — so you can check which Brick you are holding at any moment without going into a menu. This one is EV3VE. A Brick nobody has renamed says EV3.Step 3, and the reason step 1 exists. Three Bricks in range — read the name before you click Connect. Pairing with the wrong one is not an error: it works perfectly, on somebody else’s robot.
Step 2.Bluetooth switches the radio on; Visibility is what lets the computer find you. With Visibility off your Brick works perfectly and simply never appears in the list.Step 4. Look at the Brick. It asks whether to accept and names the computer. Choose the tick.Then the passkey, already 1234. Press the tick again and you are connected.
The two failures, every class, every time. The Brick has gone to sleep while you were building — press the centre button to wake it. Or you have paired with the group at the next table, which is why the name matters.
The long version, including Port View and how to read the port tiles, is in the Brick & Bluetooth guide.
Either is fine, but keep the cable away from the string. A USB cable lying across the axle will get tangled. Then the arm lifts partway and stops. That looks just like a program with the wrong number in it.
Confirm the connection 2 min
Check the Brick icon. Is it connected?
Check the port tiles. You want a Medium Motor on A, and nothing on the number ports.
Wind the arm by hand from all the way down to all the way up. Watch degrees counted. How much did it change? That is how far the motor must turn for a full lift. Your program needs that number.
Take about a tenth off it. It is wise to stop just before the top. Winding hard into the top is not.
Change it and test 8 min
Make one change at a time. Guess what will happen before each run. Guess what the whole screen will look like, not just the line you changed.
Add a third row: write [HOOK: READY] at line (5) near the start. Guess how many lines will be on the screen at the end.
Change the last block to write on line 1, not line 3. Guess what happens to the title. It is gone! You wrote over it, and the panel has lost its name.
Put it back, then delete the spaces from ARM: UP. Run it, and read the line carefully. This is the leftover-letters trap, happening live.
Add a lowering half: a wait 3 seconds, a run counterclockwise for 180 degrees, and a third write back to ARM: DOWN. Does the arm reach the same place where it started?
Now put a clear display just before that last write. Guess what the panel will look like after. The title has gone too! Clear display is the one block that wipes every line.
Remember step 5. Clear display is a hammer. When you have a panel, you almost never want it in the middle of a program. Write over the one line that changed. Leave everything else alone.
This is what you are building: the Folding Fire Escape.
Build it 15 min
Build the model before you read any further. Everything after this is about making it do something, and none of it will make much sense with nothing on the table in front of you.
One page at a time — use Next and Previous, or the ← → keys. Fullscreen makes it big enough to build from.
Check the finished build against the picture before you switch anything on. A motor mounted the wrong way round is far easier to spot now than it is to debug later, when it looks like a program fault.
Make it move 10 min
Seven blocks, and two of them make the panel. Use your own measured number instead of 180.
when program starts :: events hat
clear display :: display
write [FIRE ESCAPE] at line (1) :: display
write [ARM: DOWN  ] at line (3) :: display
[A v] set speed to (25) % :: motors
[A v] run [clockwise v] for (180) [degrees v] :: motors
write [ARM: UP    ] at line (3) :: display
Line 1 is written once and never touched again. Line 3 changes, but the title stays. That is what makes it a panel.
Go through it in the order the Brick runs it:
clear display: a blank panel. Nothing left from the last run can confuse anyone.
write FIRE ESCAPE at line 1: the title. It is written once, at the start. Nothing below it wipes it.
write ARM: DOWN at line 3: what the arm is doing. There is a blank line under the title. Then the two do not read as one sentence.
set speed to 25 %: slow. If the arm shoots up fast, the whole model can tip over.
run clockwise for 180 degrees: the string winds in, and the arm goes up. The program waits here until the block has finished.
write ARM: UP at line 3: only line 3 changes. Look at the screen. The title is still there.
Notice the spaces inside the brackets.ARM: DOWN and ARM: UP have extra spaces on purpose, so they are the same length. Without them, UP written over DOWN would leave the last two letters of DOWN. The line would say ARM: UPWN.
What success looks like: a panel with two lines, and a slow, steady lift. The bottom line changes when the arm gets to the top. The title stays above it, untouched.
Challenges 27 min
Work through them in order — each is harder than the last. The extra challenge comes after all three, and it is meant to make you plan before you build.
Challenge 1
Build a screen panel with three lines. Put the machine's name on line 1. Put what the arm is doing on line 3. Put the speed you are running at on line 5. All three must be on the screen at the same time. Only the line about the arm may change while the arm moves.
Challenge 2
Make the arm go up and come back down. The panel must be right at every stage, even while the arm moves. RISING and LOWERING must show during the move, not only after it. Think about where the write block goes compared with the motor block.
Challenge 3
First, fall into the leftover-letters trap on purpose. Then fix it. Write RISING over DOWN with no padding. Padding means extra spaces to make the words the same length. Take a photo of what the screen really says. Then pick four words for what the arm is doing. Make the panel right for all four. Each word must be a different length. Say in one sentence which fix you used and why.
Extra challenge
Design the panel a fire crew would be given.
Your fire escape must run a full cycle: raise, hold, lower. The screen must be a control panel the whole time. Each thing must stay in its own fixed place. A person should read it at a glance without hunting. Show at least three things, all live at once. None of them may ever be out of date.
Plan on paper before you build, and plan the layout first. Draw the eight lines. Decide what goes on each one. Only then work out which block writes what. If you design the panel while you type, it will move around.
You will be asked two questions when you show it. If there is a fire, which line would a person look at first? Why is it in that place? And is there any moment when the screen is wrong? Does it ever say something that is no longer true?