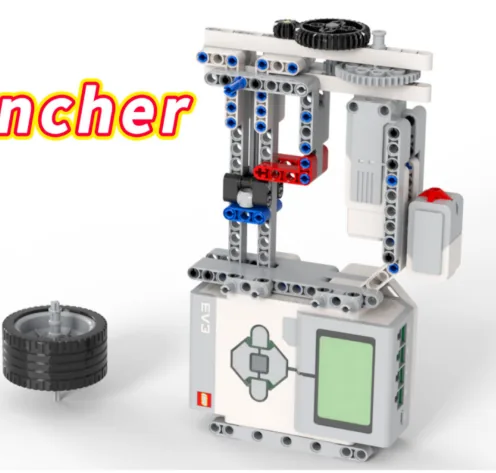
The Gyro Launcher: a motor spins a gear up to speed, a stretched rubber band waits on a trigger, and when you pull the trigger the spinning top is flung out to fight.
You built the Dual Gyro back in Lesson 3 and launched two tops at once. This one is the serious version — it stores energy in a band like the Elastic Car, and it holds it until you choose to let go.
Everything about this machine depends on one thing: being at full speed before the release. A top that leaves the launcher half spun-up is a top that stops in three seconds. So today’s idea is about a block that does nothing when it runs — and decides everything that happens afterwards.
In the real world 5 min
Where you have seen it
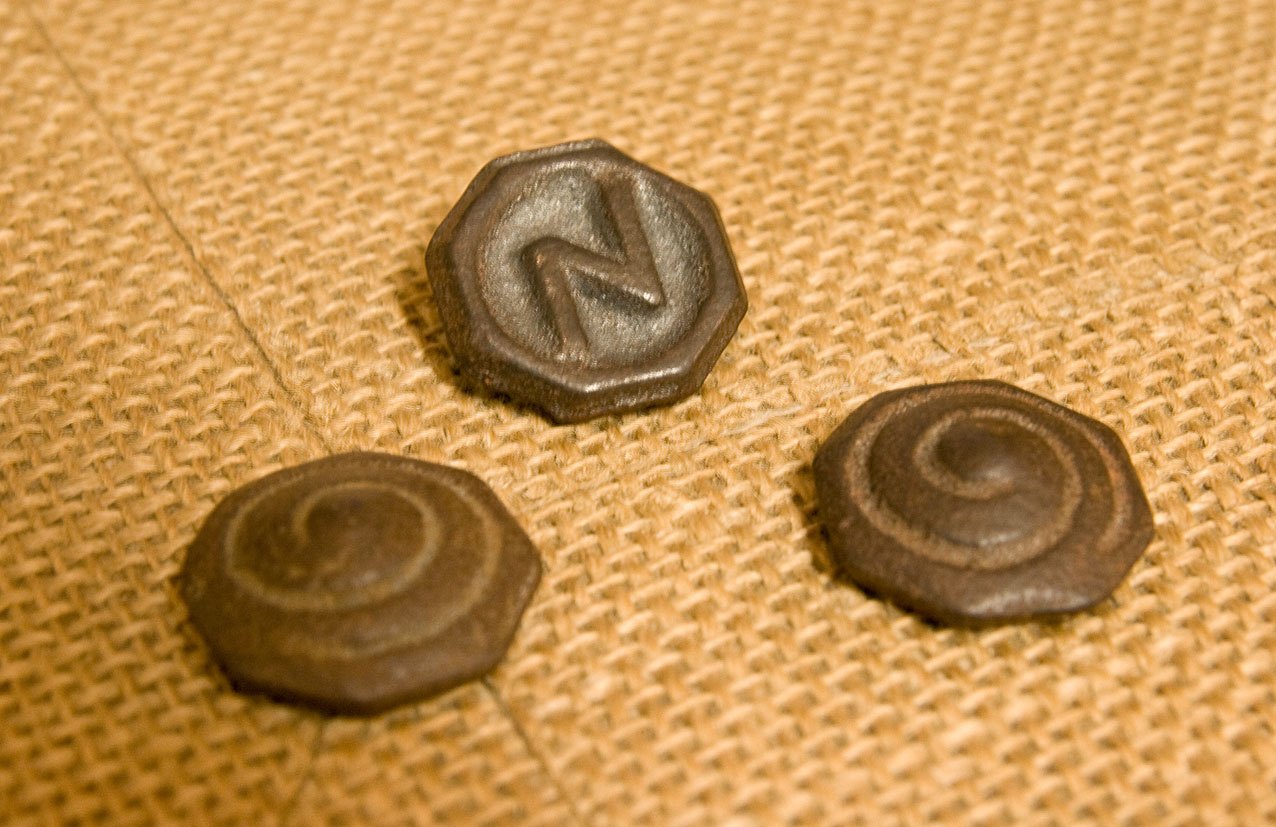
Spinning tops are old. The Japanese beigoma below is a small cast-iron top spun into a bowl against other tops — and it is the direct ancestor of the Beyblades sold in every mall today, launcher and all.
Beigoma — cast-iron Japanese spinning tops. Photo: Σ64 / Wikimedia Commons (CC BY 3.0).
Why it is built that way
A top stays upright for the same reason a bicycle does: once something is spinning fast, it resists being tipped over. The faster it spins, the more stubbornly it holds its angle — and the longer it lasts before friction wins.
So a launcher has exactly one job, and it is not aiming. It is getting the top to the highest speed it can manage before letting go. Every real launcher — the ripcord, the winder, the geared handle — exists to solve that and nothing else.
What would go wrong without it
Release too early and you have wasted the launch. Not slightly — a top spun at half speed does not last half as long, it wobbles over almost at once, because below a certain speed it cannot hold itself upright at all.
Some machines have a moment they must be ready for. Getting ready afterwards is the same as not getting ready.
Before you build 1 min
This model has no step-by-step manual, and the video below is not one. What this lesson has is a film of a finished Gyro Launcher working — useful for seeing what you are aiming at, and no use at all for finding out which beam goes where. Watch it for the target, then build from the model your teacher has, or from a photograph of a finished one. If you get stuck, ask: you are not missing a page, the page does not exist.
The main concept — blocks that do, and blocks that set 6 min
Not every block makes something happen. Some blocks only change what the next blocks will do — and they look exactly the same sitting in the stack.
Block
When it runs, it…
[A v] start motor [clockwise v] :: motors
Does something. The motor turns. You can see it and hear it.
[A v] set speed to (100) % :: motors
Sets something. Nothing moves, nothing makes a sound. It writes down a number the motor will use next time it is asked to turn.
You have quietly been using this since Lesson 3 without it being named. It matters today because of where the block sits. Put set speedafterstart motor and the motor spins up at whatever speed it was already using — and your new number sits there doing nothing until something asks the motor to move again.
speed first — works
A set speed to 25 %
A run clockwise for 2rotations
speed last — does nothing
A run clockwise for 2rotations
A set speed to 25 %
0.00rotations · slow0.00rotations · fast
Speed first: the movement was slowSpeed last: it only affects the NEXT movement
Two programs. Same two blocks in each — only the order is different.Both are running — and the right-hand one is already finished. The left is barely a third of the way.Its speed block runs now, far too late to affect the movement above it. The left motor is still going, slowly, as it was told to.Both turned exactly 2 rotations. Only one of them did it at the speed the program asked for.Finished — it will run again in a moment.
stopped
Both shafts turn exactly 2 rotations. Only the time they take is different — and the right-hand program never gets the slow movement it was written to have.
Both programs in that demo contain the same two blocks. That is what makes this bug so hard to find by reading: there is nothing wrong with either block, and nothing missing. Only the order.
A setting has to be in place before the thing it affects happens. Set the speed, then start the motor — never the other way round.
The same is true of some blocks you already know: set volume and set movement motors are settings too. None of them does anything on its own.
▶Speed and power, and the Touch SensorThe full reference for the speed block and for the switch this model uses. Open either if it is not clear yet.Show meHide
ComponentMotion4 min
Speed and power
Speed is set separately from movement. You tell the motor how fast it should go, and then you tell it to go — two blocks, in that order.
Speed is a percentage of what this motor can do, not a real-world unit — the same 50 % moves a light arm quickly and a heavy one slowly.
Blocks reference
Block
What it does
[A v] set speed to (25) % :: motors
Sets the speed for this motor from now on. Nothing moves — it only changes what the next movement will do.
[A v] run [clockwise v] for (2) [rotations v] :: motors
Now moves, at whatever speed was last set.
Set it first
when program starts :: events hat
[A v] set speed to (25) % :: motors
[A v] run [clockwise v] for (2) [rotations v] :: motors
Swap those two blocks round and the program still contains a speed of 25 % — it just never gets used. Both shafts below are asked for exactly 2 rotations; watch how long each one takes.
speed first — works
A set speed to 25 %
A run clockwise for 2rotations
speed last — does nothing
A run clockwise for 2rotations
A set speed to 25 %
0.00rotations · slow0.00rotations · fast
Speed first: the movement was slowSpeed last: it only affects the NEXT movement
Two programs. Same two blocks in each — only the order is different.Both are running — and the right-hand one is already finished. The left is barely a third of the way.Its speed block runs now, far too late to affect the movement above it. The left motor is still going, slowly, as it was told to.Both turned exactly 2 rotations. Only one of them did it at the speed the program asked for.Finished — it will run again in a moment.
stopped
Both shafts turn exactly 2 rotations. Only the time they take is different — and the right-hand program never gets the slow movement it was written to have.
The right-hand movement is over before the left is a third of the way round, because it ran at the default speed. Its set speed to () block does run — you can see it light up — but by then the movement it was meant to slow down has already happened. A speed block only ever affects the movements after it. This catches people out constantly.
Slow is often better
A high speed is not a better program. Slow movements are gentler on the gears, easier to watch and debug, and look more like the real machine — a barrier that snaps up in a fraction of a second reads as broken rather than fast.
ComponentSensing5 min
The Touch Sensor
The Touch Sensor is the simplest input the EV3 has: a button that is either pressed or not. That sounds trivial, but it is how a robot knows it has hit a wall, reached the end of a track, or been told to start by a person.
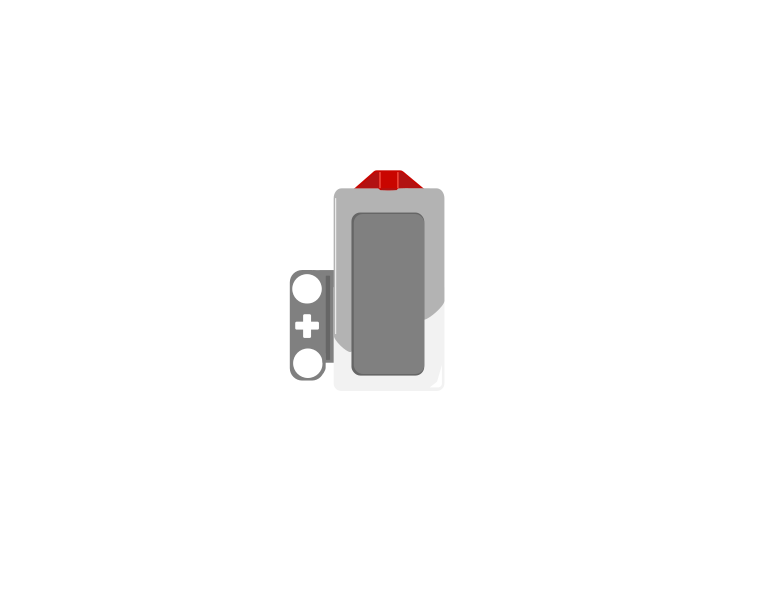
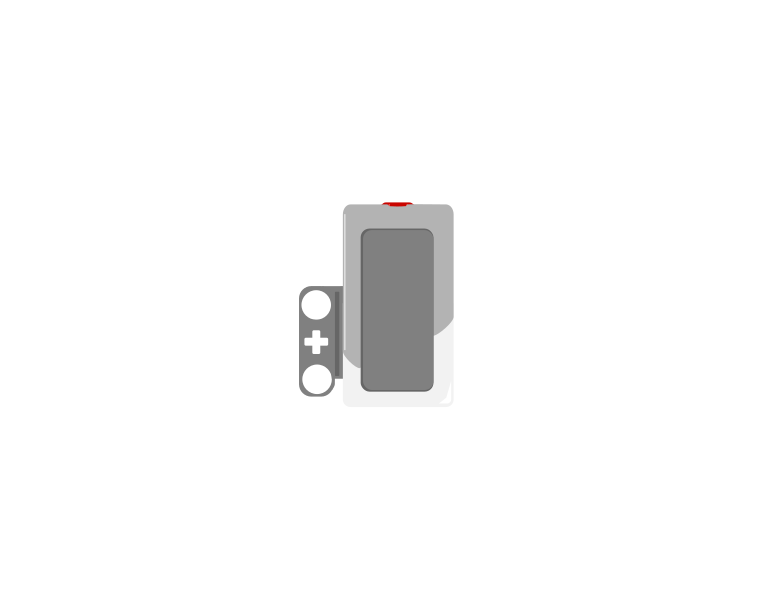
released
pressed
The red button out, and the same sensor with it pushed in. These two states are the entire output of this sensor — there is nothing in between.
Blocks reference
Block
What it does
wait until <[1 v] is pressed? :: sensors>
Holds the program here until somebody presses the sensor.
<[1 v] is pressed? :: sensors>
Reports true or false. Drop it into a condition to make a decision rather than a wait.
[1 v] when [bumped v] :: events hat
Starts a whole stack of its own. The dropdown chooses the moment: pressed, released or bumped.
Three different events
A button is not only “pressed”. One press is three things: the moment it goes down, the time it stays down, and the moment it comes back up. Watch what a single press does to three programs at once.
when program starts
forever
if 1 is pressed? then
change count by 1
versus two hat blocks
1 when pressed
1 when bumped
0is pressed? in a loop0when pressed0when bumped
In a loop: 0 answers from one pressBumped: exactly one
Nobody is touching the sensor. All three programs are watching it.A finger presses the button. Watch the red button go in — a couple of millimetres is the sensor's entire movement.The finger is still down. The loop checking «is pressed?» has already run hundreds of times, and every one of them counted.The finger lifts. Only now does «bumped» count, because bumped means pressed AND released.One press. Three completely different answers.Finished. The same press, counted three ways.
released
The middle counter is the one that surprises people. Nothing is wrong with it — a loop really does check that fast, and every check really is a separate answer.
Nothing there is broken. A loop really does get round hundreds of times a second, and each time it asks is pressed? the honest answer is still yes — so if that loop plays a sound or counts something, it does it hundreds of times from one finger. The two hat blocks each fire once, and they fire at different moments: pressed the instant the button goes down, bumped only when it comes back up.
The three options, and what each is for:
Pressed — the button is down right now. Good for “hold to run”.
Released — it is up again. Good for acting when somebody lets go.
Bumped — pressed and released. This is what you want for “click to start”, because it will not fire repeatedly while a finger stays down.
The classic bumper
when program starts :: events hat
set movement motors to [B v] and [C v] :: movement
start moving [straight: 0] :: movement
wait until <[1 v] is pressed? :: sensors>
stop moving :: movement
The robot drives until something presses the sensor. Note that the movement is started unmeasured on purpose — the sensor decides when to stop, not a distance.
Why it matters
Touch sensors are everywhere in machines you cannot see into: a lift knows the doors are shut, a printer knows the lid is closed, a washing machine will not spin until it is latched. They are safety devices as much as inputs.
Say this back before moving on: “Set speed does not move anything. It decides how fast the next movement will be.”
What’s in this build 4 min
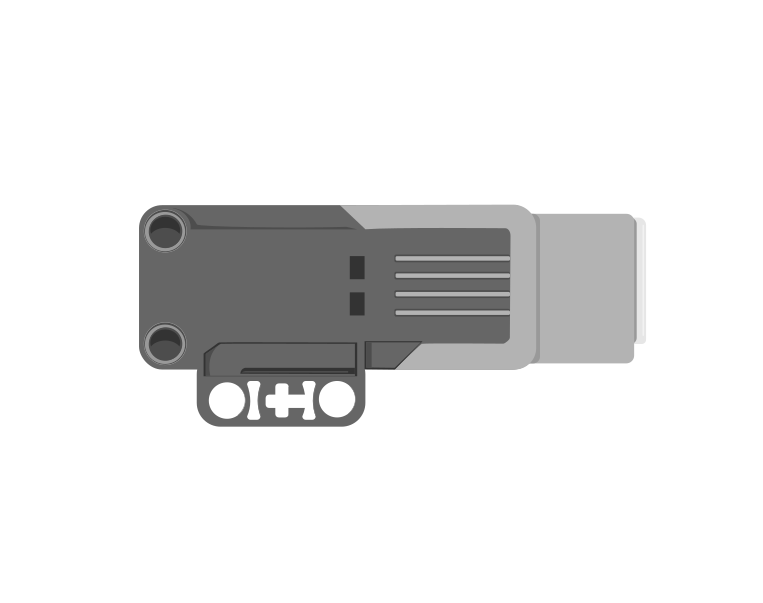
Find the parts with cables. There are three — and you have to tell us which motor it is, because this model has no written parts list to check against.
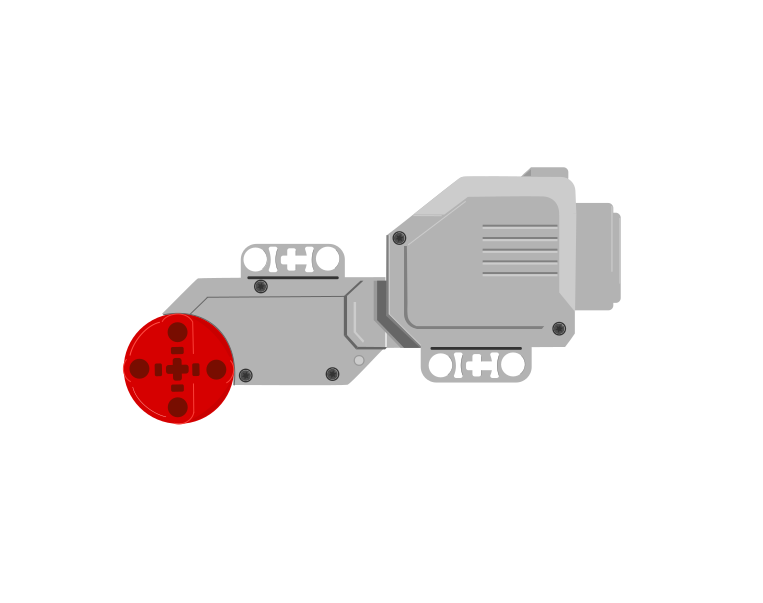
Large Motor
Medium Motor
Which one is in your build? The Large Motor has a big red drum on the end and a stepped body. The Medium Motor is a flat slab with a small red boss on its end face.
Part
What it is doing here
EV3 Intelligent Brick
Runs the program and anchors the launcher.
One motor — you decide which
Spins the gear that spins the top. Whichever it is, it goes in port A and every program below says A.
Touch Sensor
Starts the spin-up. The same part you met on the Timber Saw in Lesson 16.
The rubber band and trigger (no cable)
Holds stored energy and releases the top — the same elastic energy you measured on the Elastic Car in Lesson 14.
The launch itself is not programmed. The motor spins the gear up; the trigger is pulled by a person. The program controls the getting-ready, and your hand controls the moment. Knowing which part is which is half of understanding this machine.
Ports — and the rule 4 min
Sensors go in ports 1, 2, 3, 4. Motors go in ports A, B, C, D. They are not interchangeable, and nothing will tell you politely if you swap them.
Part
Port
Why this one
The motor (spins the gear)
A
A single working motor takes A. Note the programs say A, not “the Medium Motor” — because the port is the thing the Brick actually knows about.
Touch Sensor (starts the spin-up)
1
Touch is always port 1 in this course, exactly as on the Timber Saw.
Check your own build now:
Motor cable in A. A letter.
Touch Sensor cable in 1. A number.
Spin the launcher gear by hand. Free, and no rubbing? Anything dragging here comes straight off the top’s spin time.
Is the rubber band hooked and the trigger holding? Check it holds without your finger on it.
Point the launcher at a clear space. Not at a person, not at a window. This one genuinely throws something.
Connect the Brick 4 min
Two routes, and either is fine. USB is the reliable one and the one to fall back on when a room’s Bluetooth is busy; Bluetooth leaves the robot free to move, which some models need.
▶How to connect the BrickUSB and Bluetooth, step by step, with a photograph of every screen. Open it if you have not done this before — or if pairing is not working.Show meHide
USB — the reliable one
Switch the Brick on with the dark grey centre button.
Cable into the Brick’s PC port — the small square socket beside the numbered ports, not one of the numbered ones.
Other end into the computer.
Bluetooth — name it first
Do these in order. Naming the Brick after you go looking for it in the list is how groups end up driving each other’s robots.
Name your Brick. On the Brick: Settings (the spanner) → Brick Name. Type something nobody else will pick, then press the tick. Every Brick is called EV3 until somebody changes it.
Turn Bluetooth on. Settings → Bluetooth. Tick Bluetooth and Visibility. Leave iPhone/iPad/iPod unticked.
Connect from EV3 Classroom. Click the Brick icon at the top of the programming area, find your Brick by name, and click Connect.
Say yes on the Brick. It asks “Connect?” with the computer’s name — choose the tick, then accept the passkey, which is already 1234.
Where to read it. The name sits in the bar across the very top of the screen, on every screen — so you can check which Brick you are holding at any moment without going into a menu. This one is EV3VE. A Brick nobody has renamed says EV3.Step 3, and the reason step 1 exists. Three Bricks in range — read the name before you click Connect. Pairing with the wrong one is not an error: it works perfectly, on somebody else’s robot.
Step 2.Bluetooth switches the radio on; Visibility is what lets the computer find you. With Visibility off your Brick works perfectly and simply never appears in the list.Step 4. Look at the Brick. It asks whether to accept and names the computer. Choose the tick.Then the passkey, already 1234. Press the tick again and you are connected.
The two failures, every class, every time. The Brick has gone to sleep while you were building — press the centre button to wake it. Or you have paired with the group at the next table, which is why the name matters.
The long version, including Port View and how to read the port tiles, is in the Brick & Bluetooth guide.
Keep the computer out of the firing line. Whichever you pick, set the launcher up so the top flies away from the desk rather than across it.
Confirm the connection 2 min
Check the Brick icon: connected, or not.
Port A shows a motor. Read which kind the tile says it is, and check it against what you decided in section 5.
Port 1 shows a Touch Sensor. Press the red button and watch the reading flip.
Spin the gear by hand and watch degrees counted move.
If the port 1 tile does not change when you press the button, stop. Nothing you write will start.
Change it and test 8 min
One change at a time, and predict before each run. Time how long the top spins after each launch — that is your measurement, and it beats an opinion.
Move set speed so it sits immediately afterstart motor. Predict what changes. Run it and time the spin.
Run step 1 twice in a row without stopping the Brick. The second launch is strong and the first was weak — because by the second run the motor already had the number from last time.
Put it back at the top and try 50 %. Time the spin. Half the speed should cost you far more than half the spin time.
Back to 100 %, and change the wait to 1 second. Pull the trigger as it stops. Did it have time to reach full speed? A motor does not arrive at 100 % instantly.
Now 6 seconds. Is it any better than three? There is a point past which the motor is already as fast as it goes and you are just waiting.
Step 2 is the nastiest bug in this lesson and worth sitting with. The program was wrong, and it worked — on the second try. A fault that disappears when you run it again is the hardest kind to find, and this is exactly how they happen.
“It worked the second time” is not fixed. It is a setting arriving too late.
This is what you are building: the Gyro Launcher.
Build it 15 min
Build the model before you read any further. Everything after this is about making it do something, and none of it will make much sense with nothing on the table in front of you.
Use the viewer's own controls to zoom and turn pages. Fullscreen makes it big enough to build from.
Check the finished build against the picture before you switch anything on. A motor mounted the wrong way round is far easier to spot now than it is to debug later, when it looks like a program fault.
Make it move 10 min
Six blocks. Set the speed, wait for a click, spin up, hold at speed, stop. You pull the trigger by hand while it is at full speed.
when program starts :: events hat
[A v] set speed to (100) % :: motors
[1 v] wait until [bumped v] :: sensors
[A v] start motor [clockwise v] :: motors
wait (3) seconds
[A v] stop motor :: motors
The speed is set at the very top — long before anything turns — because it has to be true by the time the motor starts.
Walk it in the order the Brick runs it:
set speed to 100 % — nothing happens. No noise, no movement. It writes the number down.
wait until bumped — the program stops here, for as long as you like, until a finger presses and lifts. The speed is already set and waiting.
start motor clockwise — the gear spins up, at 100 %, because that was decided two blocks ago.
wait 3 seconds — the spin-up time. The motor is turning throughout. This is when you pull the trigger.
stop motor — the launcher winds down.
What success looks like: a click, three seconds of rising whine, a top that leaves the launcher hard and stays upright for a good while. Time it. That number is how you will judge every change you make next.
If the top wobbles over almost at once, it left too slowly. Either the trigger went early, or the gear was not free, or the speed never reached 100 — which is what the next section is for.
Challenges 27 min
Work through them in order — each is harder than the last. The extra challenge comes after all three, and it is meant to make you plan before you build.
Challenge 1
Prove the order matters, with numbers. Launch three times with set speed above start motor, and three times with it below, timing how long the top spins each time. Six timings, two averages, and one sentence saying which arrangement won and by how much.
Challenge 2
Find the spin-up time your launcher actually needs. Try 1, 2, 3, 4 and 6 seconds between the click and your trigger pull, timing the spin each time. Report the point past which waiting longer stops buying you anything, and say what is happening at that point.
Challenge 3
Make the launcher tell you when it is ready. It must warn before it starts spinning, show or sound something while it is spinning up, and clearly signal the moment it has reached full speed — so a person knows exactly when to pull the trigger without counting in their head.
Extra challenge
Build a launcher that gives the same launch every time.
Your machine must produce launches consistent enough to compete: five launches in a row whose spin times are close to each other, with the operator doing nothing but pulling the trigger when told. Consistency is the target, not the record — a launcher that is brilliant once and poor four times is no use in a tournament.
Plan on paper before you build. List everything that could differ between one launch and the next, including the things a program cannot control, then decide which of them you can remove.
Two questions when you demonstrate it. What is the biggest remaining source of difference between your launches, and how do you know? And which parts of your program are settings rather than actions — point at each one.