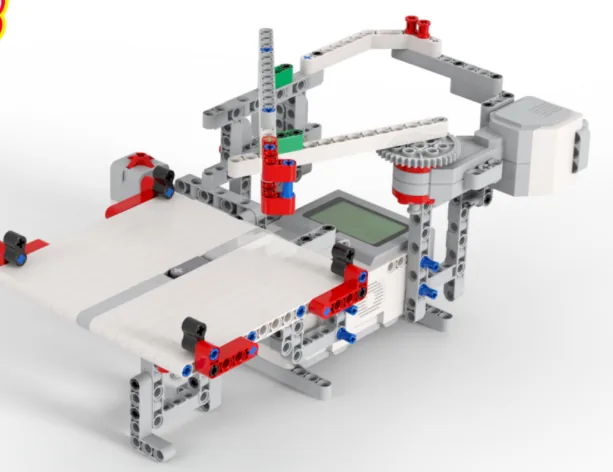
The Drawing Machine: a pen held in an arm that sweeps across the paper, and a second motor that moves the paper underneath it. Press the Touch Sensor and it draws — by itself, without anybody holding the pen.
It is the first machine in this course that makes something you can keep. When it finishes there is a piece of paper with a pattern on it, and that pattern is the proof of whether your program was right.
Welcome to Level 2. Level 1 asked whether you could make a model move. Level 2 asks a harder question: does it do the same thing every single time? A robot that works once is a lucky robot. From here on, every lesson is about making the second run look exactly like the first.
In the real world 5 min
Where you have seen it
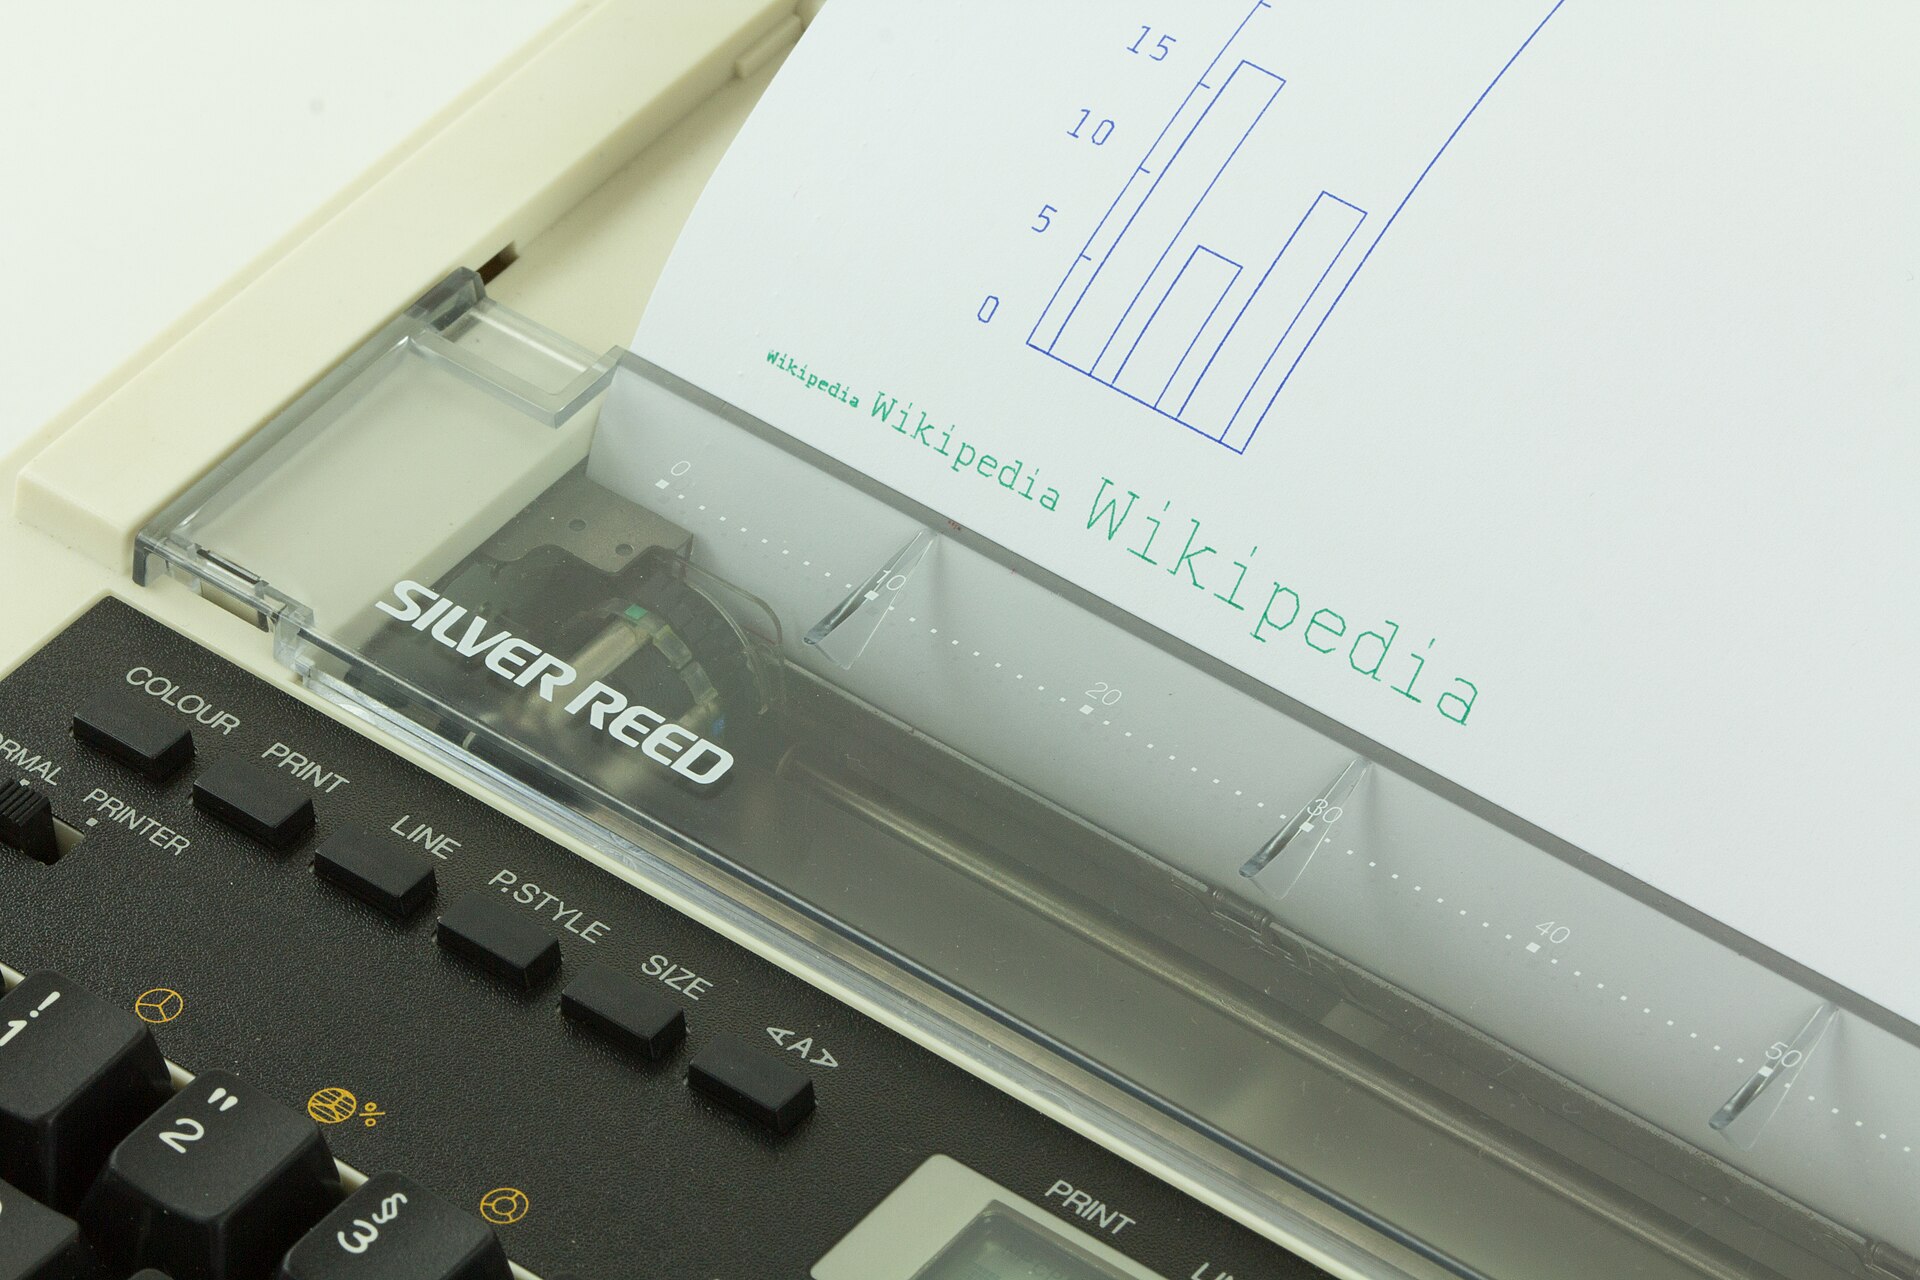
Before there were large printers there were pen plotters. A real pen, in a real holder, dragged across real paper by two motors — one moving the pen, one moving the paper. Engineers drew building plans on them, and schools drew graphs.
A pen plotter drawing a chart. The pen slides along the clear rail; the paper moves the other way. Photo: Elke Wetzig / Wikimedia Commons (CC BY-SA 4.0).
Why it is built that way
A pen can only draw a line in the direction it is being pulled. One motor gives you one direction, and one direction gives you one straight line — you could draw a dash, and nothing else.
So a plotter uses two motors at right angles to each other. The shape comes from the two motions happening at the same time. Move the pen right while the paper moves up and the pen draws a diagonal. Change how fast each one goes and the diagonal gets steeper or shallower. Every curve a plotter has ever drawn is two motors disagreeing about speed while both keep running.
What would go wrong without it
Take away the overlap and the machine still works — it just draws nothing useful. Sweep the pen fully across, stop, then feed the paper, then sweep back: you get a set of separate parallel lines with gaps between them. A ladder, not a drawing.
The drawing is not in either motor. It is in the two of them running together.
The main concept — one stack is a queue 6 min
Blocks in a stack take turns. Block two does not begin until block one has finished. That is a promise the EV3 makes you, and until today it has only ever helped.
when program starts :: events hat
[A v] run for (4) [rotations v] at (40) % speed :: motors
[D v] run for (4) [rotations v] at (40) % speed :: motors
One stack. The pen sweeps all the way across, and only then does the paper move. Two separate motions, one after the other.
Read that program and picture the paper. The arm crosses and draws a line. It stops. The paper shifts. Nothing is drawing while the paper shifts, because the pen is not moving. You get a line, then a gap.
Now the same two blocks, split across two stacks:
when program starts :: events hat
[A v] run for (4) [rotations v] at (40) % speed :: motors

when program starts :: events hat
[D v] run for (4) [rotations v] at (40) % speed :: motors
Two stacks, two hats. Both start the moment the program starts, and neither waits for the other.
Same blocks. Same speeds. Completely different drawing — because now the paper is moving while the pen is moving, and the pen leaves a diagonal instead of a straight line.
Blocks in one stack wait for each other. Separate stacks do not. If you want two things to happen at once, they must live in two stacks.
You can have as many stacks as you like, and every one of them starts when you press Play. This is how a robot walks and talks at the same time, and how a machine can watch a sensor while it is busy doing something else.
▶Doing two things at onceThe full reference for parallel stacks — when to use them, and the one thing that goes wrong. Open it if the two-hats idea is not clear yet.Show meHide
ComponentControl5 min
Two things at once
A program does not have to be one long column of blocks. Several stacks can run at the same time, each doing its own job — one driving, one watching a sensor, one keeping the display up to date.
How it is done
Give each stack its own hat block. Every stack beginning with when program starts starts at the same instant — not one after another — and from then on they run alongside each other.
Nor is it limited to two. Below, three stacks run together: a Medium Motor turning an attachment, the status light flashing, and the drive base rolling. Watch the arrows at the top — they all begin at once, and no stack waits for any other.
when program starts :: events hat
[A v] start motor [clockwise v] :: motors

when program starts :: events hat
forever
  set status light to [green v] :: display
  wait (0.5) seconds
  set status light to [red v] :: display
  wait (0.5) seconds
end

when program starts :: events hat
start moving [straight: 0] :: movement
Written down they have to go one under another, because a page is a column — but that is an accident of paper. On the Brick they sit side by side, and nothing in the first stack happens before anything in the third.
The rule: one owner per thing
Parallel stacks go wrong when two of them try to control the same thing. Use the switch below to take the wheels away from the third stack and point it at motor A, which the first stack is already driving.
the program starts — all of these begin here
stack 1 · Medium Motor
when program starts
A start motor clockwise
stack 2 · status light
when program starts
forever
set status light to green
wait 0.5 seconds
set status light to red
wait 0.5 seconds
stack 3 · drive base
when program starts
start moving straight: 0
One stack, one jobAll three at once
Three stacks, each with its own hat block. All three start the moment the program starts — none of them waits for the others.All three are running in the same instant: the Medium Motor is turning, the light is flashing, and the drive base is rolling.Each stack owns one thing and never touches another stack's job. That is the rule that makes this work.Finished. All three jobs ran the whole time, and none got in another's way.
three stacks, three jobs
Every stack is highlighted at the same moment on purpose — that is what running in parallel looks like. The switch above changes only what the third stack controls.
With one owner each, all three stacks are highlighted at the same instant and all three jobs get done. With two owners, motor A is handed contradictory orders hundreds of times a second and shivers instead of turning — and notice the second cost, which is easy to miss: the wheels now have nobody driving them. A stack that goes to fight over someone else’s motor has abandoned its own job. Nothing reports an error either way; as far as the Brick is concerned every stack is working perfectly. The same happens to a display line or a variable that two stacks both write to.
The discipline is simple: give each stack sole ownership of what it controls. One stack owns the motors, another owns the screen, another watches the sensors and tells the others what it found — which is what broadcasting is for.
One rule to remember. Two stacks must never drive the same motor. Both will send it orders, the motor will obey whichever arrived last, and the result changes from run to run — which is exactly the kind of “works once” behaviour Level 2 exists to get rid of. One motor, one stack.
Say this back before moving on: “Two things at the same time means two stacks.”
What’s in this build 4 min
Part
What it is doing here
EV3 Intelligent Brick
Runs both stacks at the same time. It is not taking turns between them quickly — from where you are standing, they are simply both running.
Large Motor — the pen arm
Sweeps the pen across the paper. This is the motion you see most, and the one that decides how wide the drawing is.
Second motor — the paper feed
Moves the paper under the pen. Slower than the arm, almost always — it only has to shift the paper a little for the pen to land somewhere new.
Touch Sensor
The start button. The program waits on it so the drawing begins when the paper is straight and your hands are clear, not the instant you press Play.
The pen (not electronic)
Must touch the paper firmly enough to mark it and loosely enough to slide. Half the failures in this lesson are pen pressure, not code.
Check the pen before you check anything else
Take the cap off. Every class loses ten minutes to a capped pen at least once.
Push the arm across by hand. Does the pen leave an unbroken line all the way, or does it fade in the middle? A fading line means the paper is not flat or the arm is not level.
Lift the arm and let it down. It should rest on the paper under its own weight, not be jammed against it.
Push the paper feed by hand. It should move the paper smoothly without the sheet lifting or creasing.
Ports — and the rule 4 min
Sensors go in ports 1, 2, 3, 4. Motors go in ports A, B, C, D. They are not interchangeable, and nothing will tell you politely if you swap them.
Part
Port
Why this one
Pen-arm motor
A
A and D are the ports for a motor that does a job rather than drives a wheel. The arm is a job.
Paper-feed motor
D
The other end of the Brick, so the two cables do not fight for the same corner and tangle over the paper.
Touch Sensor
1
Touch is always port 1 in this course. Learn one habit and it works in every lesson.
Check your own build now. This model comes from a build video rather than a printed manual, so the motors may not be where the table says:
Find the motor attached to the pen arm. Whatever port it is in, that is the port you will write in the first stack.
Find the motor attached to the paper feed. That is the second stack.
If they are in A and D, use the program below unchanged. If they are somewhere else, change the two port dropdowns and nothing else.
Route the cables away from the paper. A cable lying across the sheet will be drawn on, and will drag the paper out of line.
Connect the Brick 4 min
Two routes, and either is fine. USB is the reliable one and the one to fall back on when a room’s Bluetooth is busy; Bluetooth leaves the robot free to move, which some models need.
▶How to connect the BrickUSB and Bluetooth, step by step, with a photograph of every screen. Open it if you have not done this before — or if pairing is not working.Show meHide
USB — the reliable one
Switch the Brick on with the dark grey centre button.
Cable into the Brick’s PC port — the small square socket beside the numbered ports, not one of the numbered ones.
Other end into the computer.
Bluetooth — name it first
Do these in order. Naming the Brick after you go looking for it in the list is how groups end up driving each other’s robots.
Name your Brick. On the Brick: Settings (the spanner) → Brick Name. Type something nobody else will pick, then press the tick. Every Brick is called EV3 until somebody changes it.
Turn Bluetooth on. Settings → Bluetooth. Tick Bluetooth and Visibility. Leave iPhone/iPad/iPod unticked.
Connect from EV3 Classroom. Click the Brick icon at the top of the programming area, find your Brick by name, and click Connect.
Say yes on the Brick. It asks “Connect?” with the computer’s name — choose the tick, then accept the passkey, which is already 1234.
Where to read it. The name sits in the bar across the very top of the screen, on every screen — so you can check which Brick you are holding at any moment without going into a menu. This one is EV3VE. A Brick nobody has renamed says EV3.Step 3, and the reason step 1 exists. Three Bricks in range — read the name before you click Connect. Pairing with the wrong one is not an error: it works perfectly, on somebody else’s robot.
Step 2.Bluetooth switches the radio on; Visibility is what lets the computer find you. With Visibility off your Brick works perfectly and simply never appears in the list.Step 4. Look at the Brick. It asks whether to accept and names the computer. Choose the tick.Then the passkey, already 1234. Press the tick again and you are connected.
The two failures, every class, every time. The Brick has gone to sleep while you were building — press the centre button to wake it. Or you have paired with the group at the next table, which is why the name matters.
The long version, including Port View and how to read the port tiles, is in the Brick & Bluetooth guide.
USB is fine today. The Drawing Machine stays on the table, so a cable costs you nothing — and a cabled Brick never drops its connection halfway through a drawing.
Confirm the connection 2 min
Check the Brick icon: connected, or not.
You should see two motor tiles and one sensor tile. If a motor tile is missing, the cable is loose — the program will run anyway and half your machine will sit still.
Turn the pen arm by hand and watch which tile changes. That tells you the arm’s port for certain, without tracing a cable.
Press the Touch Sensor and watch its tile change. If it does not, you are about to write a program that waits for ever and looks broken.
Change it and test 8 min
Fresh paper each time, one change per run, and predict the shape before you press Play. Keep the sheets — laid side by side they are the clearest record of what each number does.
Change the paper feed to 30%. The two speeds are now closer. Predict whether the slope gets steeper or shallower before you run it.
Change the paper feed to 0%. Predict what you get. This is the same drawing as a one-stack program, and it is worth seeing on paper.
Put the feed back to 15% and change the arm to 20%. Both slow now. Is the shape different, or only the time it took?
Make the arm speed negative (−40). It sweeps the other way. Which corner does the drawing start from now?
Give the paper-feed stack a wait (2) seconds before its motor block. The arm sets off alone and the paper joins in later. Look closely at where the line changes direction.
Step 5 is the interesting one. The two stacks are no longer doing the same thing at the same time — they are doing different things, on their own schedules. That is what parallel really buys you, and the bend in the line is where you can see it.
Two stacks do not have to agree about anything — not the speed, not the direction, and not when they start.
This is what you are building: the EV3 Drawing Machine.
Make it move 10 min
Two stacks, side by side in the same project. Build the first one, then drag a second “when program starts” hat into an empty part of the canvas and build the other under it.
when program starts :: events hat
[1 v] wait until [pressed v] :: sensors
[A v] run for (6) [rotations v] at (40) % speed :: motors

when program starts :: events hat
[1 v] wait until [pressed v] :: sensors
[D v] run for (6) [rotations v] at (15) % speed :: motors
Both stacks wait for the same press, then both run. The arm at 40, the paper at 15 — different speeds, on purpose.
Walk it through in the order the Brick runs it:
You press Play. Both hats fire at once. There is no first stack and no second stack; the words “first” and “second” only describe where they sit on your screen.
Both stacks reach wait until pressed and stop there. The machine looks dead. It is not — it is waiting, twice.
You press the Touch Sensor. Both waits end together , because both were watching the same sensor.
The arm runs 6 rotations at 40% while the paper runs 6 rotations at 15%. The paper is slower, so it travels less far in the same time — and the pen writes a long, slow slope instead of a straight line.
What success looks like: one continuous mark on the paper that is not parallel to the edge of the sheet. If your line runs perfectly straight along the paper, one of the two motors is not turning — go back to section 8.
If only one motor moves, you almost certainly built the second stack underneath the first one instead of beside it. Blocks joined into one column are one stack, however far down the screen they go. Drag the second hat well clear and check there is a visible gap.
Build it 15 min
Build the model before you read any further. Everything after this is about making it do something, and none of it will make much sense with nothing on the table in front of you.
Use the viewer's own controls to zoom and turn pages. Fullscreen makes it big enough to build from.
Check the finished build against the picture before you switch anything on. A motor mounted the wrong way round is far easier to spot now than it is to debug later, when it looks like a program fault.
Challenges 27 min
Work through them in order — each is harder than the last. The extra challenge comes after all three, and it is meant to make you plan before you build.
Challenge 1
Draw a line that no single motor could have drawn. Anything sloping across the page proves both motors were running at the same moment — a line parallel to the edge of the paper proves one of them was not. Keep the sheet and write the two speeds on the back.
Fullscreen it while you build — you can pause and scrub with the player's own controls.
Watch it done
Challenge 2
Draw a shape with a corner in it. The pen must change direction part-way through without you touching anything, which means one stack has to alter what it is doing while the other carries on. Say which stack made the corner.
Challenge 3
Draw the same picture twice and make the two sheets match. Run it, take the paper off, put a fresh sheet on in the same place and run it again. Hold the two up to the light together. Whatever does not line up is the thing you have not controlled yet — find it and say what it was.
Extra challenge
Design a machine that signs its own name.
Your drawing machine has to produce the same recognisable mark every single time it is run — a letter, a symbol, a monogram. Anyone should be able to look at two runs and say they came from the same machine.
Plan on paper first. Work out which motor is doing what during each part of the mark, where the two stacks have to start together and where one has to wait, and what has to be true before the pen touches the paper at all.
Then prove it. Run the mark five times on five sheets, without adjusting anything between runs. Lay all five side by side.
Two questions when you present it. Which run is the odd one out, and what made it different — the machine, the paper, the pen or the program? And if you had to hand your machine to another group and have them reproduce your mark exactly, what would you have to tell them that is not already written in the program?