Challenge 1
Deal one card to a player just 60 cm away. Work out the rotations with sums. Do not just try numbers until one works.
Quick Learn — the model, the instructions, the program and the challenges. The theory is in Full Lesson.
EV3 Robotics›Level 2 · Intermediate›Lesson 16
Level 2 · Lesson 16 · EV3-L02-1660 minutes · Ages 8+ · Model: Automatic Card Dealer
The Automatic Card Dealer: a driving base that carries a stack of cards. A small rubber wheel presses down on the top card. A Medium Motor turns that wheel.
Turn the wheel a little. It peels just one card off the stack and flicks it out. Turn it too far, and two cards go. Turn it too little, and none go.
By the end of the lesson, the robot will drive to each player and deal them one card. You will work out every number in the program. You will not guess.
A cash machine counts out money notes one at a time, very fast. It gets it right millions of times a day. Inside is a rubber roller. It does just what your card wheel does.

The trick is called a friction feeder. A rubber roller grips the top note and pulls it forward. A second surface underneath grips the next note and holds it back. The two pull against each other. So just one note comes out.
The roller does not run for a time. It turns a measured angle. The machine knows how wide its roller is. It knows how long a note is. So it can work out just how far to turn. A note 15 cm long, on a roller 3 cm across, needs about 1.6 turns. That is a sum. Nobody had to guess.
In many countries, notes of different values are different sizes. One note may be 145 mm long, and the next one 150 mm. The machine has a different number for each. When you count money, 5 mm matters.
What if you set up a cash machine by guessing and trying? It would work on that day. But what if you change the note, or the roller? What if the air gets damp? Then you must find every number again by hand. A sum still works after all three.
If you know the sizes, you can work out the number. You do not have to hunt for it.
There is no printed manual for this model. But the video above is a real build video, not just a show. It is Lau Mo’s build video for the 45544 + 45560 sets. You can build straight from it. Pause it often. You cannot turn a video’s pages at your own speed, like a manual.
First, watch how the card wheel presses on the stack. Watch how the cards are held down. The whole lesson depends on that.
The programs below name ports, not motor types.
Some machines are too tricky to work out on paper, like a folding door. You have to measure them. You will do that in Lesson 33. A wheel is not tricky. You can work this one out on paper.
Distance travelled in one rotation = π × wheel diameter
Roll a wheel one full turn. It lays its own edge out along the floor. The distance round the edge is called the circumference. The width across the middle is the diameter. The number π, about 3.14, links the two. It is the same for every circle there is.
| Wheel | Diameter | One rotation carries the robot |
|---|---|---|
| Standard EV3 Education wheel | 5.6 cm | 3.14 × 5.6 = 17.6 cm |
| Small EV3 wheel | 4.3 cm | 3.14 × 4.3 = 13.5 cm |
| Large balloon tyre | 8.2 cm | 3.14 × 8.2 = 25.7 cm |
Measure your own wheel with a ruler. Go across the middle, over the rubber. The three above are common. But yours is the one that counts.
You want the robot to drive 50 cm to the next player. Your wheel moves it 17.6 cm in each rotation.
rotations = distance ÷ circumference = 50 ÷ 17.6 = 2.8
move [forward v] for (2.8) [rotations v] at (40) % speed :: movement
The rotations box takes decimals. You can type 2.8. Round it to 3, and you go 3.5 cm too far on every move. After four players, that is 14 cm. The robot ends up at the wrong seat.
Measure the diameter of the card wheel. Measure how far a card must move to come off the stack. Divide, then times by 360 for degrees. Nothing new. It is just a smaller circle.
A sum cannot fix turning. You can work out a turn from the gap between the wheels. But it will be wrong. Turning depends on grip, and every floor grips in its own way. The Tank Bot, in Level 1, Lesson 48, was all about this. This model has no Gyro, so its turns are the weak part. The straight lines will be very good. The corners will drift.
There are two ways to tell an EV3 motor how much to move: give it a length of time, or give it an amount of turn. Only the second one is repeatable, and that difference decides whether a machine works reliably or only sometimes.
| Block | What it does |
|---|---|
[A v] run [clockwise v] for (1) [rotations v] :: motors | One full turn of the motor shaft, then stop. The program waits for it. |
[A v] run [clockwise v] for (180) [degrees v] :: motors | Half a turn. 360 degrees is one rotation. |
The counters below tick up in step with the shaft, so you can watch a rotation being counted rather than take it on trust.
the same movement, written in degrees
The two motor read-outs are the same measurement — 1 rotation is 360°. Use whichever makes the number easier to read.
Notice that the two motor counters finish together: 2.00 rotations and 720° are the same instant, because they are the same measurement in different units. So pick whichever makes the number easier to read. A winch that needs eight full turns is clearest in rotations. A gate that lifts a quarter turn is clearest in degrees — 90 rather than 0.25.
The third counter is the one that catches people out. The block counts turns of the motor, not of the thing it drives — and the gear in the demo is three times the size, so two motor rotations move it only 0.67 of a turn. Ask for two rotations and the mechanism does not move two rotations’ worth unless the gearing is one to one.
That is why a number that works on one build has to be retuned when the gearing changes — the program is right, the mechanism is different.
A printer feeds paper an exact distance; a lift stops level with the floor; a robot arm returns to the same place a thousand times. None of that is possible by timing a motor — they all count turns.
A driving base has two Large Motors, one per wheel. You could drive them with two separate motor blocks — but they would never start at quite the same instant, and the robot would curve away. EV3 has a separate family of Movement blocks that treat the pair as a single driving base.
 port Bport C
| Block | What it does |
|---|---|
set movement motors to [B v] and [C v] :: movement | Tells the Movement blocks which two ports are the driving wheels. Put it at the top of the program, before any movement. |
move [forward v] for (2) [rotations v] :: movement | Drives both wheels together, so the robot travels in a straight line. |
move for (1) [rotations v] at (75) (25) % speed :: movement | Drives the two wheels at different speeds, which makes the robot curve. |
set movement speed to (50) % :: movement | Sets how fast the driving base travels from now on. |
set movement motors to [B] and [C] is the block that decides which two motors every Movement block after it will drive. It does not look at the robot. It drives the two ports you name, whether or not there is a motor in them — so those two letters have to be the two sockets the cables are actually in.
This is the single commonest reason a driving base does nothing, and it is invisible in the program: every block is spelled correctly and the robot still will not go.
the same program on both robots
The yellow outline marks the two ports the block is driving. A robot only goes straight when both of them have a motor in them.
Both robots run the identical program. The left one has its motors in B and C, so both named ports have a motor and the robot drives straight. The right one is plugged into A and B: the block drives B, finds nothing in C, and never mentions the motor in A at all — so one wheel turns, one wheel sits there, and the robot swings round the dead one instead of driving.
If neither named port has a motor in it — cables in A and D, say, with the block still set to B and C — the robot does not move at all. The program runs happily to the end and the Brick reports nothing wrong, because as far as it is concerned it did exactly what it was told.
So before you look for a bug in the program, look at the cables: read the port letters off the Brick, then make the block say those two. B and C are only the usual choice, not a rule — if your build has the driving motors in A and D, set the block to A and D and everything works.
Everything a driving base can do comes from those two speed numbers. Try each button below and watch the trail the robot leaves.
The path is worked out from the two wheel speeds in the block, not drawn by hand — so changing the preset changes the numbers and the shape together.
Notice there is no steering block anywhere in that program, and no steering part anywhere on the robot. The turn is made entirely by driving the two wheels different amounts.
when program starts :: events hat
set movement motors to [B v] and [C v] :: movement
move [forward v] for (2) [rotations v] :: movement
move for (1) [rotations v] at (50) (-50) % speed :: movement
“Move forward 2 rotations” says nothing about the floor — it says how many times the wheels go round. How far the robot actually travels depends on how big the wheels are, and once round a standard EV3 driving wheel is about 17.5 cm.
Before doing any sums, get a feel for it. Drag the robot along and watch both scales at once — rotations on top, centimetres underneath, the same line. Land on the half marks: there is a number between 1 and 2, and it is 1.5.
Drag the robot, or use the arrow keys — it moves in half rotations. Rotations above the line, centimetres below.
1.5 — a half rotation past 1. Half a turn of the wheels is 8.75 cm, so halves matter.
35 ÷ 17.5 = 2. That is a number you can type straight into the block.
set movement motors to [B v] and [C v] :: movement
set movement speed to (30) % :: movement
move [forward v] for (2) [rotations v] :: movement
Steering at right 100 or left 100 drives the two wheels in opposite directions, so the base stops travelling and pivots where it stands. The angle it sweeps is a simple doubling of the rotations:
Half a rotation is the one worth remembering: a square corner, 90°.
| Rotations | The robot turns |
|---|---|
| 0.25 | 45° — half a corner |
| 0.5 | 90° — a square corner |
| 1 | 180° — turn round and face back |
| 2 | 360° — all the way round |
The one to memorise is 0.5 rotations = 90°. Everything else follows from doubling or halving it.
set movement speed to (20) % :: movement
move [right: 100] for (0.5) [rotations v] :: movement
Turn slowly. The wheels on a driving base are big and the robot carries a lot of weight, so at full speed it keeps going after the motors stop and lands past the angle you asked for. Somewhere between 15% and 30% speed is where turns become repeatable. A turn that overshoots is almost always a turn taken too fast, not a wrong number.
These figures belong to your robot. The distance depends on the wheels and the angle depends on how far apart they are, so a wider base needs a different number for 90°. Test it, measure what actually happened, and adjust — the same discipline as the Gyro Sensor tolerance.
Every wheeled vehicle steers this way — a tank, a digger, an office chair with two driven castors. Cars use a steering rack instead, but a robot that turns by driving its wheels at different speeds needs no steering mechanism at all.
Measure the wheel once. Then every distance in your program is a sum, not a hunt.
Every EV3 motor contains a sensor that counts how far it has actually turned. That means a motor is not only an output — you can ask it where it is, and the answer describes what really happened rather than what you asked for.
| Block | What it does |
|---|---|
([A v] degrees counted :: sensors) | Reports how far this motor has actually turned since the count was last reset, in degrees. |
[A v] reset degrees counted :: motors | Sets the count back to zero, making right here the new reference point. |
([A v] speed :: sensors) | Reports how fast the motor is turning right now, as a percentage. A motor that is being driven but reads zero is a motor that is stuck. |
Those two are not always the same. Here are two identical motors, running the same program, with only their mechanisms different.
the same program, on two identical motors
Nothing on the Brick announces a stall. The only evidence is that the counter stopped changing while the motor was still being told to turn.
Nothing on the Brick announces the jam. The motor is still being driven, the program is still sitting on the same block, and the only trace of the problem anywhere is a counter that has stopped climbing. Comparing what you asked for with what was counted is how a robot notices — which is the whole of stall detection.
When the Brick powers on, the count is simply whatever it happens to be. It is not a position on the machine — it becomes one only when you tie it to something physical.
That is what reset degrees counted is for, and it is not just a tidy-up block for the top of a program. Where you put it decides what zero means, so putting it part-way through — after the mechanism has been driven somewhere known — is the normal way to use it, not an abuse of it.
A conveyor has no idea where it is. Give it a touch sensor at one end and it can find out: drive it until the sensor is pressed, and it is now at a place you can name. Only then reset the count, and that end becomes 0.
when program starts :: events hat
[A v] start motor [counterclockwise v] :: motors
[1 v] wait until [pressed v] :: sensors
[A v] stop motor :: motors
[A v] reset degrees counted :: motors
The order is the whole point. Reset before the sensor is pressed and you have zeroed a random spot; reset after it, and every later reading means “how far from home”. This is called homing, and it is why a printer rattles its head to one side when you switch it on.
Drive towards home gently. The mechanism is deliberately being run into its own end stop, so a slow speed saves the gears — and the touch sensor is what stops it, which means it stops in the same place every time regardless of where it started.
Home is often a corner, and a corner is an awkward place to measure from. Say the conveyor carries a chute that dispenses bricks, and you would rather describe its position as left and right of the middle. Then home once, drive the known distance to the middle, and reset again there:
when program starts :: events hat
[A v] start motor [counterclockwise v] :: motors
[1 v] wait until [pressed v] :: sensors
[A v] stop motor :: motors
[A v] reset degrees counted :: motors
[A v] run [clockwise v] for (900) [degrees v] :: motors
[A v] reset degrees counted :: motors
Now the middle is 0. Moving right counts up, moving left counts down past zero into negative numbers — the count is perfectly happy to go negative — and “go back to the middle” becomes the simplest instruction in the program: drive until the count reaches 0.
Both resets earn their place. The first one turns a meaningless number into a distance from a real, repeatable place. The second one moves zero to where the maths is easiest. A reset in the middle of a program is only a mistake when the mechanism is somewhere you cannot name.
Because the count is in degrees, and a wheel of known size travels a known distance per turn, the reading can be converted into how far the robot has actually driven. That is how a robot reports a distance in centimetres rather than in rotations — and it is why changing the wheels changes the answer.
This is how a printer knows the paper jammed, how a car window stops when it meets your hand, and how a robot arm knows it has reached its limit. A machine that can only give orders is fragile; one that can check what happened can recover.
Say this out loud before you go on: “Distance divided by circumference is rotations.”
Look at your robot. There are three motors. Two of them do the same job. Which two?
| Part | What it is doing here |
|---|---|
| EV3 Intelligent Brick | The body. Its weight helps the drive wheels grip the table. |
| Drive motor ×2 | A matching pair. You are about to measure the diameter of their wheels. |
| Card wheel motor | Turns the small rubber wheel that peels off a card. It has its own job, its own port and its own circumference. |
| The card wheel and its rubber (not electronic) | Grip is everything. A shiny or dusty wheel slips. Then it turns the right number of degrees, but moves no card. |
| The card tray (not electronic) | Holds the stack under the wheel and presses it up steadily. Press too hard, and it deals two cards. Too soft, and it deals none. |
Sensors go in ports 1, 2, 3, 4. Motors go in ports A, B, C, D. You cannot swap them. If you do, nothing warns you. The robot just will not work.
| Part | Port | Why this one |
|---|---|---|
| Left drive wheel | B | The pair. Two motors, one job: driving. |
| Right drive wheel | C | The other half of the pair. |
| Card wheel | A | A job of its own, away from B and C. |
| Sensors | none | Today, you work out every number and the robot just does it. Nothing checks. That is the weak spot of this lesson. |
Check your own wiring now:
Two routes, and either is fine. USB is the reliable one and the one to fall back on when a room’s Bluetooth is busy; Bluetooth leaves the robot free to move, which some models need.
Do these in order. Naming the Brick after you go looking for it in the list is how groups end up driving each other’s robots.
EV3 until somebody changes it.EV3.The two failures, every class, every time. The Brick has gone to sleep while you were building — press the centre button to wake it. Or you have paired with the group at the next table, which is why the name matters.
The long version, including Port View and how to read the port tiles, is in the Brick & Bluetooth guide.
Use Bluetooth. This time you must. A cable behind a driving robot pulls on it. The pull changes as the robot goes further. And distance is just what you are measuring today. The cable will make your careful sums look wrong.
Stuck? The long version, with a photo of every screen, is in the Brick & Bluetooth guide.
Make one change at a time. Keep a tape measure on the table. Today you can guess the answers before you run. So write your guess down first, in centimetres. See how close you get.
Step 6 is the summary of the whole lesson. The straight lines you worked out go about the same distance on any surface. The corner you guessed does not. Sums fixed the straights. You no longer have to guess and hope. Only a sensor can do that for the corners.
Work out what you can. Measure what you cannot work out. Use a sensor for what you cannot measure before you start.
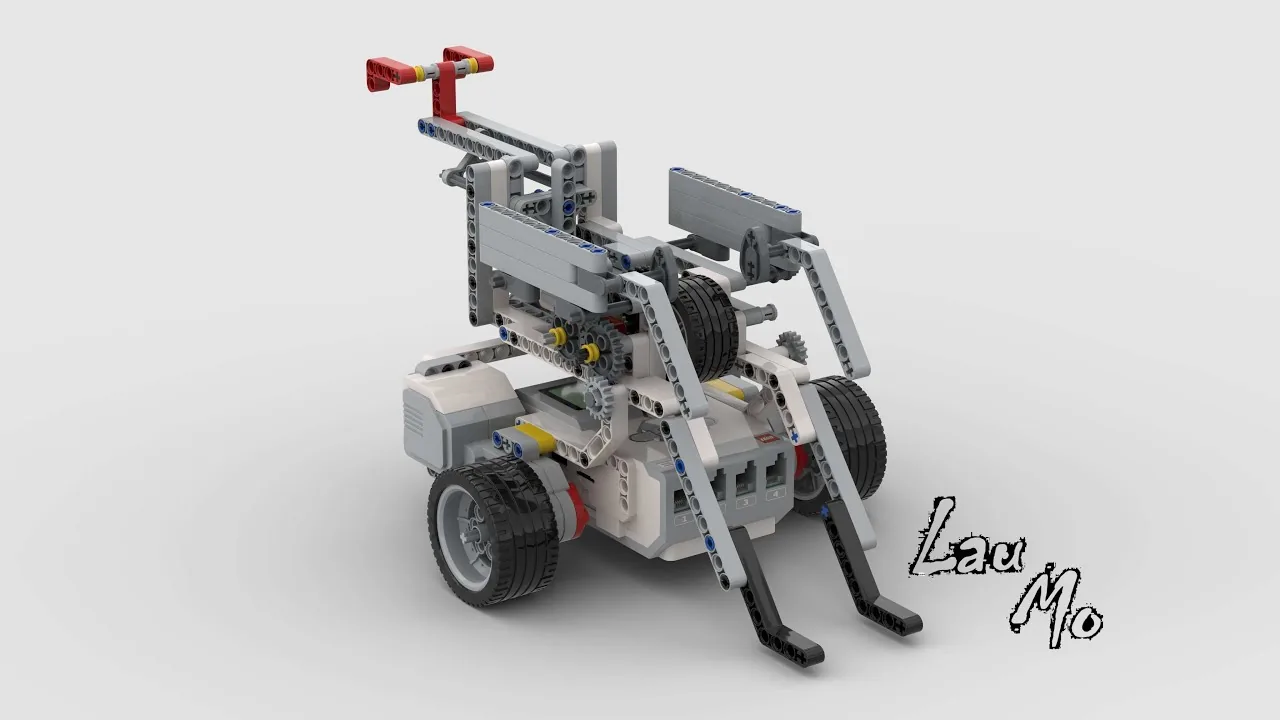
Build the model before you read any further. Everything after this is about making it do something, and none of it will make much sense with nothing on the table in front of you.
One page at a time — use Next and Previous, or the ← → keys. Fullscreen makes it big enough to build from.
The same build on Google Drive — sometimes a video, sometimes a scan:
Fullscreen it while you build — you can pause and scrub with the player's own controls.
Check the finished build against the picture before you switch anything on. A motor mounted the wrong way round is far easier to spot now than it is to debug later, when it looks like a program fault.
Four players sit round a square table. Drive 50 cm, deal one card, turn the corner. Do it again.
when program starts :: events hat
set movement motors to [B v] and [C v] :: movement
clear display :: display
write [DEALING] at line (1) :: display
repeat (4)
  move [forward v] for (2.8) [rotations v] at (40) % speed :: movement
  wait (0.5) seconds
  [A v] run [clockwise v] for (240) [degrees v] at (30) % speed :: motors
  wait (0.5) seconds
  move [straight: 100] for (0.85) [rotations v] at (25) % speed :: movement
end
stop moving :: movement
play sound [Communication / Goodbye v] until done :: sound
What a good run looks like: the robot drives half a metre. It stops and flicks out just one card. It turns the corner and does it again. Four cards, four seats. It ends up close to where it started.
Does it deal two cards? Use fewer degrees, or press less on the stack. Does it deal none? The wheel is slipping. Clean it, or press a little harder. Are the straights perfect but the corners not? That is not a bug. This model has no Gyro. The Tank Bot used a Gyro to fix just that.
Work through them in order — each is harder than the last. The extra challenge comes after all three, and it is meant to make you plan before you build.
Deal one card to a player just 60 cm away. Work out the rotations with sums. Do not just try numbers until one works.
Deal two cards each to three players. They sit at different distances, and you measure each one. Work out every number from your wheel's circumference. That is the length round the edge of the wheel.
Put on wheels of a different size. Work out every number in the program again. Then run the same deal, and make it work.
Deal a full round of five cards each to four players around a table. Measure the table yourself. On paper, first work out each drive and each time a card is let go. Run it once. Then look at where each of the twenty cards landed. Measure how far it is from where you wanted it. Say which card missed by the most, and what caused it.