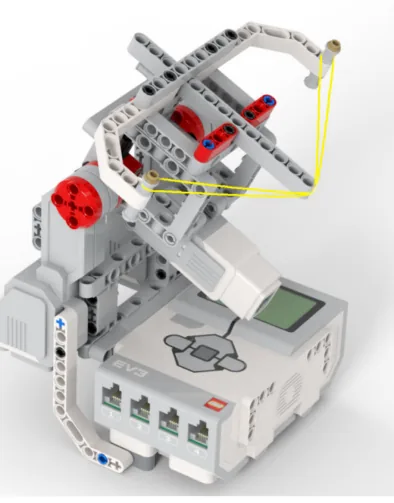
The Moon Orbit: a model of the Moon going round the Earth, driven by a Large Motor, with the Brick keeping count of how many orbits it has completed.
You can already count degrees. So why is counting orbits a new problem? Because an orbit is an event, not an angle — and the motor’s counter has no opinion about events. It will happily tell you 3600 degrees, but it will never say “that is ten orbits” unless something does the counting.
Today you get somewhere to keep a number of your own.
In the real world 5 min
Where you have seen it
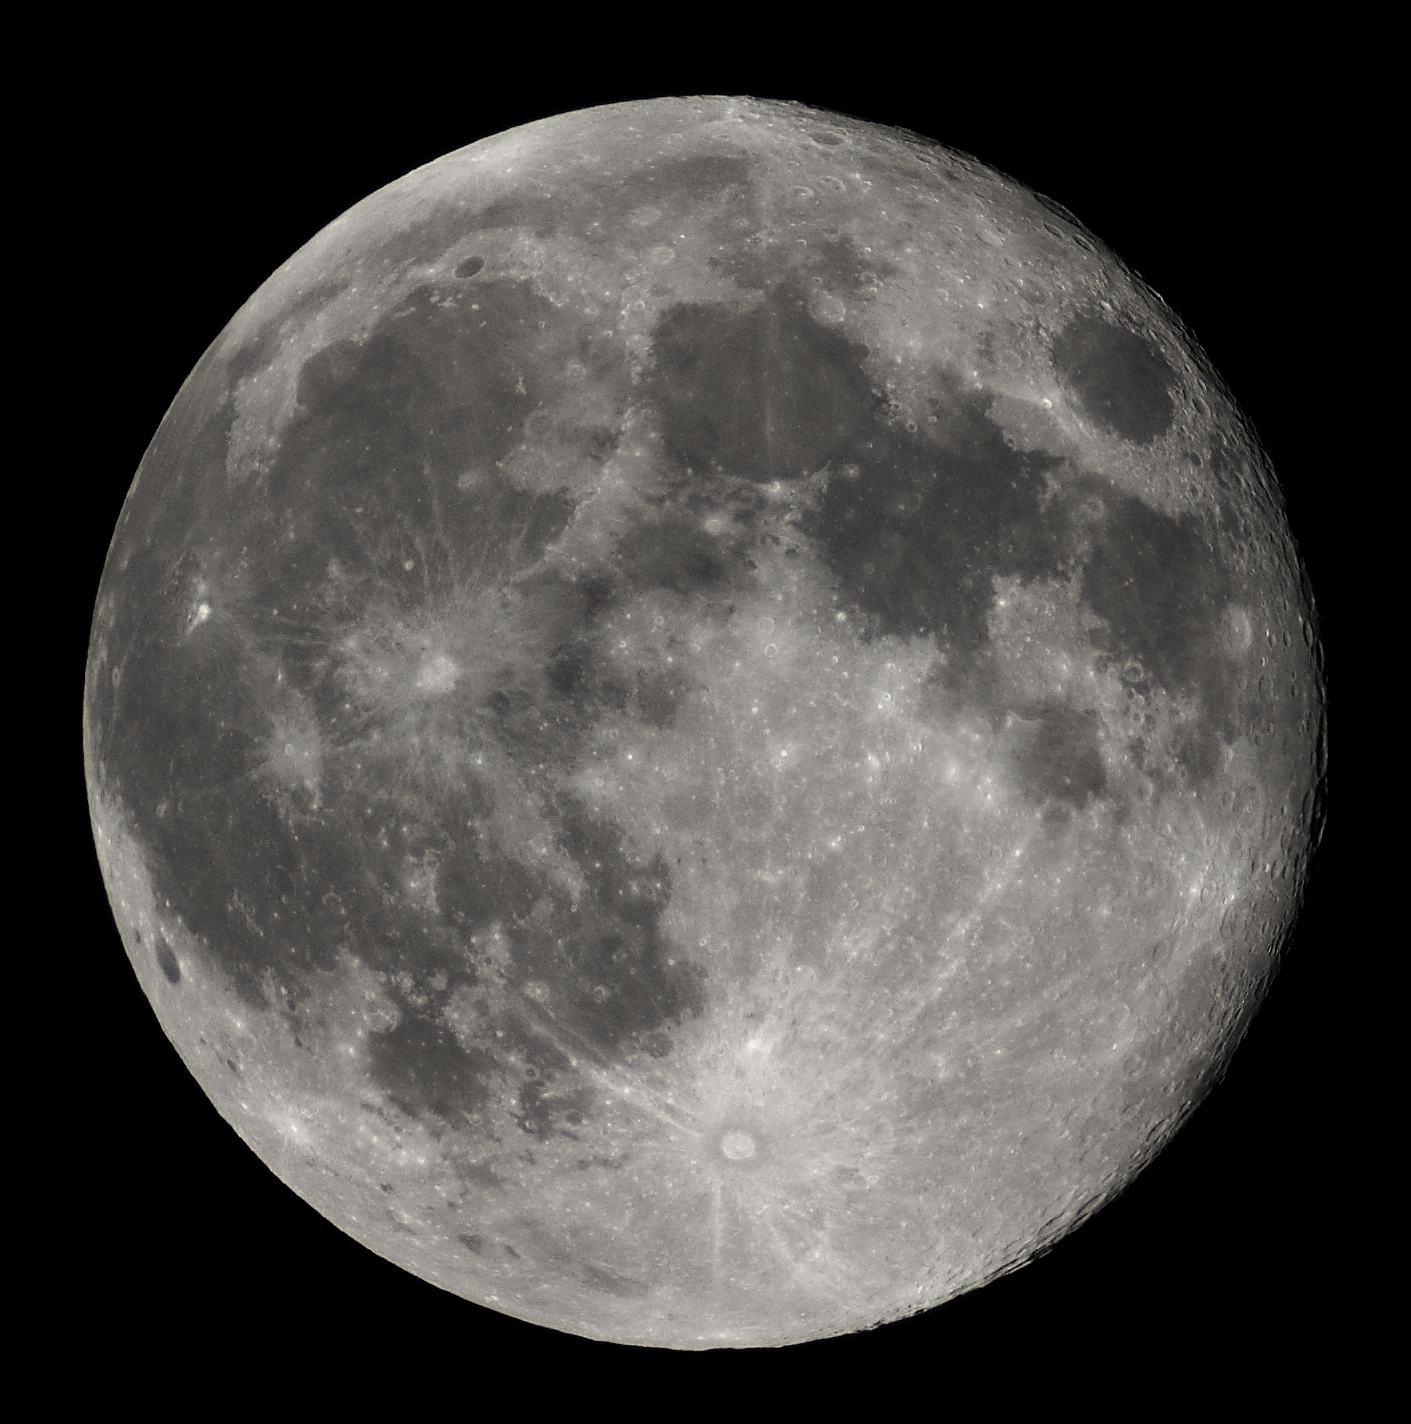
The Moon goes round the Earth once every 27.3 days, and has done for about four and a half billion years. It is the most-counted orbit in human history — calendars, tides and festivals across the world are all built on it.
The nearly full Moon. Photo: Luc Viatour / Wikimedia Commons (CC BY-SA 3.0).
Why it is built that way
The Moon keeps going round because gravity pulls it towards the Earth while it is travelling sideways fast enough to keep missing. An orbit is falling and not landing, over and over.
Which means an orbit has no natural end. Nothing about the Moon changes when it completes one — it does not stop, mark anything, or do anything differently. The lap is a thing we count, because we find it useful.
The Hijri calendar counts them directly: twelve lunar months to a year, which is why Ramadan moves through the seasons. Somebody has been keeping that count, by hand, for a very long time.
What would go wrong without it
Without a count you cannot answer “how many?” about anything that repeats. Not orbits, not laps, not customers served, not attempts remaining. The machine does the thing perfectly well — it simply has no memory that it has done it before.
A machine with no memory can only ever be doing something. It can never have done something.
The main concept — somewhere to keep a number 6 min
A variable is a box with a name on it that holds one number. You choose the name, you decide what goes in, and it stays there until you change it.
Block
What it does
set [orbit v] to (0)
Puts a number in the box, throwing away whatever was there.
change [orbit v] by (1)
Adds to what is already in the box. This is the counting one.
(orbit)
A reporter — the number in the box, usable anywhere a number goes.
The shapes should feel familiar by now. (orbit) is rounded, exactly like (timer) and ([A v] degrees counted), so it drops into a display block or a comparison the same way they do.
set [orbit v] to (0)
repeat (10)
  [A v] run for (360) [degrees v] at (40) % speed :: motors
  change [orbit v] by (1)
  write (orbit) at line (3) :: display
end
One orbit of the model, then one added to the count. Ten times.
Why not just use the encoder?
You could divide degrees by 360, and for this model it would work. But the variable can do something the encoder cannot: it counts whatever you decide counts.
degrees counted
A variable
Counts
Turns of one particular shaft. Nothing else, ever.
Anything you say. Orbits, hits, mistakes, plants watered.
Can go down
Only by turning the motor backwards.
Yes — change by (-1). This is how lives work.
Survives the motor stopping
Yes, but it is still about the motor.
Yes, and it was never about the motor.
This is the block Lesson 18 was missing. The Speed Bot had to nest three operators inside one another because there was nowhere to put the intermediate answers. With a variable you can work out rotations, keep it, then use it — and read the program afterwards. Level 3 takes that much further.
ComponentData6 min
Variables
Why anybody needs one
Long before there were computers, people had exactly this problem. A shepherd counting sheep through a gate, a trader counting sacks of grain, a builder counting days — none of them can hold the number in their head while they get on with the work. So they scratched a mark on a wall, cut a notch in a stick, or wrote a number on a piece of paper. The number lived outside the person, in a place they had agreed on, and they could go back to it, read it, and change it.
Better still, once the number is written down somebody else can use it. Watch these two: one of them counts and writes, the other never sees a single animal and simply reads the wall.
Abby never remembers the numberBen never sees a henThe wall holds it for both
Abby has a gate and a wall. Before a single hen comes through she chalks 0 on the wall — that is where the number is going to live.A hen goes through. Abby rubs out the 0 and chalks 1. Another goes through, and she does it again.Three hens have been through, and the wall says 3. Abby is not remembering the number — she is reading her own wall each time and writing the next one.Ben has been at the market all morning. He has not seen one hen. He walks up, reads the wall, and knows the answer — without asking Abby anything.That is a variable. Not a number in somebody's head, but a place both of them agreed on: one writes to it, the other reads from it, and it keeps the number in between.Finished. Abby wrote, Ben read, and the wall is what joined them up.
the wall holds it
Notice what never happens: Ben never asks Abby. He does not need to — the number is not in her head, it is on the wall, and the wall is there for anyone who needs it.
Neither Abby nor Ben is holding the number — the wall is. And notice what never happens: Ben does not ask Abby. He does not need to, because the count is not in her head. It is in a place they both agreed on, which is what makes it useful to more than one of them.
That is all a variable is. The robot cannot hold a number in its head either, so you give it a wall of its own, write a name at the top so everyone knows which wall is which — score, count, degree_turn — and the program can read what is on it and write something new. One part of the program writes; another part reads. Exactly Abby and Ben.
The paper, and the two things you can do to it
Say we are counting rotations of a motor. Before we start we write 0 on the paper. Every time the motor completes a turn we cross out what is there and write one more: 0 becomes 1, then 2, then 3. That is change — it has to read the old number to work out the new one.
set is the other thing you can do, and it is completely different: rub the whole paper out and write the number you want. It does not care what was there. Press the buttons and watch what happens to the crossings-out.
score
0
The paper starts blank, so we write 0 on it. That is what a variable is: a place to keep a number while the robot works.
change leaves a trail — every value follows from the one before it. This is what counting is.
set wipes the sheet. Use it to start a count, never to continue one.
Press set score to 0 after counting up a few times and watch the whole history vanish. That is what happens to a count when a set block ends up in the wrong place — and it is the commonest variable bug there is.
Blocks reference
Block
What it does
set [count v] to (0)
Puts a value in, replacing whatever was there.
change [count v] by (1)
Adds to what is already there.
(count)
Reports the current value, for use in a comparison or on the display.
Set, or change?
set replaces; change adds. Counting things needs change. Starting a count needs set. Both programs below have both blocks — the only difference is whether the set block is inside the loop or above it.
set before the loop
when program starts
set count to 0
repeat 4
A run clockwise for 1rotations
change count by 1
set inside it
repeat 4
set count to 0
A run clockwise for 1rotations
change count by 1
Before the loop: counted 0Inside the loop: stuck at 0
Both programs count the turns of a motor. The left sets the count to zero before the loop; the right sets it inside.Turn 1. Both counters read 1, and so far the two programs agree.Turn 2. The left count is 2. The right was set back to zero at the top of the loop, so it is 1 again.Turn 3. The left reads 3. The right still reads 1.Turn 4. The motor turned four times on both robots — only one of them counted them.Finished. Four turns, and one of the two counts is fiction.
stopped
Both programs contain both blocks. Only the position of set [count] to 0 is different.
The count on the right is not broken; it is being told to start again on every pass. Each time round the loop it is wiped back to zero and then changed by one, so the honest answer is always 1 — while the motor cheerfully turns four times. A counter stuck at 1 almost always means a set block that has slipped inside the loop.
Anything oval is a number you can pick up
EV3 Classroom tells you what a block does by its shape, and once you have noticed that, a whole set of questions answers itself:
Oval — reports a number. The blue degrees counted, the timer, a distance, your own variable.
Pointed — reports true or false. These go in an if or a wait until, not in a variable.
Block-shaped — does something. These stack up; they do not fit inside anything.
So when a slot is oval, any oval fits it — and it does not matter in the least where that number came from. You can take the motor’s own A degrees counted and keep it in a variable you named degree_turn, then compare that with a number later. Pick an oval below and watch the same one drop into all three kinds of slot.
pick an oval
the same oval fits all three
set degree_turn to A degrees countedkeep it in a variable of your own
A degrees counted+10do arithmetic with it
A degrees counted>50compare it with a number
Every one of those slots is oval-shaped, and A degrees counted is an oval — so it drops in. Nothing about where the number came from matters.
This is what makes a variable more than a counter. A sensor reading is true only at the instant you read it; copying it into a variable freezes it, so the robot can compare where it is now against where it was when something happened:
when program starts :: events hat
[A v] reset degrees counted :: motors
set [degree_turn v] to ([A v] degrees counted :: sensors)
start moving [right: 30] :: movement
wait until <(([A v] degrees counted :: sensors) - (degree_turn)) > (400)>
stop moving :: movement
Read the condition aloud: how far the motor has gone now, minus where it was when we started, is more than 400. Both are ovals, so both can go into a subtraction, and the subtraction is an oval too — which is why it can go into a comparison. Ovals nest inside ovals as deep as you need.
Reset at the start, every time
A variable keeps its value after the program ends. Run the program again without setting it back and the second run begins where the first left off — the count starts at 14, the robot thinks it has already done the job. Every variable a program changes must be set to its starting value at the top.
Why it matters
A variable is the difference between a machine that repeats a fixed routine and one that responds to how things have gone — counting parts, tracking a score, remembering where it started.
Set it once at the start. Change it when the thing happens. Read it whenever you like.
▶Nested loopsFrom Lesson 20 — worth having open, because a counter inside two loops counts the inner one.Show meHide
ComponentControl5 min
Repeating
Machines repeat. A wiper sweeps, a conveyor runs, a ride goes round — and none of that should mean copying the same blocks over and over. A loop says “do this again” once.
Blocks reference
Block
What it does
repeat (10)
end
Runs the blocks inside a set number of times, then carries on below.
forever
end
Runs the blocks inside over and over, and never carries on below.
repeat until <>
end
Repeats until a condition becomes true — a loop with a sensor as its exit.
Forever really does mean forever
Anything placed after a forever loop will never run. Not “runs late” — never. Both programs below end with the same block: set the status light green.
repeat (3)
repeat 3
A run clockwise for 0.25rotations
set status light to green
forever
forever
A run clockwise for 0.25rotations
set status light to green
↑ this block never runs
0passes · repeat (3)0passes · forever
repeat (3): still goingforever: light never set
Both loops begin. Each pass turns the motor a quarter turn.Pass 1.Pass 2.Pass 3 — and repeat (3) has now done its three.The left program carries on to the block underneath and sets its light green. The right one has jumped back to the top of the loop, and it always will.The left program has finished. The right program has not, and will not.
starting
Both programs contain the same green-light block. Let it run as long as you like — the right-hand ring will never turn green.
The repeat loop counts its three passes, stops, and moves on to the block underneath, so its light turns green. The forever loop reaches the bottom of its own blocks and jumps straight back to the top, so the block underneath is never reached — however long you leave it. If a program seems to stop half way through, look for a forever loop above the blocks that are not happening.
Why a sensor program needs a loop at all
A program is a list, and the Brick works down it once. Every block runs, in order, and when the last one is done the program is over. That is fine for a list of instructions — drive, turn, beep, stop — because each is a thing you do once.
A sensor is not a thing you do once. Asking is 1 pressed? gives you an answer about this instant, and an instant later it may be wrong. Checking a sensor once tells you what the world was like at the moment the program started — which is almost never what you wanted to know.
So a program that has to react must ask again, and again, for as long as it is running. That is the whole job of the loop: not to repeat an action, but to keep the question being asked.
Read, decide, act — and then do it again
Wrap a sensor check and the motor it controls in a forever loop and you have built a closed-loop control system — the pattern behind every line follower, thermostat and cruise control:
Read the sensor.
Decide what that reading means.
Act on the motors.
Go back to 1 — immediately, thousands of times a minute.
It is called closed because the output feeds back round to the input: the motors move the robot, moving the robot changes what the sensor sees, and what the sensor sees changes the motors. Break the circle at any point and the robot stops responding.
when program starts :: events hat
forever
  if <[1 v] is pressed? :: sensors> then
    [A v] start motor [clockwise v] :: motors
  else
    [A v] stop motor :: motors
  end
end
Read it as a sentence and it is almost too simple to need explaining: for ever, if the button is pressed run the motor, otherwise stop it. The motor now follows the button for as long as the program is running.
The same program without the loop
This is the mistake nearly everybody makes first, and it is a hard one to spot because nothing about it looks wrong:
when program starts :: events hat
if <[1 v] is pressed? :: sensors> then
  [A v] start motor [clockwise v] :: motors
else
  [A v] stop motor :: motors
end
The logic is perfect. The ports are right. Nothing is misspelled. And the robot will ignore the button completely — because the Brick reaches that if/else a few milliseconds after you press Run, finds the button not pressed, takes the else branch, stops the motor, runs out of blocks and ends. By the time a finger arrives, there is no program left to notice it.
with forever — a closed loop
when program starts
forever
if 1 is pressed? then
A start motor clockwise
else
A stop motor
without it — the common mistake
when program starts
if 1 is pressed? then
A start motor clockwise
else
A stop motor
↑ running — for the only time
40checks · with forever1checks · no loop
Looped: motor off, matching the buttonNo loop: motor off for ever, whatever you press
Both programs start. The button is not pressed, so both take the else branch and leave the motor off. So far they agree exactly.The right-hand program has already finished. One if/else, checked once, and there were no more blocks after it — the program ended in a few milliseconds.Press the button. The looped program comes round, checks again, sees `pressed`, and starts the motor. The finished program cannot: it is not running.Release. The looped program comes round again and stops the motor. The other one has not looked at the sensor since the instant it started.Press again, and again. Every pass round the loop is another check — that constant read, decide, act is what a closed loop IS.Finished. The looped program answered the button every time. The other answered it once, before anybody had touched it.
button released
Both programs contain exactly the same if/else. The only difference is the forever block around one of them.
Both programs contain exactly the same if/else. The counter is what gives it away: one keeps checking for as long as it runs, the other is stuck on the single check it made before anybody touched anything. A student who has seen this once stops writing it.
The tell on a real robot is a program that ends the instant you start it — the Brick returns to its menu almost immediately. If a sensor program finishes rather than waits, the loop is what is missing.
Choosing the right loop
Known number of times — repeat (n). A wiper that sweeps five times.
Until something happens — repeat until. Drive until the wall is close.
For as long as the machine is on — forever. A fan, a ride, a monitor.
Say this back before moving on: “Set it to zero first, or it starts from last time.”
What’s in this build 4 min
Part
What it is doing here
EV3 Intelligent Brick
Holds the variable. Unlike the motor’s counter, this number lives in the Brick and has nothing to do with any hardware.
Large Motor — the orbit
Carries the Moon round. One full turn of the driven arm is one orbit — check the gearing, because one motor turn may not be one orbit.
The orbit arm (not electronic)
Must clear everything all the way round. An arm that catches once per lap gives you a count that is right and a model that is not.
The Brick screen
Shows the count. This is the first number on the screen that the program itself decided, rather than read from hardware.
Find out what one orbit is
Mark the Moon’s starting position on the base with a piece of tape.
Turn the motor by hand until the Moon comes back to the tape. Read the degrees off the motor tile.
That number — not necessarily 360 — is one orbit on your build. If your model is geared, it could be 1080 or more.
Do it twice to be sure, then write it on your sheet. Everything today uses it.
Ports — and the rule 4 min
Sensors go in ports 1, 2, 3, 4. Motors go in ports A, B, C, D. They are not interchangeable, and nothing will tell you politely if you swap them.
Part
Port
Why this one
Orbit motor (Large)
A
One job motor, carrying the Moon round.
Sensors
none
Nothing detects an orbit. The program decides an orbit has happened because it just did one — which is exactly why it needs a variable to remember.
Check your own build now:
Motor in A.
Set the Moon on its tape mark before each run, so a count of three means three complete laps from a known place.
Route the cable so the arm cannot catch it. This model turns the same way for a long time and will wind a cable up.
Connect the Brick 4 min
Two routes, and either is fine. USB is the reliable one and the one to fall back on when a room’s Bluetooth is busy; Bluetooth leaves the robot free to move, which some models need.
▶How to connect the BrickUSB and Bluetooth, step by step, with a photograph of every screen. Open it if you have not done this before — or if pairing is not working.Show meHide
USB — the reliable one
Switch the Brick on with the dark grey centre button.
Cable into the Brick’s PC port — the small square socket beside the numbered ports, not one of the numbered ones.
Other end into the computer.
Bluetooth — name it first
Do these in order. Naming the Brick after you go looking for it in the list is how groups end up driving each other’s robots.
Name your Brick. On the Brick: Settings (the spanner) → Brick Name. Type something nobody else will pick, then press the tick. Every Brick is called EV3 until somebody changes it.
Turn Bluetooth on. Settings → Bluetooth. Tick Bluetooth and Visibility. Leave iPhone/iPad/iPod unticked.
Connect from EV3 Classroom. Click the Brick icon at the top of the programming area, find your Brick by name, and click Connect.
Say yes on the Brick. It asks “Connect?” with the computer’s name — choose the tick, then accept the passkey, which is already 1234.
Where to read it. The name sits in the bar across the very top of the screen, on every screen — so you can check which Brick you are holding at any moment without going into a menu. This one is EV3VE. A Brick nobody has renamed says EV3.Step 3, and the reason step 1 exists. Three Bricks in range — read the name before you click Connect. Pairing with the wrong one is not an error: it works perfectly, on somebody else’s robot.
Step 2.Bluetooth switches the radio on; Visibility is what lets the computer find you. With Visibility off your Brick works perfectly and simply never appears in the list.Step 4. Look at the Brick. It asks whether to accept and names the computer. Choose the tick.Then the passkey, already 1234. Press the tick again and you are connected.
The two failures, every class, every time. The Brick has gone to sleep while you were building — press the centre button to wake it. Or you have paired with the group at the next table, which is why the name matters.
The long version, including Port View and how to read the port tiles, is in the Brick & Bluetooth guide.
Either is fine. The model stays on the table. If you use Bluetooth you can also watch the variable on the Brick’s own screen rather than the laptop, which makes the count feel like the model’s rather than the editor’s.
Confirm the connection 2 min
Check the Brick icon: connected, or not.
One Large Motor tile on A.
Turn the arm one full orbit by hand and check the count matches the number you measured in section 5.
Note that there is no tile for your variable. It does not exist until the program creates it, and you will only ever see it where you choose to display it.
Change it and test 8 min
Reset the Moon to its tape mark each time, and predict the final number before every run.
Delete set [orbit v] to (0) and run the program twice in a row. The second run finishes at 20. Explain why in one sentence — you have seen this exact bug before, with the encoder in Lesson 8.
Put it back, and move change [orbit v] by (1)above the motor block. Same ten orbits, and the screen now reads 1 before the first lap has happened.
Change the halfway test from = to >. Listen to the chime sound on every orbit from the fifth onwards. = fires once; > fires always.
Count down instead. Set the variable to 10 and use change by (-1), with a message when it reaches 0. That is a countdown, and it is the same block doing the opposite job.
Put the counter inside a nested loop — two orbits inside, five rounds outside. Predict the final count before you run it. It is the Lesson 20 multiplication again, now with a number you can read.
Step 3 is the payoff for a bug that has been following you since Lesson 13. A condition on a rising value stays true once it is true — but a variable lets you ask “is it exactly this?”, which is true for exactly one lap. That is the tool that was missing.
The encoder tells you what the machine did. A variable tells you what you decided to keep track of.
This is what you are building: the Moon Orbit.
Build it 15 min
Build the model before you read any further. Everything after this is about making it do something, and none of it will make much sense with nothing on the table in front of you.
Use the viewer's own controls to zoom and turn pages. Fullscreen makes it big enough to build from.
Check the finished build against the picture before you switch anything on. A motor mounted the wrong way round is far easier to spot now than it is to debug later, when it looks like a program fault.
Make it move 10 min
Ten orbits, counted and announced — and a message when the count reaches a number that matters.
when program starts :: events hat
clear display :: display
set [orbit v] to (0)
write [BULAN] at line (1) :: display
write [Pusingan:] at line (3) :: display
repeat (10)
  [A v] run for (360) [degrees v] at (40) % speed :: motors
  change [orbit v] by (1)
  write (orbit) at line (4) :: display
  play beep (65) for (0.1) seconds :: sound
  if <(orbit) = (5)> then
    write [SEPARUH] at line (6) :: display
    play beep (80) for (0.4) seconds :: sound
  end
end
write [TAMAT] at line (6) :: display
Replace 360 with your measured orbit. The count on line 4 is the program’s own number, not the motor’s.
set orbit to 0 — before anything. A variable keeps whatever it had last time the program ran, so a count that is not reset starts from wherever it finished.
run for one orbit — the movement.
change orbit by 1 — after the movement, so the count means “orbits completed” rather than “orbits started”. That choice is yours to make and worth making deliberately.
if orbit = 5 — the halfway announcement. Note it uses = rather than >, so it fires exactly once — which fixes Lesson 13’s repeated-beep problem in a way that needed a variable.
What success looks like: the Moon goes round, and the number on screen climbs 1, 2, 3 … 10, one per lap. The halfway chime sounds once and only once, on the fifth orbit.
If the count is one behind what you expect, look at where change by (1) sits relative to the movement. Counting before or after the thing happens is a real decision, and both are defensible — but only one matches the word on your screen.
Challenges 27 min
Work through them in order — each is harder than the last. The extra challenge comes after all three, and it is meant to make you plan before you build.
Challenge 1
Load the crossbow and walk away. Draw the string, take your hands off, and leave it for a full minute without touching the model. It must be exactly as taut at the end of the minute as it was at the start. If it creeps, say which stop setting you were using and what you changed it to.
Challenge 2
Make it say whether it is loaded. Somebody walking up to your crossbow should be able to tell from the Brick alone whether the string is drawn — screen, status light or sound, your choice. Then test it: load it, hand it to someone who has not watched, and see whether they know.
Challenge 3
Find where brake stops being enough. Set the winch to brake rather than hold position, and draw the string a little further each run until it starts to creep back. Record the point at which it fails. Then explain in one sentence what hold position is doing at that point that brake is not.
Extra challenge
Build a loading routine that cannot go wrong in somebody else's hands.
A loaded crossbow is a stored-energy machine, and the person using it next may not be the person who programmed it. Your job is to make the whole cycle — load, wait, fire, reset — safe for a stranger.
Plan on paper before you touch the program. Decide what the machine does the instant it is switched on so its state is never a surprise, what stops a second press of the draw button over-winding a string that is already back, and how a user knows it is safe to approach.
Then test it properly. Hand it to somebody from another group with no explanation, stand back, and watch. Do not help them. Write down every moment they hesitate or do something you did not expect.
Two questions when you demonstrate it. What did your tester do that you had not planned for? And your crossbow still cannot tell whether the string is actually drawn — it only knows what it was last told to do. Describe exactly what you would add to the model, and where, so that it could know for certain.