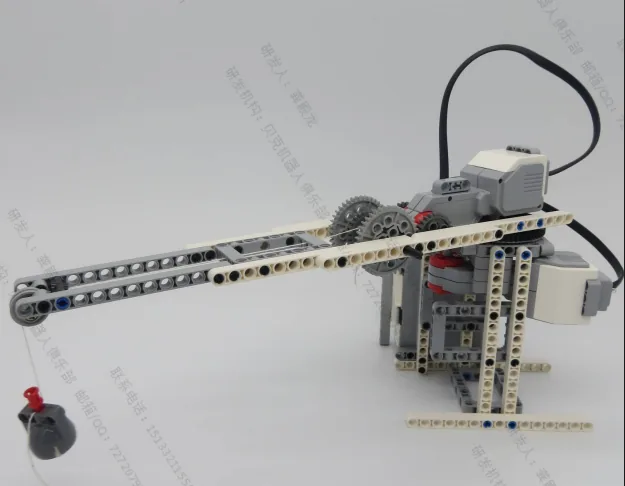
Challenge 1
Build a four-control panel that flies the crane — up, down, left, right — with each control on its own stack and every motor holding position when it stops.
Quick Learn — the model, the instructions, the program and the challenges. The theory is in Full Lesson.
EV3 Robotics›Level 2 · Intermediate›Lesson 25
Level 2 · Lesson 25 · EV3-L02-2560 minutes · Ages 9–16 · Model: Crane
The Crane: a slewing tower with a hoist, operated by the Brick’s buttons — up, down, left, right — with limits that stop it hurting itself.
Every machine you have built this level ran a routine. You pressed Play and it did its thing.
A crane does not have a routine. An operator decides, moment by moment, and the machine’s job is to do exactly what it is told — and to refuse the few things that would break it.
Tower cranes stand over every building site, lifting steel and concrete all day. One operator sits at the top with two joysticks and a screen, and everything the crane does comes from those hands.

A building site is different every hour. Loads arrive in different places, people move around, the wind changes. No routine could cope — so the crane does not try. It is a set of controls, and the intelligence is the operator.
But it is not only controls. Underneath the joysticks sit limits the operator cannot override: the hoist stops before the hook reaches the pulley, the slew has an end, and the load moment indicator will refuse a lift that would tip the crane over. The operator decides what to do; the machine decides what is survivable.
Controls with no limits mean the machine is only as safe as the tiredest moment of the operator’s shift. Limits with no controls mean a machine that can only do what somebody guessed in advance. Real machines need both, and the limits have to be the part that cannot be argued with.
The operator says what to do. The machine says what it will not do.
A control panel is not one clever program. It is several small ones, each owning one control and one motor, all running at once.
when [up v] button [pressed v] :: events hat
[A v] run for (90) [degrees v] at (30) % speed :: motors

when [down v] button [pressed v] :: events hat
[A v] run for (90) [degrees v] at (-30) % speed :: motors
You have had every piece of this since Lesson 1. Separate stacks run independently; a button hat waits for its own button. What is new is using that to build an interface rather than a routine.
One motor, one stack at a time. Lesson 1 warned that two stacks must never drive the same motor, and a control panel is where students break that rule. Two hats may both mention motor A — as above — but only because a person cannot press up and down at the same moment. If two controls could ever be active together and both drive the same motor, the motor obeys whichever order arrived last, and the result changes run to run.
An operator holding the up button does not want to think about the top of the mast. So the control checks for them, using the encoder comparison from Lesson 13 and the and from Lesson 17:
when [up v] button [pressed v] :: events hat
if <([A v] degrees counted) < (1000)> then
  [A v] run for (90) [degrees v] at (30) % speed :: motors
else
  play beep (45) for (0.3) seconds :: sound
end
That else matters more than it looks. A control that does nothing at all when refused feels broken, and an operator who thinks a control is broken starts pressing harder and looking for another way.
The Brick has five buttons of its own — up, down, left, right and centre. They need no sensor, no cable and no port, which makes them the easiest way to let a person tell the robot to do something.
| Block | What it does |
|---|---|
when [center v] button [pressed v] :: events hat | Starts a whole stack when that button is pressed. |
wait until <is [center v] button pressed? :: sensors> | Holds an existing program until the button is pressed. |
A program sitting on a wait block looks exactly like a program that has crashed. Watch one wait — including through two presses of the wrong button.
the other way to do it
A program parked on a wait block looks identical to a crashed one. This is why the status light or a line on the screen is worth setting before you wait.
The wait is watching one button. Up and right change the (button) reading, and the program does not care. That reading is a number rather than a name: 0 for nothing, then 1 left, 2 centre, 3 right, 4 up, 5 down.
Nearly every machine has a start button that is deliberately separate from switching the power on. A robot that begins moving the instant it is powered up is hard to set down and hard to test — one that waits for a press can be positioned first.
Give every control its own stack, its own motor, and a limit it cannot be talked out of.
A program does not have to be one long column of blocks. Several stacks can run at the same time, each doing its own job — one driving, one watching a sensor, one keeping the display up to date.
Give each stack its own hat block. Every stack beginning with when program starts starts at the same instant — not one after another — and from then on they run alongside each other.
Nor is it limited to two. Below, three stacks run together: a Medium Motor turning an attachment, the status light flashing, and the drive base rolling. Watch the arrows at the top — they all begin at once, and no stack waits for any other.
when program starts :: events hat
[A v] start motor [clockwise v] :: motors

when program starts :: events hat
forever
  set status light to [green v] :: display
  wait (0.5) seconds
  set status light to [red v] :: display
  wait (0.5) seconds
end

when program starts :: events hat
start moving [straight: 0] :: movement
Written down they have to go one under another, because a page is a column — but that is an accident of paper. On the Brick they sit side by side, and nothing in the first stack happens before anything in the third.
Parallel stacks go wrong when two of them try to control the same thing. Use the switch below to take the wheels away from the third stack and point it at motor A, which the first stack is already driving.
the program starts — all of these begin here
stack 1 · Medium Motor
stack 2 · status light
stack 3 · drive base
Every stack is highlighted at the same moment on purpose — that is what running in parallel looks like. The switch above changes only what the third stack controls.
With one owner each, all three stacks are highlighted at the same instant and all three jobs get done. With two owners, motor A is handed contradictory orders hundreds of times a second and shivers instead of turning — and notice the second cost, which is easy to miss: the wheels now have nobody driving them. A stack that goes to fight over someone else’s motor has abandoned its own job. Nothing reports an error either way; as far as the Brick is concerned every stack is working perfectly. The same happens to a display line or a variable that two stacks both write to.
The discipline is simple: give each stack sole ownership of what it controls. One stack owns the motors, another owns the screen, another watches the sensors and tells the others what it found — which is what broadcasting is for.
Say this back before moving on: “One control, one stack, one motor.”
| Part | What it is doing here |
|---|---|
| EV3 Intelligent Brick | The cab. Its five buttons are the whole control panel, and its screen is the instrument display. |
| Large Motor — the hoist | Raises and lowers the hook. Must hold position when it stops, or the load descends every time the operator lets go. |
| Large Motor — the slew | Turns the tower. Geared down heavily, because turning a loaded jib is the hardest thing this model does. |
| The jib and counterweight (not electronic) | The counterweight is what stops the crane tipping when the load is out at the end. Take it off and the model will show you why real cranes have one. |
Sensors go in ports 1, 2, 3, 4. Motors go in ports A, B, C, D. They are not interchangeable, and nothing will tell you politely if you swap them.
| Part | Port | Why this one |
|---|---|---|
| Hoist (Large) | A | Up and down live here, and its port appears in both stacks and both limits. |
| Slew (Large) | D | Left and right. Kept well away from A so a mis-typed port cannot make the hoist slew. |
| Sensors | none | The Brick’s buttons are the controls and the encoders are the limits. Adding a Touch Sensor as a real end-stop is what the challenges are for. |
Check your own build now:
Two routes, and either is fine. USB is the reliable one and the one to fall back on when a room’s Bluetooth is busy; Bluetooth leaves the robot free to move, which some models need.
Do these in order. Naming the Brick after you go looking for it in the list is how groups end up driving each other’s robots.
EV3 until somebody changes it.EV3.The two failures, every class, every time. The Brick has gone to sleep while you were building — press the centre button to wake it. Or you have paired with the group at the next table, which is why the name matters.
The long version, including Port View and how to read the port tiles, is in the Brick & Bluetooth guide.
Bluetooth. The Brick is the cab, and you will be holding it and pressing its buttons while watching the hook. A cable decides where you have to stand.
Test the panel the way an operator would: use it. Try to do a real job with it and notice what annoys you.
Step 2 is the interesting one and it is not really about code. The machine is behaving perfectly — it is protecting itself exactly as designed — and it feels broken. Most of what makes a machine pleasant to operate is telling the operator what it is doing and why it is refusing.
A refusal must be audible. A machine that silently ignores you is indistinguishable from one that has failed.
Five stacks: one setup and four controls. Each control owns one direction of one motor and checks its own limit.
when program starts :: events hat
[A v] set motor to [hold position v] at stop :: motors
[D v] set motor to [hold position v] at stop :: motors
[A v] reset degrees counted :: motors
[D v] reset degrees counted :: motors
clear display :: display
write [KREN SEDIA] at line (1) :: display

when [up v] button [pressed v] :: events hat
if <([A v] degrees counted) < (1000)> then
  [A v] run for (90) [degrees v] at (30) % speed :: motors
else
  play beep (45) for (0.3) seconds :: sound
end

when [down v] button [pressed v] :: events hat
if <([A v] degrees counted) > (30)> then
  [A v] run for (90) [degrees v] at (-30) % speed :: motors
else
  play beep (45) for (0.3) seconds :: sound
end

when [left v] button [pressed v] :: events hat
if <([D v] degrees counted) > (-400)> then
  [D v] run for (45) [degrees v] at (-25) % speed :: motors
else
  play beep (45) for (0.3) seconds :: sound
end

when [right v] button [pressed v] :: events hat
if <([D v] degrees counted) < (400)> then
  [D v] run for (45) [degrees v] at (25) % speed :: motors
else
  play beep (45) for (0.3) seconds :: sound
end
What success looks like: pick the Brick up and fly the crane. Up and down raise and lower smoothly; left and right slew. Hold the up button and the hook climbs in steps and then, at the top, starts beeping instead — and nothing strains.
If a control runs the wrong way, change the sign of that stack’s speed, not the limit. And if the hoist creeps down when you let go, the stop setting is not hold position — go back to Lesson 2.
Build the model before you read any further. Everything after this is about making it do something, and none of it will make much sense with nothing on the table in front of you.
Use the viewer's own controls to zoom and turn pages. Fullscreen makes it big enough to build from.
Check the finished build against the picture before you switch anything on. A motor mounted the wrong way round is far easier to spot now than it is to debug later, when it looks like a program fault.
Work through them in order — each is harder than the last. The extra challenge comes after all three, and it is meant to make you plan before you build.
Build a four-control panel that flies the crane — up, down, left, right — with each control on its own stack and every motor holding position when it stops.
Add limits the operator cannot get past, and make every refusal audible. Drive to each of the four limits in turn and confirm you hear a refusal rather than silence.
Add a home button that returns the hoist to a set height from wherever it is, using the go-to loop from Lesson 22. It must work from above and from below.
Run a real lifting job with an operator who has never seen the crane. Set up a task: a load in one place, a target in another, and something in between that must not be knocked over. Somebody who has not built your crane has to do the job using only your controls. Design the panel for them, not for you. Plan on paper which control does what, what the screen shows while they work, and what happens at every limit. Then write nothing down for them — the panel has to explain itself. Hand them the Brick and watch. Do not help, and do not explain. Two questions when you present it. What did your operator try that you had not planned for, and what did you change afterwards? And your crane has limits but no idea what it is carrying — describe what you would add so it could refuse a load that was too heavy, and where that check would have to go.