Challenge 1
Open the door to exactly 5 cm, then exactly 10 cm, using your measured ratio. Check both with a ruler.
Quick Learn — the model, the instructions, the program and the challenges. The theory is in Full Lesson.
EV3 Robotics›Level 2 · Intermediate›Lesson 33
Level 2 · Lesson 33 · EV3-L02-3360 minutes · Ages 9–16 · Model: Assault Rifle
The Assault Rifle: a motor draws a rubber band back against a bent beam, the beam releases, and a short beam is flicked out of the magazine. A Touch Sensor at the grip is the trigger.
The mechanism is Level 1’s stored energy, grown up. What is new is the magazine: a stack of beams that is not endless.
By the end of the lesson the Brick will keep count of what is left, show it on screen, and stop firing when the magazine is empty — not because anything jammed, but because the program knows.
Safety, before anything else. This model launches a beam. Point it at a wall, never at a person or a window, and everybody within two metres wears their glasses. A machine that fires is a machine that gets one rule and no exceptions.
A carpenter’s nail gun holds a strip of nails in a magazine and fires one every time the trigger goes. On a building site it drives thousands of nails a day, and the operator never counts them.
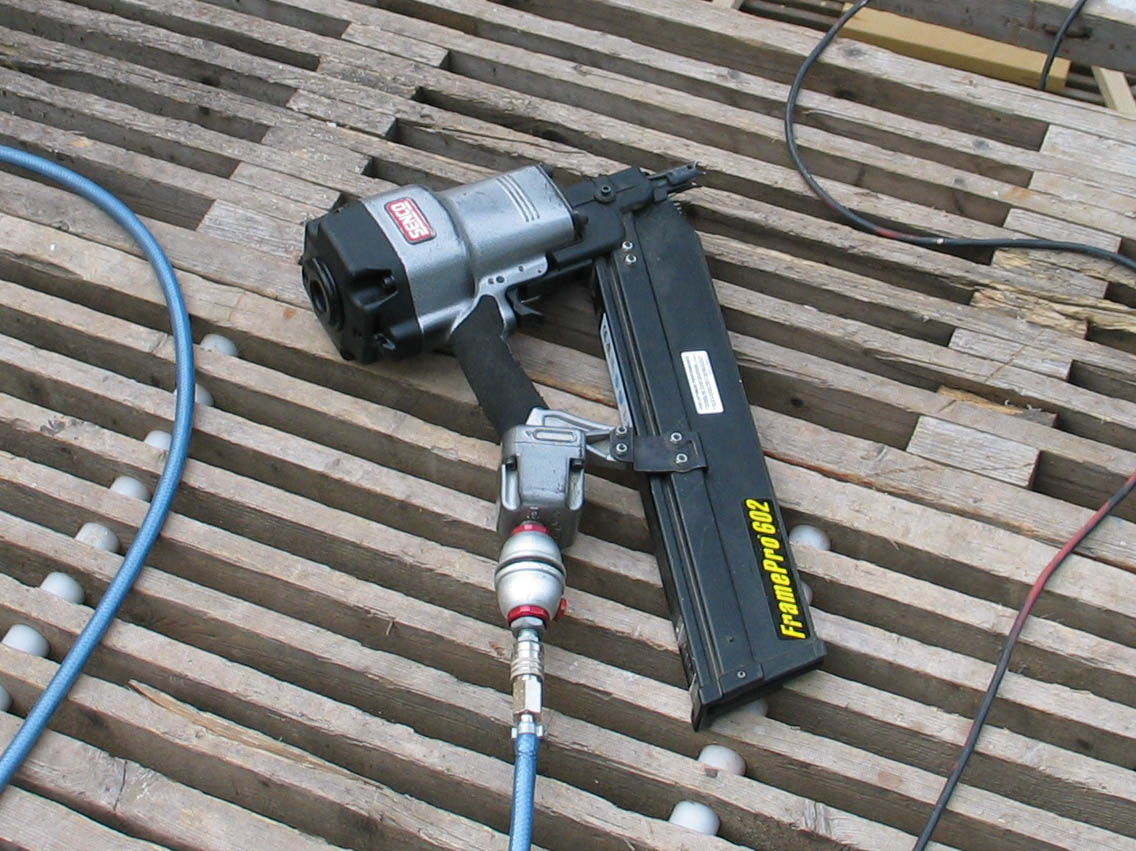
Good nail guns have a dry-fire lockout. When the magazine is nearly empty the trigger simply stops working — the tool refuses to fire rather than firing nothing.
It is not there to protect the nails. A nail gun fired empty still slams its driver blade forward at full force, and that blade marks the timber, damages the tool, and — worst of all — feels exactly like a nail going in. The carpenter walks away believing a joint is fastened when it is not.
A machine that cannot tell “I did the job” from “I went through the motions” is worse than a machine that stops. The stop is annoying. The silent failure gets built into a roof.
A machine that keeps count can refuse. A machine that cannot count can only pretend.
In Lesson 26 the Moon Orbit counted its laps and put the number on the screen. The number was a report. Take it away and the machine behaved identically.
Today the number decides. Take it away and the machine cannot work at all.
set [peluru v] to (10)
repeat until <(peluru) = (0)>
  [1 v] wait until [pressed v] :: sensors
  [A v] run [clockwise v] for (1) [rotations v] :: motors
  change [peluru v] by (-1)
end
10 to 3 and you have a three-shot machine — with no change to the build, and no change to any other block.There is a trap in the loop above, and it is better met than described. Hold the trigger down and [1 v] wait until [pressed v] is satisfied instantly, every time round — so one long press empties the whole magazine.
repeat until <(peluru) = (0)>
  [1 v] wait until [pressed v] :: sensors
  [A v] run [clockwise v] for (1) [rotations v] :: motors
  change [peluru v] by (-1)
  [1 v] wait until [released v] :: sensors
end
A press is two events, not one — going down, and coming back up. Any program that counts presses has to watch for both, or it counts how long a finger stayed there instead. You will meet this idea again in Lesson 38, where it is the whole lesson.
Long before there were computers, people had exactly this problem. A shepherd counting sheep through a gate, a trader counting sacks of grain, a builder counting days — none of them can hold the number in their head while they get on with the work. So they scratched a mark on a wall, cut a notch in a stick, or wrote a number on a piece of paper. The number lived outside the person, in a place they had agreed on, and they could go back to it, read it, and change it.
Better still, once the number is written down somebody else can use it. Watch these two: one of them counts and writes, the other never sees a single animal and simply reads the wall.
Notice what never happens: Ben never asks Abby. He does not need to — the number is not in her head, it is on the wall, and the wall is there for anyone who needs it.
Neither Abby nor Ben is holding the number — the wall is. And notice what never happens: Ben does not ask Abby. He does not need to, because the count is not in her head. It is in a place they both agreed on, which is what makes it useful to more than one of them.
That is all a variable is. The robot cannot hold a number in its head either, so you give it a wall of its own, write a name at the top so everyone knows which wall is which — score, count, degree_turn — and the program can read what is on it and write something new. One part of the program writes; another part reads. Exactly Abby and Ben.
Say we are counting rotations of a motor. Before we start we write 0 on the paper. Every time the motor completes a turn we cross out what is there and write one more: 0 becomes 1, then 2, then 3. That is change — it has to read the old number to work out the new one.
set is the other thing you can do, and it is completely different: rub the whole paper out and write the number you want. It does not care what was there. Press the buttons and watch what happens to the crossings-out.
The paper starts blank, so we write 0 on it. That is what a variable is: a place to keep a number while the robot works.
| Block | What it does |
|---|---|
set [count v] to (0) | Puts a value in, replacing whatever was there. |
change [count v] by (1) | Adds to what is already there. |
(count) | Reports the current value, for use in a comparison or on the display. |
set replaces; change adds. Counting things needs change. Starting a count needs set. Both programs below have both blocks — the only difference is whether the set block is inside the loop or above it.
set before the loop
set inside it
Both programs contain both blocks. Only the position of set [count] to 0 is different.
The count on the right is not broken; it is being told to start again on every pass. Each time round the loop it is wiped back to zero and then changed by one, so the honest answer is always 1 — while the motor cheerfully turns four times. A counter stuck at 1 almost always means a set block that has slipped inside the loop.
EV3 Classroom tells you what a block does by its shape, and once you have noticed that, a whole set of questions answers itself:
So when a slot is oval, any oval fits it — and it does not matter in the least where that number came from. You can take the motor’s own A degrees counted and keep it in a variable you named degree_turn, then compare that with a number later. Pick an oval below and watch the same one drop into all three kinds of slot.
pick an oval
the same oval fits all three
Every one of those slots is oval-shaped, and A degrees counted is an oval — so it drops in. Nothing about where the number came from matters.
This is what makes a variable more than a counter. A sensor reading is true only at the instant you read it; copying it into a variable freezes it, so the robot can compare where it is now against where it was when something happened:
when program starts :: events hat
[A v] reset degrees counted :: motors
set [degree_turn v] to ([A v] degrees counted :: sensors)
start moving [right: 30] :: movement
wait until <(([A v] degrees counted :: sensors) - (degree_turn)) > (400)>
stop moving :: movement
Read the condition aloud: how far the motor has gone now, minus where it was when we started, is more than 400. Both are ovals, so both can go into a subtraction, and the subtraction is an oval too — which is why it can go into a comparison. Ovals nest inside ovals as deep as you need.
A variable keeps its value after the program ends. Run the program again without setting it back and the second run begins where the first left off — the count starts at 14, the robot thinks it has already done the job. Every variable a program changes must be set to its starting value at the top.
A variable is the difference between a machine that repeats a fixed routine and one that responds to how things have gone — counting parts, tracking a score, remembering where it started.
Machines repeat. A wiper sweeps, a conveyor runs, a ride goes round — and none of that should mean copying the same blocks over and over. A loop says “do this again” once.
| Block | What it does |
|---|---|
repeat (10) end | Runs the blocks inside a set number of times, then carries on below. |
forever end | Runs the blocks inside over and over, and never carries on below. |
repeat until <> end | Repeats until a condition becomes true — a loop with a sensor as its exit. |
Anything placed after a forever loop will never run. Not “runs late” — never. Both programs below end with the same block: set the status light green.
repeat (3)
forever
↑ this block never runs
Both programs contain the same green-light block. Let it run as long as you like — the right-hand ring will never turn green.
The repeat loop counts its three passes, stops, and moves on to the block underneath, so its light turns green. The forever loop reaches the bottom of its own blocks and jumps straight back to the top, so the block underneath is never reached — however long you leave it. If a program seems to stop half way through, look for a forever loop above the blocks that are not happening.
A program is a list, and the Brick works down it once. Every block runs, in order, and when the last one is done the program is over. That is fine for a list of instructions — drive, turn, beep, stop — because each is a thing you do once.
A sensor is not a thing you do once. Asking is 1 pressed? gives you an answer about this instant, and an instant later it may be wrong. Checking a sensor once tells you what the world was like at the moment the program started — which is almost never what you wanted to know.
So a program that has to react must ask again, and again, for as long as it is running. That is the whole job of the loop: not to repeat an action, but to keep the question being asked.
Wrap a sensor check and the motor it controls in a forever loop and you have built a closed-loop control system — the pattern behind every line follower, thermostat and cruise control:
It is called closed because the output feeds back round to the input: the motors move the robot, moving the robot changes what the sensor sees, and what the sensor sees changes the motors. Break the circle at any point and the robot stops responding.
when program starts :: events hat
forever
  if <[1 v] is pressed? :: sensors> then
    [A v] start motor [clockwise v] :: motors
  else
    [A v] stop motor :: motors
  end
end
Read it as a sentence and it is almost too simple to need explaining: for ever, if the button is pressed run the motor, otherwise stop it. The motor now follows the button for as long as the program is running.
This is the mistake nearly everybody makes first, and it is a hard one to spot because nothing about it looks wrong:
when program starts :: events hat
if <[1 v] is pressed? :: sensors> then
  [A v] start motor [clockwise v] :: motors
else
  [A v] stop motor :: motors
end
The logic is perfect. The ports are right. Nothing is misspelled. And the robot will ignore the button completely — because the Brick reaches that if/else a few milliseconds after you press Run, finds the button not pressed, takes the else branch, stops the motor, runs out of blocks and ends. By the time a finger arrives, there is no program left to notice it.
with forever — a closed loop
without it — the common mistake
↑ running — for the only time
Both programs contain exactly the same if/else. The only difference is the forever block around one of them.
Both programs contain exactly the same if/else. The counter is what gives it away: one keeps checking for as long as it runs, the other is stuck on the single check it made before anybody touched anything. A student who has seen this once stops writing it.
The tell on a real robot is a program that ends the instant you start it — the Brick returns to its menu almost immediately. If a sensor program finishes rather than waits, the loop is what is missing.
A counter that only reports is decoration. A counter that decides is a magazine.
Long before there were computers, people had exactly this problem. A shepherd counting sheep through a gate, a trader counting sacks of grain, a builder counting days — none of them can hold the number in their head while they get on with the work. So they scratched a mark on a wall, cut a notch in a stick, or wrote a number on a piece of paper. The number lived outside the person, in a place they had agreed on, and they could go back to it, read it, and change it.
Better still, once the number is written down somebody else can use it. Watch these two: one of them counts and writes, the other never sees a single animal and simply reads the wall.
Notice what never happens: Ben never asks Abby. He does not need to — the number is not in her head, it is on the wall, and the wall is there for anyone who needs it.
Neither Abby nor Ben is holding the number — the wall is. And notice what never happens: Ben does not ask Abby. He does not need to, because the count is not in her head. It is in a place they both agreed on, which is what makes it useful to more than one of them.
That is all a variable is. The robot cannot hold a number in its head either, so you give it a wall of its own, write a name at the top so everyone knows which wall is which — score, count, degree_turn — and the program can read what is on it and write something new. One part of the program writes; another part reads. Exactly Abby and Ben.
Say we are counting rotations of a motor. Before we start we write 0 on the paper. Every time the motor completes a turn we cross out what is there and write one more: 0 becomes 1, then 2, then 3. That is change — it has to read the old number to work out the new one.
set is the other thing you can do, and it is completely different: rub the whole paper out and write the number you want. It does not care what was there. Press the buttons and watch what happens to the crossings-out.
The paper starts blank, so we write 0 on it. That is what a variable is: a place to keep a number while the robot works.
| Block | What it does |
|---|---|
set [count v] to (0) | Puts a value in, replacing whatever was there. |
change [count v] by (1) | Adds to what is already there. |
(count) | Reports the current value, for use in a comparison or on the display. |
set replaces; change adds. Counting things needs change. Starting a count needs set. Both programs below have both blocks — the only difference is whether the set block is inside the loop or above it.
set before the loop
set inside it
Both programs contain both blocks. Only the position of set [count] to 0 is different.
The count on the right is not broken; it is being told to start again on every pass. Each time round the loop it is wiped back to zero and then changed by one, so the honest answer is always 1 — while the motor cheerfully turns four times. A counter stuck at 1 almost always means a set block that has slipped inside the loop.
EV3 Classroom tells you what a block does by its shape, and once you have noticed that, a whole set of questions answers itself:
So when a slot is oval, any oval fits it — and it does not matter in the least where that number came from. You can take the motor’s own A degrees counted and keep it in a variable you named degree_turn, then compare that with a number later. Pick an oval below and watch the same one drop into all three kinds of slot.
pick an oval
the same oval fits all three
Every one of those slots is oval-shaped, and A degrees counted is an oval — so it drops in. Nothing about where the number came from matters.
This is what makes a variable more than a counter. A sensor reading is true only at the instant you read it; copying it into a variable freezes it, so the robot can compare where it is now against where it was when something happened:
when program starts :: events hat
[A v] reset degrees counted :: motors
set [degree_turn v] to ([A v] degrees counted :: sensors)
start moving [right: 30] :: movement
wait until <(([A v] degrees counted :: sensors) - (degree_turn)) > (400)>
stop moving :: movement
Read the condition aloud: how far the motor has gone now, minus where it was when we started, is more than 400. Both are ovals, so both can go into a subtraction, and the subtraction is an oval too — which is why it can go into a comparison. Ovals nest inside ovals as deep as you need.
A variable keeps its value after the program ends. Run the program again without setting it back and the second run begins where the first left off — the count starts at 14, the robot thinks it has already done the job. Every variable a program changes must be set to its starting value at the top.
A variable is the difference between a machine that repeats a fixed routine and one that responds to how things have gone — counting parts, tracking a score, remembering where it started.
Say this back before moving on: “When the box holds zero, the machine stops asking.”
Look at your model. Which parts are electronic? There are three, and the part doing the actual work is not one of them.
| Part | What it is doing here |
|---|---|
| EV3 Intelligent Brick | The body of the machine, and the only thing here that can count. Its screen is the ammunition readout. |
| Large Motor — the draw | Pulls the rubber band back against the bent beam, one rotation per shot. Large, because drawing a band is the definition of a job that needs force rather than speed. |
| Touch Sensor — the trigger | Pressed by a finger, which makes it different from Lesson 29’s switch. A person is in the loop here. |
| The rubber band (not electronic) | Stores the energy and does the launching. The motor never touches the beam that flies. |
| The magazine (not electronic) | Holds the beams and feeds them one at a time. Count what you actually load — the number in your program has to match the number in your hand. |
Nothing on this machine can see the magazine. There is no sensor looking into it. The count in the program is the machine’s only knowledge of how many are left — which is precisely why the number has to be right when you set it.
Sensors go in ports 1, 2, 3, 4. Motors go in ports A, B, C, D. They are not interchangeable, and nothing will tell you politely if you swap them.
| Part | Port | Why this one |
|---|---|---|
| Draw motor | A | One motor doing its own job. |
| Trigger (Touch Sensor) | 1 | The Touch Sensor’s standing home, and the port that appears twice in the firing loop. |
The manual puts the trigger in port 4, not port 1. The motor port matches — the manual says “large motor: port A” — but this lesson keeps the Touch Sensor on 1, its home across the whole course. Move that one cable, or change both [1 v] blocks in the firing loop.
Check your own build now:
Two routes, and either is fine. USB is the reliable one and the one to fall back on when a room’s Bluetooth is busy; Bluetooth leaves the robot free to move, which some models need.
Do these in order. Naming the Brick after you go looking for it in the list is how groups end up driving each other’s robots.
EV3 until somebody changes it.EV3.The two failures, every class, every time. The Brick has gone to sleep while you were building — press the centre button to wake it. Or you have paired with the group at the next table, which is why the name matters.
The long version, including Port View and how to read the port tiles, is in the Brick & Bluetooth guide.
Bluetooth, for a reason that matters here. This machine is picked up and pointed. A USB cable pulls the muzzle as you aim, and drags the laptop toward the firing line. Stay in reach of the stop button either way.
Stuck? The long version, with a photograph of every screen, is in the Brick & Bluetooth guide.
One change at a time. Unload the magazine for anything you are unsure about — the mechanism cycles perfectly well empty and you can watch the numbers instead of the beams.
set [peluru] to (10) to 3. Nothing else. The machine is now a three-shot machine — proof that the magazine lives in one number.wait until released and hold the trigger down. Predict what happens first. This is the bug you are meant to see.= (0) to < (1). Same behaviour — but now think about what would happen with = (0) if something ever took away two at once.if <(peluru) < (3)> then beep, and show a different message. Real tools warn before they lock out.forever loop, and after KOSONG use wait until [center v] button is [pressed v] before setting peluru back to 10.Step 6 is the point of the lesson and it is not a bug you can fix in the program. The count is what the machine believes, not what is true. It stays true only while every change goes through the program. The moment a human reaches in, the belief and the world part company — which is why the real fix is a sensor that can see the magazine, and why Level 3 spends so long on calibration.
A variable remembers what the program did. It does not know what happened.
Build the model before you read any further. Everything after this is about making it do something, and none of it will make much sense with nothing on the table in front of you.
Use the viewer's own controls to zoom and turn pages. Fullscreen makes it big enough to build from.
Check the finished build against the picture before you switch anything on. A motor mounted the wrong way round is far easier to spot now than it is to debug later, when it looks like a program fault.
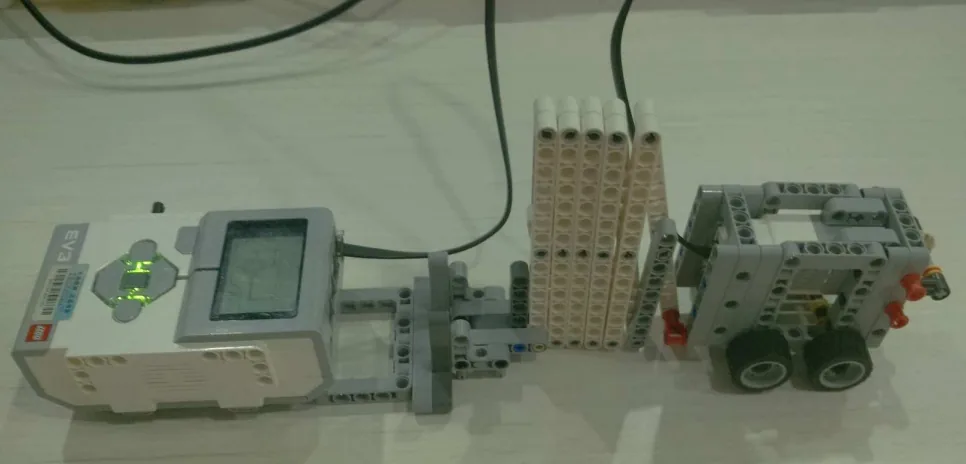
Load ten, fire on each trigger press, show what is left, and lock out when empty.
when program starts :: events hat
set [peluru v] to (10)
clear display :: display
write (peluru) at line (1) :: display
repeat until <(peluru) = (0)>
  [1 v] wait until [pressed v] :: sensors
  [A v] run [clockwise v] for (1) [rotations v] :: motors
  change [peluru v] by (-1)
  write (peluru) at line (1) :: display
  [1 v] wait until [released v] :: sensors
end
write [KOSONG] at line (3) :: display
play sound [Communication / Goodbye v] until done :: sound
change above the motor block and the screen lies for half a second.wait until released is what makes it one shot per press. ** Take it out and hold the trigger to see why it is there.What success looks like: the screen reads 10. Each trigger press fires one beam and the number drops. After the tenth the machine says KOSONG, says goodbye, and ignores the trigger completely.
If one press empties the magazine, the release wait is missing or in the wrong place. If the count goes negative, you have changed it somewhere the loop condition cannot see — check that nothing decrements outside the loop.
Work through them in order — each is harder than the last. The extra challenge comes after all three, and it is meant to make you plan before you build.
Open the door to exactly 5 cm, then exactly 10 cm, using your measured ratio. Check both with a ruler.
Make the door open only as far as it needs to: a small opening for a hand, the full opening for a whole box.
Add or remove one X pair from the lattice, re-measure your ratio, and get the door back to exactly 10 cm.
Build a two-speed door: quickly to 80% open, then slowly for the last stretch, and slowly all the way when closing. It must return to exactly closed on every cycle — prove it by running twenty cycles and measuring the closed position afterwards.