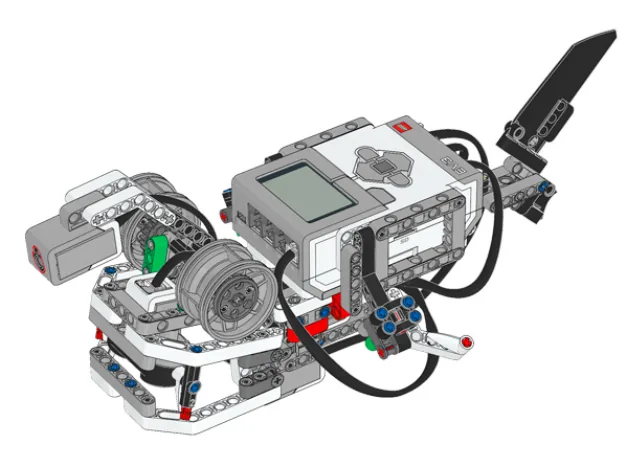
The Anglerfish. It lives deep in the sea. It hides and waits to catch its food. It has a jaw that opens and shuts. A lure on a stalk curves out over its mouth, like bait on a fishing rod.
A Medium Motor waves the lure. A Large Motor moves the jaw. A Gyro Sensor tells the fish if it is being moved. Almost nothing on this model is fast. It is a machine built for waiting. The waiting is the point.
By the end of the lesson, you will have one block called sweep. It can wave the lure gently, wildly, or anything in between. And there will be no second copy of it anywhere in your program.
In the real world 5 min
Where you have seen it
Two hundred metres down in the sea, the sunlight runs out. Below a thousand metres, there is no light at all. Food is hard to find down there. Most of it drifts down from far above. Think of an animal that swam about looking for food. It would use up more energy than the food gave back.
So the anglerfish does not chase its food. It stays almost still. It hangs a light in front of its own mouth. The rod is a changed fin bone called the illicium. The glowing tip is the esca. The tip does not make its own light. It is full of tiny living things called bacteria that glow. They live there, and the fish feeds them.
Why it is built that way
The lure is not waved at one speed. A slow, drifting wave looks like a small swimming animal. A quick twitch looks like something hurt. So the fish changes the movement. To an animal watching, the same movement at a different size means a different thing. And it is watching in the dark, with almost nothing to go on.
Life is hard down there. A deep-sea anglerfish may eat only a few times a year. Every wave of the lure uses energy it cannot easily get back. So each wave has to be worth it.
What would go wrong without it
A lure that only moved one way would catch only one kind of animal. And only until that animal learned! This fish can wave its lure slowly or wildly, with just one rod. One tool does many jobs.
One tool, many sizes of movement. That is just what you are about to build with blocks.
The main concept — a block that takes a number 6 min
You can give a set of blocks a name. Then you use the name like one block. That is called a My Block. You wished you had one on the Forklift with Pulley in Lesson 21. Today the name also gets a slot. You fill in a number each time you use the block. The slot is called an input. Without it, a block does one thing. With it, a block does one kind of thing.
The problem
Say the lure must sweep gently at first. Then it must sweep wildly when something is close. Without inputs, you need two blocks:
define sweep slow
repeat (4)
  [A v] run [clockwise v] for (40) [degrees v] at (15) % speed :: motors
  [A v] run [counterclockwise v] for (40) [degrees v] at (15) % speed :: motors
end

define sweep fast
repeat (4)
  [A v] run [clockwise v] for (40) [degrees v] at (60) % speed :: motors
  [A v] run [counterclockwise v] for (40) [degrees v] at (60) % speed :: motors
end
Two blocks that differ by one number. Want to change the 40? You must remember to change it in four places.
A name on its own does not fix this. Giving blocks a name took the copies out of the main program. But the copies are still there. They just moved.
The fix: one block, one slot
define sweep (speed)
repeat (4)
  [A v] run [clockwise v] for (40) [degrees v] at (speed) % speed :: motors
  [A v] run [counterclockwise v] for (40) [degrees v] at (speed) % speed :: motors
end
One block. speed is the input. You give it a number when you use the block. That number is used everywhere speed appears inside.
when program starts :: events hat
sweep (15) :: custom
sweep (60) :: custom
sweep (15) :: custom
Three different sweeps from one block. Change how a sweep works, and all three change together.
Word
What it means
Where you see it
Input
The empty slot in the block’s name.
In the define hat: sweep (speed)
Argument
The real number you put in when you use it.
In the program: sweep (60)
Inside the block
The input works like a number. Drag it from the define hat into any slot.
at (speed) % speed
Making one, in EV3 Classroom
My Blocks → Make a Block.
Type the name, then click Add an input — number.
Name the input for what it means. Good names are speed, times, degrees. Never use number1.
Click OK.
To use it inside the definition, drag the input out of the define hat and drop it into a slot. You cannot type its name. You have to drag the real thing.
ComponentData6 min
My Blocks
A My Block is a block you make yourself. You take a group of blocks that do one job, give the group a name, and from then on that name is the block.
Blocks reference
Block
What it does
define grab
The head of a definition. Whatever is attached under it is what the block does. There is exactly one of these per My Block.
grab :: myblocks
Runs the definition. Use it as many times as you like.
define turn (degrees)
A definition with an input. degrees is a name for whatever number the caller types.
turn (90) :: myblocks
Runs it with 90 in place of that name.
Why bother
Copying blocks works perfectly — right up until the copied thing has to change. Here are two robots driving a square, one with a My Block and one with the blocks copied four times, and then somebody asks for a bigger square.
a My Block, used four times
define side
move forward for 2rotations
move right: 100 for 0.5rotations
repeat 4
side
the same thing copied
move forward for 2rotations
move right: 100 for 0.5rotations
move forward for 2rotations
move right: 100 for 0.5rotations
move forward for 2rotations
move right: 100 for 0.5rotations
move forward for 2rotations
move right: 100 for 0.5rotations
↑ the fourth copy still says 2
1place to edit · My Block4places to edit · copies
My Block: square closedCopies: one rotation adrift
Both robots drive a square: forward, turn, four times. The left uses a My Block called «side»; the right has the same two blocks copied four times.Now the square has to be bigger — 3 rotations a side instead of 2. The left program is edited in one place. The right has four places to edit, and the fourth is missed.Run them. Three of the right-hand robot's sides are the new length and the fourth is not.The left robot is back exactly where it started. The right one is a whole rotation adrift — and every block in its program is spelled correctly.Finished. One robot closed its square; the other is a rotation short.
before the change
The bug is not in any block. It is in the fact that the same idea was written down four times, and only three of them were updated.
The right-hand robot is not running a broken program. It is running four programs that were supposed to be identical, and three of them were updated. Nothing is misspelled, nothing reports an error, and the only evidence is a square that does not close.
The left-hand program is these two listings, and nothing else:
define side
move [forward v] for (3) [rotations v] :: movement
move [right: 100 v] for (0.5) [rotations v] :: movement
when program starts :: events hat
repeat (4)
  side :: myblocks
end
One place to fix. A turn defined once and used eleven times is corrected in one place. Copied eleven times, it is corrected in eleven — and one always gets missed.
Readable. A program that reads turn-right, drive-to-wall, grab explains itself. The same program written out in full does not.
Inputs make it general
A My Block can take a value. Turn-right is useful; turn (degrees) is far more useful, because one definition then serves every turn in the program. The value is given a name when the block is made, and that name is used inside the definition wherever the number belongs.
The name is the part that trips people up. Inside the definition, (cm) is not a variable you have to set anywhere — it is a hole, and it is filled in with whatever the caller typed, every time the block is called.
Example 1 — a block that thinks in centimetres
EV3 movement blocks count wheel turns, and nobody measures a table in wheel turns. One turn of a standard driving wheel carries the robot about 17.5 cm, so driving 50 cm means asking for 50 ÷ 17.5 rotations. Doing that sum in your head, at every movement block, all program long, is how mistakes get in.
Put the sum inside a My Block once and the whole program can be written in centimetres. Change the two numbers below and watch where they end up.
cm
These two numbers are the whole interface. Everything below is what the definition does with them.
what you write in the program
drive (50) cm at (75) % :: myblocks
↓
the definition — (cm) and (speed) are names, not values
define drive (cm) cm at (speed) %
set movement speed to (speed) % :: movement
move [forward v] for ((cm) / (17.5)) [rotations v] :: movement
↓
the same blocks, with your two numbers put in
set movement speed to (75) % :: movement
move [forward v] for ((50) / (17.5)) [rotations v] :: movement
The green division block is doing the only real work: the movement block underneath counts wheel turns, and you asked in centimetres. One turn of these wheels carries the robot 17.5 cm, so 50 cm is 50 ÷ 17.5 = 2.86 turns.
2.86rotations · what the block gets2whole turns15.0cm · the part turn75%speed
Set the distance to 17.5, 35 or 70 and the part turn disappears — those are whole numbers of wheel turns. Every other distance leaves a fraction, which is exactly why the division belongs inside the My Block and not in your head.
Two inputs, and the definition is three blocks. Note what has actually been gained: not fewer blocks — the same blocks run either way — but a program you can check against a ruler. drive (50) cm at (75) % is either right or wrong about the table, and you can tell which without running it.
Typing a fixed number inside the definition instead of using the input is the classic slip — the block then ignores whatever it is given and always drives the same distance:
define drive (cm) cm at (speed) %
set movement speed to (speed) % :: movement
move [forward v] for ((50) / (17.5)) [rotations v] :: movement
That block takes a distance and throws it away. It will pass every test you run at 50 cm.
Build a script and run it
Here are those two My Blocks and a 100 × 100 cm mat. Drag blocks into the script, set the numbers, and press Run — the base always starts in the left-hand corner facing up the mat. Say where you think it will finish before you press it; the ruler is there to settle the argument.
Two My Blocks, a 100 × 100 cm mat and a ruler. Drag blocks into the script — or press one to add it — set the numbers, then Run and see whether the base ends up where you said it would.
my blocks — drag or press
the script — 0 / 8 blocks
when program starts
Empty. Drag a block in from above, or press one.
10, 10cm · where it is0°heading0.0sthe whole run
Nothing to run yet. A square is four drives and four turns — try predicting the distance before you press Run.
Eight blocks is enough for a square with 40 cm sides, and not enough for anything you cannot picture. If a shape needs more than that, it wants a repeat (4) around it — which is the next thing a My Block usually grows into.
Example 2 — a block that thinks in degrees
The Gyro Sensor gives an accurate turn, and it costs five blocks every time: reset the angle, start turning, wait until the reading is a few degrees short of the target, stop. Those five blocks are about the sensor. What the program wants to say is turn 90.
The − 4 is the overshoot allowance from the Gyro Sensor module: the robot carries on turning for a moment after the motors are told to stop, so the block asks for less than it wants and lets it coast in. Written here, it is decided once. Written out at every corner, it is eleven chances to forget it.
Now the input earns its keep — because the shape a robot draws is decided entirely by that one number. A closed shape turns through 360° in total, so a shape with n corners turns 360 ÷ n at each one.
the whole program
when program starts :: events hat
repeat (4)
  move [forward v] for (2) [rotations v] :: movement
  turn (90) :: myblocks
end
what turn is, once
define turn (degrees)
[2 v] reset angle :: sensors
start moving [right: 30] :: movement
wait until <([2 v] angle :: sensors) > ((degrees) - (4))>
stop moving :: movement
90°the input0 / 4corners turned360°turned in total
1 block in the program5 gyro blocks, written once
A square has 4 corners, so each turn is 360 ÷ 4 = 90°. That number is the only thing being changed.Drive a side, call turn (90), repeat. The five gyro blocks run inside the My Block every time, and none of them are in the program.Closed, back on the start mark. Every corner was measured by the gyro — nothing here counted wheel turns to get an angle.Finished. Three shapes, one definition — the only edit was the number in the call.
parked
Nothing in the program mentions the gyro. It is all inside turn, which is the point: the sensor is an implementation detail of turning, and the program should be about the shape.
Same definition, same drive block, same length of side. The only edit between a triangle and a pentagon is turn (120) :: myblocks becoming turn (72) :: myblocks. That is what a well-chosen input does: it turns a program that draws one shape into a program that draws shapes.
The same block also turns left, if you let it. Give the definition an if … then … else and a negative input means anticlockwise:
define turn (degrees)
[2 v] reset angle :: sensors
if <(degrees) > (0)> then
  start moving [right: 30 v] :: movement
  wait until <([2 v] angle :: sensors) > ((degrees) - (4))>
else
  start moving [left: 30 v] :: movement
  wait until <([2 v] angle :: sensors) < ((degrees) + (4))>
end
stop moving :: movement
One block, two directions, and every program that uses it gets the left turn for free the moment this definition is edited.
When to make one
The signal is repetition: the same sequence appearing in more than one place. That is the moment to name it. Making a My Block for something used once adds a layer without adding clarity.
The second signal is a unit. If the blocks convert between what you think in (centimetres, degrees, seconds) and what the hardware counts (rotations, sensor readings), that conversion is worth a name — it is the thing you will otherwise get wrong.
ComponentSensing6 min
The Gyro Sensor
The Gyro Sensor measures how far the robot has turned, in degrees. Wheels slip and floors vary, so counting wheel rotations is a poor way to turn accurately — the gyro measures the turn itself rather than inferring it.
from above
front
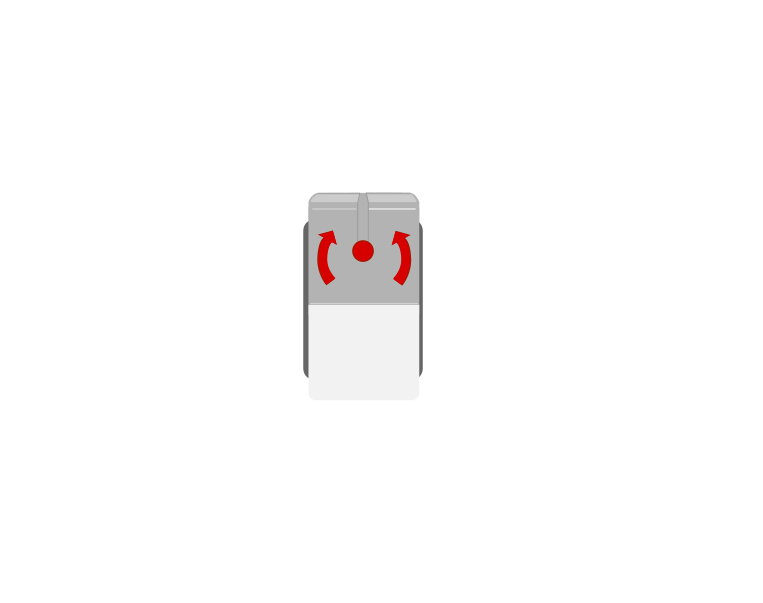
The arrows moulded into the top show which way round the sensor measures. Mount it flat and the wrong way up and it will read your turns backwards.
Blocks reference
Block
What it does
([2 v] angle :: sensors)
Reports how far the robot has turned since the angle was last reset.
[2 v] reset angle :: sensors
Sets the current heading as zero.
Always reset before you turn
The angle is measured from wherever it was last zeroed — not from where this turn started. Here are two robots given the same instruction, one with a reset block and one without.
reset first
when program starts
2 reset angle
start moving right: 100
2 wait until angle >90
stop moving
no reset
start moving right: 100
2 wait until angle >90
0°actually turned · reset0°actually turned · no reset
Reset: a real 90° turnNo reset: 0°, and no warning
Both robots have been sitting still. Both gyros already read about 34° — left over from an earlier turn — and the reading is creeping upward even now. That creep is drift.The left program resets its angle to zero. The right program has no reset block.Both turn. Both stop the moment their gyro reads more than 90.The left robot turned 90°. The right one turned 55°, because it started counting from 34 — and it stopped at 90 all the same.Finished. Both readings say 90. Only one of the robots turned 90.
still
Both programs are correct about what they asked for. Only the left one asked the question from a known starting point.
Both programs did exactly what they said. Both gyros stopped at 90. But the robot on the right had 34 degrees already on the clock, so it only turned 55 — and nothing about the program looks wrong. Watch the first step too: neither robot is moving and the reading is still climbing. That is drift, and it is why the reset belongs immediately before the turn.
Reset with the robot completely still, as late as you can.
when program starts :: events hat
[2 v] reset angle :: sensors
start moving [straight: 0] :: movement
wait until <([2 v] angle :: sensors) > (90)>
stop moving :: movement
That program is the obvious one to write, and it will not give you a 90 degree turn. The next section is why.
Stop before you get there
Asking to stop at 90 does not stop the robot at 90. Between the gyro reaching 90 and the wheels actually standing still there is a delay — the sensor has to be read, the next block has to run, and the motors have to physically brake. The robot is still turning through all of it, so it ends up past where you asked.
The fix is to ask for less than you want. Aim for a 90 degree turn by waiting for 86: the robot coasts the last few degrees on its own and settles at roughly 89 to 91.
ask for exactly 90
2 reset angle
start moving right: 30
2 wait until angle >90
stop moving
stop 4° early
2 wait until angle >86
stop moving
slowthis run · 50°/s+4°carried past the stop86tolerance needed here
Asked for 90: ended at 0°Asked for 86: ended at 0°
Both robots are told to turn 90°. The left one waits for the angle to pass 90; the right one gives up 4° early and waits for 86.They turn. Each stops the moment its own condition is met — and then keeps going.That extra sweep in red is the latency: the time to read the gyro, decide, and actually halt the motors. Nothing was wrong with either program.Finished. At this speed the robot carries on about 4° past whatever angle the program stopped at.
slow turn
The tolerance has to match the speed. At 50°/s the number that lands this turn on 90° is 86 — let it loop, and watch that number change when the speed does.
The size of that gap is not a fixed property of the robot — it is the delay multiplied by how fast you are turning. The delay stays about the same whatever you do, so a turn at double the speed carries you about double the distance past the mark.
Turn speed
Carried past the stop
Wait for
Ends up at
slow
about 4°
86
about 90°
fast
about 10°
80
about 90°
So the tolerance and the speed have to be chosen together. Turn faster and you must give up more; if you speed a turn up and forget to lower the number, the robot starts overshooting every corner and the program that worked last week no longer does.
when program starts :: events hat
[2 v] reset angle :: sensors
start moving [right: 30] :: movement
wait until <([2 v] angle :: sensors) > (86)>
stop moving :: movement
Find your own number rather than copying this one — it depends on your robot’s weight, its wheels and the speed you turn at. Run the turn, measure where it actually stops, and move the number by however far it missed. Two or three tries is usually enough.
The other half of the answer is to slow down. A slower turn overshoots less, so it needs less guessing and repeats more reliably — which is why a turn worth getting right is rarely worth rushing.
Drift — the thing that catches everyone
A gyro slowly loses its zero even when nothing is moving. Leave a robot sitting still for a minute and the angle may have wandered several degrees all by itself. That is drift, and it is a property of the hardware, not a bug in your program.
Two habits deal with it: reset the angle as late as possible before a turn, and keep the robot dead still while the reset happens. Resetting while the robot is rolling bakes the error in permanently.
Why it matters
Aircraft, ships and phones all use gyros to know their orientation — it is how a phone knows you have turned it sideways. A robot that can turn exactly 90 degrees on any surface is far more reliable than one that guesses with wheel rotations.
A block with an input does one kind of job at any size. A block without one does just one job.
▶The Gyro SensorFrom Level 1, Lesson 43. How it measures how far the model has turned, and why it must be still when the program starts.Show meHide
ComponentSensing6 min
The Gyro Sensor
The Gyro Sensor measures how far the robot has turned, in degrees. Wheels slip and floors vary, so counting wheel rotations is a poor way to turn accurately — the gyro measures the turn itself rather than inferring it.
from above
front
The arrows moulded into the top show which way round the sensor measures. Mount it flat and the wrong way up and it will read your turns backwards.
Blocks reference
Block
What it does
([2 v] angle :: sensors)
Reports how far the robot has turned since the angle was last reset.
[2 v] reset angle :: sensors
Sets the current heading as zero.
Always reset before you turn
The angle is measured from wherever it was last zeroed — not from where this turn started. Here are two robots given the same instruction, one with a reset block and one without.
reset first
when program starts
2 reset angle
start moving right: 100
2 wait until angle >90
stop moving
no reset
start moving right: 100
2 wait until angle >90
0°actually turned · reset0°actually turned · no reset
Reset: a real 90° turnNo reset: 0°, and no warning
Both robots have been sitting still. Both gyros already read about 34° — left over from an earlier turn — and the reading is creeping upward even now. That creep is drift.The left program resets its angle to zero. The right program has no reset block.Both turn. Both stop the moment their gyro reads more than 90.The left robot turned 90°. The right one turned 55°, because it started counting from 34 — and it stopped at 90 all the same.Finished. Both readings say 90. Only one of the robots turned 90.
still
Both programs are correct about what they asked for. Only the left one asked the question from a known starting point.
Both programs did exactly what they said. Both gyros stopped at 90. But the robot on the right had 34 degrees already on the clock, so it only turned 55 — and nothing about the program looks wrong. Watch the first step too: neither robot is moving and the reading is still climbing. That is drift, and it is why the reset belongs immediately before the turn.
Reset with the robot completely still, as late as you can.
when program starts :: events hat
[2 v] reset angle :: sensors
start moving [straight: 0] :: movement
wait until <([2 v] angle :: sensors) > (90)>
stop moving :: movement
That program is the obvious one to write, and it will not give you a 90 degree turn. The next section is why.
Stop before you get there
Asking to stop at 90 does not stop the robot at 90. Between the gyro reaching 90 and the wheels actually standing still there is a delay — the sensor has to be read, the next block has to run, and the motors have to physically brake. The robot is still turning through all of it, so it ends up past where you asked.
The fix is to ask for less than you want. Aim for a 90 degree turn by waiting for 86: the robot coasts the last few degrees on its own and settles at roughly 89 to 91.
ask for exactly 90
2 reset angle
start moving right: 30
2 wait until angle >90
stop moving
stop 4° early
2 wait until angle >86
stop moving
slowthis run · 50°/s+4°carried past the stop86tolerance needed here
Asked for 90: ended at 0°Asked for 86: ended at 0°
Both robots are told to turn 90°. The left one waits for the angle to pass 90; the right one gives up 4° early and waits for 86.They turn. Each stops the moment its own condition is met — and then keeps going.That extra sweep in red is the latency: the time to read the gyro, decide, and actually halt the motors. Nothing was wrong with either program.Finished. At this speed the robot carries on about 4° past whatever angle the program stopped at.
slow turn
The tolerance has to match the speed. At 50°/s the number that lands this turn on 90° is 86 — let it loop, and watch that number change when the speed does.
The size of that gap is not a fixed property of the robot — it is the delay multiplied by how fast you are turning. The delay stays about the same whatever you do, so a turn at double the speed carries you about double the distance past the mark.
Turn speed
Carried past the stop
Wait for
Ends up at
slow
about 4°
86
about 90°
fast
about 10°
80
about 90°
So the tolerance and the speed have to be chosen together. Turn faster and you must give up more; if you speed a turn up and forget to lower the number, the robot starts overshooting every corner and the program that worked last week no longer does.
when program starts :: events hat
[2 v] reset angle :: sensors
start moving [right: 30] :: movement
wait until <([2 v] angle :: sensors) > (86)>
stop moving :: movement
Find your own number rather than copying this one — it depends on your robot’s weight, its wheels and the speed you turn at. Run the turn, measure where it actually stops, and move the number by however far it missed. Two or three tries is usually enough.
The other half of the answer is to slow down. A slower turn overshoots less, so it needs less guessing and repeats more reliably — which is why a turn worth getting right is rarely worth rushing.
Drift — the thing that catches everyone
A gyro slowly loses its zero even when nothing is moving. Leave a robot sitting still for a minute and the angle may have wandered several degrees all by itself. That is drift, and it is a property of the hardware, not a bug in your program.
Two habits deal with it: reset the angle as late as possible before a turn, and keep the robot dead still while the reset happens. Resetting while the robot is rolling bakes the error in permanently.
Why it matters
Aircraft, ships and phones all use gyros to know their orientation — it is how a phone knows you have turned it sideways. A robot that can turn exactly 90 degrees on any surface is far more reliable than one that guesses with wheel rotations.
Say this back before moving on: “The block has a slot. The program fills it in.”
What’s in this build 4 min
Look at the fish before you read on. Which parts with wires can you find? Which one does nothing you can see? There are four to name.
Part
What it is doing here
EV3 Intelligent Brick
The body of the fish, and most of its weight. It also has the screen. Today the screen shows what the Gyro can feel.
Medium Motor — the lure
Waves the stalk. It is Medium because the lure is light. The movement must be quick and exact, not strong.
Large Motor — the jaw
Snaps the mouth shut. It is Large because a jaw has to move a lot of plastic fast. That needs turning strength, called torque.
Gyro Sensor
Feels the fish being tipped or turned. Nothing on the model moves it. You move it. So its reading comes from the world, not from the machine.
The lure stalk and jaw parts (no wires)
Both must swing freely. Move each one by hand before you run anything. A stiff stalk turns a smooth sweep into lots of jerks. Then your slow and fast sweeps will look the same.
The Gyro must be still when the program starts. It finds its zero in the first moment. If you are carrying the fish then, it will read wrong the whole time. Put it down, then press Run.
Ports — and the rule 4 min
Sensors go in ports 1, 2, 3, 4. Motors go in ports A, B, C, D. You cannot swap them. If you do, nothing warns you. The robot just will not work.
Part
Port
Why this one
Lure stalk (Medium)
A
This lesson is about this motor. Every sweep you write drives A.
Jaw (Large)
B
The second motor. It does the heavy work.
Gyro Sensor
2
The Gyro always goes on 2 in this course. So a program works on other models without moving cables.
Check your own build now:
Lure in A, jaw in B, Gyro in 2.
Swing the lure stalk all the way by hand. It must never hit the jaw. If it does, the sweep will get stuck. Then every speed will look the same.
Open and shut the jaw by hand. It should fall shut by its own weight.
Put the fish down on the table and leave it there. Your program will set the Gyro to zero when it starts.
Connect the Brick 4 min
Two routes, and either is fine. USB is the reliable one and the one to fall back on when a room’s Bluetooth is busy; Bluetooth leaves the robot free to move, which some models need.
▶How to connect the BrickUSB and Bluetooth, step by step, with a photograph of every screen. Open it if you have not done this before — or if pairing is not working.Show meHide
USB — the reliable one
Switch the Brick on with the dark grey centre button.
Cable into the Brick’s PC port — the small square socket beside the numbered ports, not one of the numbered ones.
Other end into the computer.
Bluetooth — name it first
Do these in order. Naming the Brick after you go looking for it in the list is how groups end up driving each other’s robots.
Name your Brick. On the Brick: Settings (the spanner) → Brick Name. Type something nobody else will pick, then press the tick. Every Brick is called EV3 until somebody changes it.
Turn Bluetooth on. Settings → Bluetooth. Tick Bluetooth and Visibility. Leave iPhone/iPad/iPod unticked.
Connect from EV3 Classroom. Click the Brick icon at the top of the programming area, find your Brick by name, and click Connect.
Say yes on the Brick. It asks “Connect?” with the computer’s name — choose the tick, then accept the passkey, which is already 1234.
Where to read it. The name sits in the bar across the very top of the screen, on every screen — so you can check which Brick you are holding at any moment without going into a menu. This one is EV3VE. A Brick nobody has renamed says EV3.Step 3, and the reason step 1 exists. Three Bricks in range — read the name before you click Connect. Pairing with the wrong one is not an error: it works perfectly, on somebody else’s robot.
Step 2.Bluetooth switches the radio on; Visibility is what lets the computer find you. With Visibility off your Brick works perfectly and simply never appears in the list.Step 4. Look at the Brick. It asks whether to accept and names the computer. Choose the tick.Then the passkey, already 1234. Press the tick again and you are connected.
The two failures, every class, every time. The Brick has gone to sleep while you were building — press the centre button to wake it. Or you have paired with the group at the next table, which is why the name matters.
The long version, including Port View and how to read the port tiles, is in the Brick & Bluetooth guide.
USB or Bluetooth is fine today. The fish stays on the table for most of the lesson, so a USB cable is no problem. But in the last challenge, you pick it up to tip it. Watch the cable then. It pulls on the model, and the Gyro will feel it.
Confirm the connection 2 min
Check the Brick icon: connected, or not.
Two motor tiles: A and B.
One sensor tile: 2. It shows the Gyro in degrees.
Turn the whole fish slowly, a quarter of the way round. Watch tile 2. It should go up to about 90 and stay there when you stop. Does it keep changing while the fish sits still? Then the Gyro was moving when the program started. Put it down and start again.
One change at a time. Predict, then run, then look.
Change one sweep (15) to sweep (100). Guess what the lure does. See how you did not open the define stack to do it?
Change the 40 degrees inside the definition to 15. Both sweeps get smaller. One change, and every use of the block changes. That is the other half of the deal.
Add a second input. Edit the block again and add times. Drag it into the repeat slot. Now you can use sweep (15) (10) for a long, slow wave.
Try to name the inputs badly on purpose. Rename them a and b. Then read your program. It still runs, but you cannot tell what it means. Names really matter.
Tip the fish while it sweeps and watch line 3. The Gyro reads the world, whatever the lure is doing. That is because the two are not joined up yet. Challenge 3 joins them.
Change the number in one block to change one use. Change the define stack to change every use. The skill is knowing which one you want.
Where this goes 3 min
Today every run of your program was fine, whatever happened. The fish just waved its lure.
The next model is a sweet machine. You put in a coin, and it gives you a sweet. But what if it runs out of sweets? Then it must not keep your coin.
Two things must both happen, or neither. That is called a transaction. It is the next lesson.
Today a block learned to take a number. Next, a machine learns to be fair.
Build it 15 min
Build the model before you read any further. Everything after this is about making it do something, and none of it will make much sense with nothing on the table in front of you.
Fullscreen it while you build — you can pause and scrub with the player's own controls.
Check the finished build against the picture before you switch anything on. A motor mounted the wrong way round is far easier to spot now than it is to debug later, when it looks like a program fault.
This is what you are building: the EV3 Anglerfish.
Make it move 10 min
Make a My Block called sweep. Get one sweep working. Then give the block its slot.
Step 1 — one sweep, no input
define sweep
repeat (4)
  [A v] run [clockwise v] for (40) [degrees v] at (25) % speed :: motors
  [A v] run [counterclockwise v] for (40) [degrees v] at (25) % speed :: motors
end
Four out-and-back waves of the lure. Make this smooth before you add anything.
Step 2 — give it a slot
Right-click your sweep block and choose Edit.
Add an input — number. Call it speed.
Drag speed out of the define hat. Drop it into both motor blocks, in place of the 25.
Step 3 — the whole fish
define sweep (speed)
repeat (4)
  [A v] run [clockwise v] for (40) [degrees v] at (speed) % speed :: motors
  [A v] run [counterclockwise v] for (40) [degrees v] at (speed) % speed :: motors
end

when program starts :: events hat
[2 v] reset gyro sensor :: sensors
clear display :: display
forever
  write [WAITING] at line (1) :: display
  sweep (15) :: custom
  wait (2) seconds :: control
  sweep (55) :: custom
  write ([2 v] angle) at line (3) :: display
end
A slow sweep, a pause, then a wild one. The Gyro angle is on line 3, so you can see what the fish can feel.
reset gyro sensor comes first, once. It sets today's zero. If you put it inside the loop, the fish forgets where it started every few seconds.
The two sweeps are the same block. Look at them. Only the number in the slot is different. That is the lesson, right there on the screen.
The pause matters. An anglerfish that never stops moving its lure looks like a machine. Keeping still helps it look real.
What success looks like: the lure drifts slowly four times. It holds still for two seconds. Then it flicks fast four times. The number on line 3 changes when you turn the fish.
Do both sweeps look the same? Then you may have typed 15 and 55 into the define stack. You need to drag the input into the motor blocks instead. Open the define stack. Do the motor blocks hold an orange speed oval, or a number?
Challenges 27 min
Work through them in order — each is harder than the last. The extra challenge comes after all three, and it is meant to make you plan before you build.
Challenge 1
Add a second sweep speed.
Call "sweep" a third time in your program. Give it a number you have not used yet. Make it very slow, like 8.
Watch the lure. A real anglerfish changes how its lure moves. That is because the fish it hunts judge by movement alone.
Challenge 2
Give the block a second input.
Edit "sweep". Add an input called "times". Drag it into the repeat slot.
Now call sweep (15) (10) for a long, lazy wave. Call sweep (60) (2) for a quick twitch. One definition, four different behaviours.
Challenge 3
Make the fish react when it is bumped.
If the Gyro angle changes by more than 20 degrees, the fish must stop sweeping. It snaps its jaw shut. It shows ALARM on the screen for two seconds. Then it goes back to normal.
You will need to check the Gyro between sweeps, not during one. While a sweep is running, it is not looking.
Extra challenge
Build a hunting cycle that changes as the fish gets more impatient.
The fish starts lazy, with slow sweeps and long pauses. After each sweep where nothing comes, it gets in more of a hurry. Its sweeps get faster and its pauses get shorter, up to a limit. If something does come close, it snaps. Then it goes all the way back to lazy.
Plan on paper first. What number keeps track of how impatient it is? Where does it go up? Where does it reset? What stops it going up for ever?
The whole hunting cycle must use ONE sweep block. Are you making sweep-fast and sweep-slow? Then look again at what the input is for.