Challenge 1
Make one preset that is safe to press twice. Press it from flat, then press it again straight away. The second press must do nothing at all. That is the whole test.
Quick Learn — the model, the instructions, the program and the challenges. The theory is in Full Lesson.
EV3 Robotics›Level 3 · Advanced›Lesson 22
Level 3 · Lesson 6 · EV3-L03-0660 minutes · Ages 11+ · Model: Adjustable Bed
The Adjustable Bed is a bed frame with a motor that raises and lowers the head end. It has preset positions you can call up on the Brick’s buttons.
Here is a question that sounds easy. Somebody presses the sitting up button. What should the bed do?
“Raise the head by 400 degrees” is wrong. It is wrong in a way that will not show up in testing until somebody presses the button twice. A preset is not an amount to move. It is a place to end up.
Hospital beds have had adjustable backs for centuries — long before electricity. This one is a wooden bed rest from the 1700s, propped at a chosen angle with padded supports.

Notice what that object does. It does not raise a patient by anything. It has notches, and each notch is a position. Put it in the third notch and the back is at the third-notch angle. It does not matter where it was before.
A modern bed does the same with a motor and a sensor. Press “chair position” and the bed goes to the chair position. From flat it goes a long way. From half-raised it goes a short way. From above it comes back down. The button names a place to go, not a journey.
A bed that raised by a fixed amount each press would climb to its limit after four presses and stay there. A nurse would have no way to say “put it back where it was” except by counting. And the one thing nobody wants to be doing at a hospital bed is counting.
“Move by” depends on where you already are. “Move to” does not — which is why it is safe to press twice.
Two instructions that look similar and behave completely differently.
| Move BY | Move TO | |
|---|---|---|
| What you write | run for (400) degrees | Drive while the count is below 400. |
| From flat (0) | Ends at 400. Correct. | Ends at 400. Correct. |
| From half-raised (200) | Ends at 600. Too far. | Ends at 400. Correct. |
| Pressed twice | Ends at 800. Runs out of bed. | Stays at 400. Nothing happens, which is right. |
There is no go-to-position block at this level. So you build one out of a loop and a condition. You have been using both since Level 2, Lesson 6, the Swing Ride:
[A v] start motor at (25) % speed :: motors
repeat until <([A v] degrees counted) > (400)>
end
[A v] stop motor :: motors
That is a closed loop. The machine acts, measures the result, and keeps acting until the result is right. Every machine that corrects itself works this way. Last lesson’s Rafflesia did the same job more smoothly, by working out the error. You will meet an even more careful version in Level 4.
An empty loop body looks wrong, but it is not. repeat until checks its condition all the time. So a loop with nothing in it just watches. That is exactly what you want while a motor that was already started keeps running.
One problem remains. What if the bed is above the target? Then that loop will not work. The bed is already past 400, so the loop ends straight away and the bed stays where it is. Going to a position properly means choosing a direction first. Choosing between two things is exactly what Level 2, Lesson 8, the Pterosaur, gave you.
Every EV3 motor contains a sensor that counts how far it has actually turned. That means a motor is not only an output — you can ask it where it is, and the answer describes what really happened rather than what you asked for.
| Block | What it does |
|---|---|
([A v] degrees counted :: sensors) | Reports how far this motor has actually turned since the count was last reset, in degrees. |
[A v] reset degrees counted :: motors | Sets the count back to zero, making right here the new reference point. |
([A v] speed :: sensors) | Reports how fast the motor is turning right now, as a percentage. A motor that is being driven but reads zero is a motor that is stuck. |
Those two are not always the same. Here are two identical motors, running the same program, with only their mechanisms different.
the same program, on two identical motors
Nothing on the Brick announces a stall. The only evidence is that the counter stopped changing while the motor was still being told to turn.
Nothing on the Brick announces the jam. The motor is still being driven, the program is still sitting on the same block, and the only trace of the problem anywhere is a counter that has stopped climbing. Comparing what you asked for with what was counted is how a robot notices — which is the whole of stall detection.
When the Brick powers on, the count is simply whatever it happens to be. It is not a position on the machine — it becomes one only when you tie it to something physical.
That is what reset degrees counted is for, and it is not just a tidy-up block for the top of a program. Where you put it decides what zero means, so putting it part-way through — after the mechanism has been driven somewhere known — is the normal way to use it, not an abuse of it.
A conveyor has no idea where it is. Give it a touch sensor at one end and it can find out: drive it until the sensor is pressed, and it is now at a place you can name. Only then reset the count, and that end becomes 0.
when program starts :: events hat
[A v] start motor [counterclockwise v] :: motors
[1 v] wait until [pressed v] :: sensors
[A v] stop motor :: motors
[A v] reset degrees counted :: motors
The order is the whole point. Reset before the sensor is pressed and you have zeroed a random spot; reset after it, and every later reading means “how far from home”. This is called homing, and it is why a printer rattles its head to one side when you switch it on.
Drive towards home gently. The mechanism is deliberately being run into its own end stop, so a slow speed saves the gears — and the touch sensor is what stops it, which means it stops in the same place every time regardless of where it started.
Home is often a corner, and a corner is an awkward place to measure from. Say the conveyor carries a chute that dispenses bricks, and you would rather describe its position as left and right of the middle. Then home once, drive the known distance to the middle, and reset again there:
when program starts :: events hat
[A v] start motor [counterclockwise v] :: motors
[1 v] wait until [pressed v] :: sensors
[A v] stop motor :: motors
[A v] reset degrees counted :: motors
[A v] run [clockwise v] for (900) [degrees v] :: motors
[A v] reset degrees counted :: motors
Now the middle is 0. Moving right counts up, moving left counts down past zero into negative numbers — the count is perfectly happy to go negative — and “go back to the middle” becomes the simplest instruction in the program: drive until the count reaches 0.
Both resets earn their place. The first one turns a meaningless number into a distance from a real, repeatable place. The second one moves zero to where the maths is easiest. A reset in the middle of a program is only a mistake when the mechanism is somewhere you cannot name.
Because the count is in degrees, and a wheel of known size travels a known distance per turn, the reading can be converted into how far the robot has actually driven. That is how a robot reports a distance in centimetres rather than in rotations — and it is why changing the wheels changes the answer.
This is how a printer knows the paper jammed, how a car window stops when it meets your hand, and how a robot arm knows it has reached its limit. A machine that can only give orders is fragile; one that can check what happened can recover.
To reach a target: decide which way, start moving, and watch until you arrive.
Up to now a robot has been able to wait for a sensor. Deciding is different: the robot checks the sensor and does one thing or another depending on the answer — and then carries on either way.
| Block | What it does |
|---|---|
if <> then end | Runs the blocks inside only when the condition is true. Otherwise skips them. |
if <> then else end | Runs one set of blocks when true and a different set when false. |
A decision made once, at the start, is almost never what you want. Here are two robots with the identical if-else, testing the identical sensor against the identical number — one inside a loop and one not.
decision inside a loop
the same decision, once
A decision is only worth as much as the last time it was made. Inside a loop, that is a few milliseconds ago.
Nothing is wrong with the right-hand program’s decision. It asked the question, got a truthful answer, and acted on it correctly. It simply never asked again, and the world moved on. Decisions belong inside a loop, so the robot keeps re-deciding as things change.
when program starts :: events hat
forever
  if <([4 v] distance in [cm v] :: sensors) < (15)> then
    stop moving :: movement
  else
    start moving [straight: 0] :: movement
  end
endOnce there is more than one question, decisions can be arranged in four ways. They look nearly identical stacked up in the editor, which is exactly why they get muddled — the thing that differs is not what the blocks say, it is which routes through them exist.
One question sorts them almost completely:
| Are the questions… | Use | How many bodies can run |
|---|---|---|
| independent — any combination can be true | separate ifs | none, some, or all |
| one question, two answers | if / else | exactly one |
| the second only matters when the first is true | nested if | one, and only via the outer |
| mutually exclusive cases — exactly one should win | chained if / else | exactly one, the first that matches |
Each if is asked no matter what the others answered, so any number of them can fire on the same pass. That is the right shape when the conditions genuinely have nothing to do with each other.
forever
  if <[3 v] is ambient light intensity [< v] (20) %? :: sensors> then
    [A v] start motor [clockwise v] :: motors
  end
  if <[4 v] is distance [< v] (15) [cm v]? :: sensors> then
    [D v] start motor [clockwise v] :: motors
  end
endExactly one branch runs, every time. Reach for this whenever the robot must do something either way — and in preference to two ifs testing opposite conditions, which is the same idea written twice and can drift apart.
Putting one if inside another means the inner question is only ever asked when the outer one is true. Use it when the second question is meaningless otherwise: there is no point asking which side an obstacle is on when there is no obstacle.
if <[4 v] is distance [< v] (15) [cm v]? :: sensors> then
  if <([2 v] angle :: sensors) < (0)> then
    start moving [right: 50] :: movement
  end
end
When not to nest. If you only want “both true” and nothing happens at the outer level, an and says it in one block and reads better:
if <<[4 v] is distance [< v] (15) [cm v]? :: sensors> and <([2 v] angle :: sensors) < (0)>> then
  start moving [right: 50] :: movement
end
Nesting earns its place when something happens at the outer level too, or when there is an else at each level and the two mean different things.
This is the shape for a list of cases where exactly one should win: colour bands, distance bands, speed ranges. EV3 Classroom has no else-if block, so you build a chain by putting the next if inside the else of the last one.
And here is why it matters, because this is the single commonest bug in this whole module. Three bands written as three separate ifs are each perfectly correct, and together they are wrong: a reading of 20 is under 30 and under 60 and under 90, so all three run and the last one to run is the one that sticks.
three separate ifs
chained — if / else / if
↑ the rest is inside the else — never asked
Separate ifs are not wrong here so much as unguarded: nothing stops a second one matching. Chaining is what makes “the first one wins” true.
The rule to carry away: if the cases are meant to be exclusive, they must be made exclusive. Chaining does it by construction. Separate ifs only work if you are careful to write non-overlapping bands yourself — light < 30, 30 to 60, 60 and over — which is more to get right and easy to break later.
This is the point at which a machine stops following a script and starts responding. A thermostat, an automatic door, a robot vacuum — all of them are a decision inside a loop.
Say this back before moving on: “Move to means it does not matter where I start.”
| Part | What it is doing here |
|---|---|
| EV3 Intelligent Brick | Holds the presets and its buttons are the control panel. No extra sensor is needed for the buttons. |
| Large Motor — the backrest | Raises and lowers the head end. Its encoder, the rotation counter inside the motor, is the bed’s only sense of where it is. So never move it by hand while the program is running. |
| The lifting mechanism (not electronic) | A screw, a lever or a rack. It must hold the backrest up without the motor fighting it. That is a build problem before it is a programming one. |
| The Brick screen | Names the position the bed is in, so a user knows which preset they are looking at. |
The 400 on this page is a placeholder. Your bed’s numbers come from your bed.
Sensors go in ports 1, 2, 3, 4. Motors go in ports A, B, C, D. You cannot swap them. If you do, nothing warns you. The robot just will not work.
| Part | Port | Why this one |
|---|---|---|
| Backrest motor (Large) | A | One job motor — and the port appears inside every condition as well as every movement. |
| Sensors | none | The Brick’s own buttons are the controls, and the position comes from the motor. |
Check your own build now:
Two routes, and either is fine. USB is the reliable one and the one to fall back on when a room’s Bluetooth is busy; Bluetooth leaves the robot free to move, which some models need.
Do these in order. Naming the Brick after you go looking for it in the list is how groups end up driving each other’s robots.
EV3 until somebody changes it.EV3.The two failures, every class, every time. The Brick has gone to sleep while you were building — press the centre button to wake it. Or you have paired with the group at the next table, which is why the name matters.
The long version, including Port View and how to read the port tiles, is in the Brick & Bluetooth guide.
Bluetooth suits this one. The Brick’s own buttons are your control panel. So the Brick needs to be in front of you, not wherever the cable reaches.
Start every test from a different position on purpose. A go-to that only works from flat has not been tested.
[A v] run for (400) [degrees v] at (25) % speed. Press UP three times. Watch the bed climb past its limit and strain. Then put the loop version back.Step 1 is the whole lesson in three button presses. The version that moves “by” an amount works perfectly the first time and breaks itself on the third. That kind of bug passes a demo and fails in a hospital ward.
Test a “go to” by pressing it twice. If the second press does something, it is a “go by” wearing a disguise.
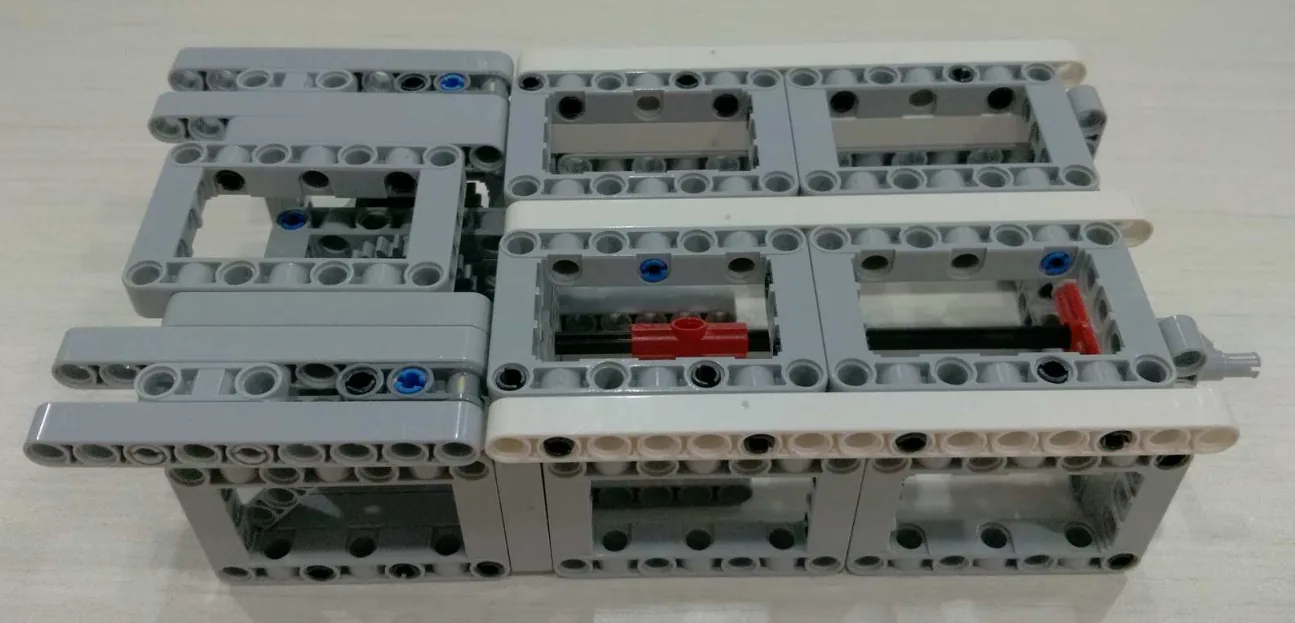
Build the model before you read any further. Everything after this is about making it do something, and none of it will make much sense with nothing on the table in front of you.
One page at a time — use Next and Previous, or the ← → keys. Fullscreen makes it big enough to build from.
Check the finished build against the picture before you switch anything on. A motor mounted the wrong way round is far easier to spot now than it is to debug later, when it looks like a program fault.
Two presets on two buttons, each of which goes to its position from wherever the bed happens to be.
when program starts :: events hat
[A v] set motor to [hold position v] at stop :: motors
[A v] reset degrees counted :: motors
clear display :: display
write [FLAT   ] at line (1) :: display

when [up v] button [pressed v] :: events hat
write [SITTING] at line (1) :: display
if <([A v] degrees counted) < (400)> then
  [A v] start motor at (25) % speed :: motors
  repeat until <([A v] degrees counted) > (400)>
  end
else
  [A v] start motor at (-25) % speed :: motors
  repeat until <([A v] degrees counted) < (400)>
  end
end
[A v] stop motor :: motors

when [down v] button [pressed v] :: events hat
write [FLAT   ] at line (1) :: display
[A v] start motor at (-25) % speed :: motors
repeat until <([A v] degrees counted) < (20)>
end
[A v] stop motor :: motors
What success looks like: from flat, press UP and the bed rises to the sitting position and holds. Press UP again and it stays put, apart from a tiny nudge back to the mark. That is the test. Press DOWN and it returns to flat. Then wind the bed halfway by hand, press UP, and watch it come to the same place as before.
If it overshoots a lot, the speed is too high for how often the loop can check. Drop to 15% and it will stop closer to the mark. A slower machine has more chances to notice it has arrived.
Work through them in order — each is harder than the last. The extra challenge comes after all three, and it is meant to make you plan before you build.
Make one preset that is safe to press twice. Press it from flat, then press it again straight away. The second press must do nothing at all. That is the whole test.
Add a third preset in the middle. Make every preset reachable from every other one. The tricky case is going DOWN to a preset. So start from the highest position and press the middle button.
Stop it going too far. Measure how far past the target the bed stops at 60% speed, then at 15%. Write down both. Then choose a speed and say what you gave up to get it so exact.
Build a bed a nurse could use in the dark. The person using an adjustable bed is not looking at it. They are looking at the patient. Your job is to make controls that work without being watched. Plan the panel on paper first. Decide which button does what and what the screen shows. Decide what the bed does that a person can hear or feel, not see. Decide what happens if somebody presses two buttons quickly, one after the other, because they will. Then test it properly. Have somebody use it while facing away from the model. They may only use the sounds and what you tell them. Do not help. Answer two questions when you show it. What did your tester get wrong without being able to see? What would you add to fix it? Your bed trusts its own counter completely. What would happen if somebody pushed the backrest by hand while the machine was off? What would you add so it could notice?