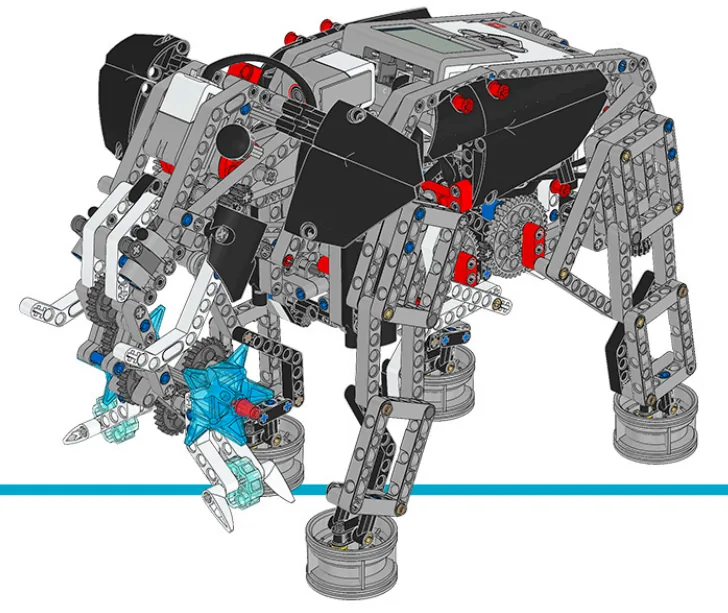
The Elephant: a head that lifts, a trunk that curls, and a twist at the base of the trunk — three motors that between them have to reach for something and pick it up.
Run those three one after another and you get a machine doing three separate things. Run them at the same speed and they finish at different times, which looks worse.
By the end of the lesson all three joints will start together and arrive together — and the difference between that and the obvious version is the difference between a robot and an animal.
In the real world 5 min
Where you have seen it
An elephant’s trunk has no bones and something like forty thousand muscle units. When it reaches for a branch, every part of it moves at once — the base swings, the middle curls and the tip opens, and they all finish at the moment the branch is reached.
Your own arm does the same. Reach for a cup and your shoulder, elbow, wrist and fingers all move throughout — the hand is already opening to the right width before it gets there. Nobody moves their shoulder, stops, then their elbow.
Why it is built that way
Partly speed: joints moving at once finish sooner than joints moving in turn. Mostly smoothness. A movement that starts and stops three times shakes the whole structure, and on a big machine that shaking is what wears it out.
Industrial robots have a name for it. In joint mode every axis runs at its own speed and they arrive whenever they arrive. In coordinated mode the controller works out which axis has furthest to go, and slows all the others so that everything lands together.
What would go wrong without it
The trunk arrives before the head has finished lifting, so it grabs at empty air. The gripper closes before it is over the object. Each joint is individually correct and the movement as a whole fails.
Finishing together is not a luxury. Joints that arrive at different times are doing different movements.
The main concept — one movement, three motors 6 min
A coordinated move is worked out backwards. Find the joint with furthest to go. Let it set the time. Then give every other joint exactly the speed it needs to cover its own distance in that same time.
Joint
Has to travel
Speed if all equal
Speed to arrive together
Head
300°
50%
50% — the longest move, so it sets the pace
Trunk curl
150°
50% — finishes halfway through
25% — half the distance, half the speed
Trunk twist
60°
50% — finishes almost at once
10%
// the longest move sets the pace; everything else is scaled to it
set [longest v] to (head to go) :: variables
if <(curl to go) > (longest)> then
  set [longest v] to (curl to go) :: variables
end
if <(twist to go) > (longest)> then
  set [longest v] to (twist to go) :: variables
end

set [head speed v] to (((head to go) / (longest)) * (top speed)) :: variables
set [curl speed v] to (((curl to go) / (longest)) * (top speed)) :: variables
set [twist speed v] to (((twist to go) / (longest)) * (top speed)) :: variables
Three divisions and three multiplications. That is the entire idea, and it works for any number of joints.
Start the motors without waiting for them. Use blocks that begin a movement and move on — a block that waits for the head to finish before touching the trunk gives you the sequential version no matter what speeds you calculated.
Very small moves need a floor
Scale a tiny move against a long one and you can ask for two percent, which an EV3 motor will not turn at. It stalls, buzzes and arrives late.
Clamp every speed to a minimum the motor can actually deliver — and accept that a joint at the floor will finish early. Knowing the limit and choosing what to do at it is engineering; discovering it as a mysterious buzz is not.
Ease in and out
Real limbs do not start at full speed. Ramping each motor up over the first fifth of its travel and down over the last fifth — Lesson 18’s idea — turns a correct movement into a convincing one, and it costs three blocks.
Unknown module “motor-rotation”. It is not in the registry — check the id against app/lego_ev3/_modules/registry.ts.
ComponentData6 min
Variables
Why anybody needs one
Long before there were computers, people had exactly this problem. A shepherd counting sheep through a gate, a trader counting sacks of grain, a builder counting days — none of them can hold the number in their head while they get on with the work. So they scratched a mark on a wall, cut a notch in a stick, or wrote a number on a piece of paper. The number lived outside the person, in a place they had agreed on, and they could go back to it, read it, and change it.
Better still, once the number is written down somebody else can use it. Watch these two: one of them counts and writes, the other never sees a single animal and simply reads the wall.
Abby never remembers the numberBen never sees a henThe wall holds it for both
Abby has a gate and a wall. Before a single hen comes through she chalks 0 on the wall — that is where the number is going to live.A hen goes through. Abby rubs out the 0 and chalks 1. Another goes through, and she does it again.Three hens have been through, and the wall says 3. Abby is not remembering the number — she is reading her own wall each time and writing the next one.Ben has been at the market all morning. He has not seen one hen. He walks up, reads the wall, and knows the answer — without asking Abby anything.That is a variable. Not a number in somebody's head, but a place both of them agreed on: one writes to it, the other reads from it, and it keeps the number in between.Finished. Abby wrote, Ben read, and the wall is what joined them up.
the wall holds it
Notice what never happens: Ben never asks Abby. He does not need to — the number is not in her head, it is on the wall, and the wall is there for anyone who needs it.
Neither Abby nor Ben is holding the number — the wall is. And notice what never happens: Ben does not ask Abby. He does not need to, because the count is not in her head. It is in a place they both agreed on, which is what makes it useful to more than one of them.
That is all a variable is. The robot cannot hold a number in its head either, so you give it a wall of its own, write a name at the top so everyone knows which wall is which — score, count, degree_turn — and the program can read what is on it and write something new. One part of the program writes; another part reads. Exactly Abby and Ben.
The paper, and the two things you can do to it
Say we are counting rotations of a motor. Before we start we write 0 on the paper. Every time the motor completes a turn we cross out what is there and write one more: 0 becomes 1, then 2, then 3. That is change — it has to read the old number to work out the new one.
set is the other thing you can do, and it is completely different: rub the whole paper out and write the number you want. It does not care what was there. Press the buttons and watch what happens to the crossings-out.
score
0
The paper starts blank, so we write 0 on it. That is what a variable is: a place to keep a number while the robot works.
change leaves a trail — every value follows from the one before it. This is what counting is.
set wipes the sheet. Use it to start a count, never to continue one.
Press set score to 0 after counting up a few times and watch the whole history vanish. That is what happens to a count when a set block ends up in the wrong place — and it is the commonest variable bug there is.
Blocks reference
Block
What it does
set [count v] to (0)
Puts a value in, replacing whatever was there.
change [count v] by (1)
Adds to what is already there.
(count)
Reports the current value, for use in a comparison or on the display.
Set, or change?
set replaces; change adds. Counting things needs change. Starting a count needs set. Both programs below have both blocks — the only difference is whether the set block is inside the loop or above it.
set before the loop
when program starts
set count to 0
repeat 4
A run clockwise for 1rotations
change count by 1
set inside it
repeat 4
set count to 0
A run clockwise for 1rotations
change count by 1
Before the loop: counted 0Inside the loop: stuck at 0
Both programs count the turns of a motor. The left sets the count to zero before the loop; the right sets it inside.Turn 1. Both counters read 1, and so far the two programs agree.Turn 2. The left count is 2. The right was set back to zero at the top of the loop, so it is 1 again.Turn 3. The left reads 3. The right still reads 1.Turn 4. The motor turned four times on both robots — only one of them counted them.Finished. Four turns, and one of the two counts is fiction.
stopped
Both programs contain both blocks. Only the position of set [count] to 0 is different.
The count on the right is not broken; it is being told to start again on every pass. Each time round the loop it is wiped back to zero and then changed by one, so the honest answer is always 1 — while the motor cheerfully turns four times. A counter stuck at 1 almost always means a set block that has slipped inside the loop.
Anything oval is a number you can pick up
EV3 Classroom tells you what a block does by its shape, and once you have noticed that, a whole set of questions answers itself:
Oval — reports a number. The blue degrees counted, the timer, a distance, your own variable.
Pointed — reports true or false. These go in an if or a wait until, not in a variable.
Block-shaped — does something. These stack up; they do not fit inside anything.
So when a slot is oval, any oval fits it — and it does not matter in the least where that number came from. You can take the motor’s own A degrees counted and keep it in a variable you named degree_turn, then compare that with a number later. Pick an oval below and watch the same one drop into all three kinds of slot.
pick an oval
the same oval fits all three
set degree_turn to A degrees countedkeep it in a variable of your own
A degrees counted+10do arithmetic with it
A degrees counted>50compare it with a number
Every one of those slots is oval-shaped, and A degrees counted is an oval — so it drops in. Nothing about where the number came from matters.
This is what makes a variable more than a counter. A sensor reading is true only at the instant you read it; copying it into a variable freezes it, so the robot can compare where it is now against where it was when something happened:
when program starts :: events hat
[A v] reset degrees counted :: motors
set [degree_turn v] to ([A v] degrees counted :: sensors)
start moving [right: 30] :: movement
wait until <(([A v] degrees counted :: sensors) - (degree_turn)) > (400)>
stop moving :: movement
Read the condition aloud: how far the motor has gone now, minus where it was when we started, is more than 400. Both are ovals, so both can go into a subtraction, and the subtraction is an oval too — which is why it can go into a comparison. Ovals nest inside ovals as deep as you need.
Reset at the start, every time
A variable keeps its value after the program ends. Run the program again without setting it back and the second run begins where the first left off — the count starts at 14, the robot thinks it has already done the job. Every variable a program changes must be set to its starting value at the top.
Why it matters
A variable is the difference between a machine that repeats a fixed routine and one that responds to how things have gone — counting parts, tracking a score, remembering where it started.
Unknown module “my-block”. It is not in the registry — check the id against app/lego_ev3/_modules/registry.ts.
Longest move sets the time. Every other speed is scaled to it.
▶My BlocksFrom Lesson 1 — one 'reach to' routine taking three target angles, so a whole movement is a single block with three numbers.Show meHide
Unknown module “my-block”. It is not in the registry — check the id against app/lego_ev3/_modules/registry.ts.
Say this back before moving on: “Which joint has furthest to go, and how fast must the others be to keep up?”
What’s in this build 4 min
Move each joint by hand from one end of its travel to the other and count the motor degrees on the Brick. Write all three down. Every calculation in this lesson divides by those numbers.
Part
What it is doing here
EV3 Intelligent Brick
The coordinator. Its only real job today is arithmetic — three divisions that turn three separate movements into one.
Large Motor — the head
The heaviest joint with the longest travel, so it will almost always be the one setting the pace.
Medium Motor — the trunk curl
The middle of the movement. Watch it: this is the joint that most obviously finishes early in the naive version.
Medium Motor — the trunk twist
The shortest travel, and therefore the one that gets scaled down hardest — and the one that will hit the speed floor first.
Touch Sensor — the trunk tip
Reports contact. It is how the elephant knows it actually reached the object rather than merely completing the movement.
Find each joint’s limits before you drive it. A coordinated move sends three motors at once, so a joint asked to go past its stop will fight the structure while the other two carry on — and by the time you notice, something has been strained.
Ports — and the rule 4 min
Sensors go in ports 1, 2, 3, 4. Motors go in ports A, B, C, D. They are not interchangeable, and nothing will tell you politely if you swap them.
Part
Port
Why this one
Trunk curl (Medium)
A
The precise joint on the front port.
Head (Large)
B
The strong one — it lifts the most weight.
Trunk twist (Medium)
D
The small joint, out of the way.
Trunk tip (Touch)
1
Touch stays on 1 across the course.
Check your own build now:
Curl in A, head in B, twist in D, tip in 1.
Set all three joints to a rest position and reset all three degree counts to zero. Every angle in this lesson is measured from there.
Write the travel range of each joint on a sticky note and put it on the model. You will refer to it constantly.
Put a light object — a small ball, a wooden block — where the trunk can reach it.
Connect the Brick 4 min
Two routes, and either is fine. USB is the reliable one and the one to fall back on when a room’s Bluetooth is busy; Bluetooth leaves the robot free to move, which some models need.
▶How to connect the BrickUSB and Bluetooth, step by step, with a photograph of every screen. Open it if you have not done this before — or if pairing is not working.Show meHide
USB — the reliable one
Switch the Brick on with the dark grey centre button.
Cable into the Brick’s PC port — the small square socket beside the numbered ports, not one of the numbered ones.
Other end into the computer.
Bluetooth — name it first
Do these in order. Naming the Brick after you go looking for it in the list is how groups end up driving each other’s robots.
Name your Brick. On the Brick: Settings (the spanner) → Brick Name. Type something nobody else will pick, then press the tick. Every Brick is called EV3 until somebody changes it.
Turn Bluetooth on. Settings → Bluetooth. Tick Bluetooth and Visibility. Leave iPhone/iPad/iPod unticked.
Connect from EV3 Classroom. Click the Brick icon at the top of the programming area, find your Brick by name, and click Connect.
Say yes on the Brick. It asks “Connect?” with the computer’s name — choose the tick, then accept the passkey, which is already 1234.
Where to read it. The name sits in the bar across the very top of the screen, on every screen — so you can check which Brick you are holding at any moment without going into a menu. This one is EV3VE. A Brick nobody has renamed says EV3.Step 3, and the reason step 1 exists. Three Bricks in range — read the name before you click Connect. Pairing with the wrong one is not an error: it works perfectly, on somebody else’s robot.
Step 2.Bluetooth switches the radio on; Visibility is what lets the computer find you. With Visibility off your Brick works perfectly and simply never appears in the list.Step 4. Look at the Brick. It asks whether to accept and names the computer. Choose the tick.Then the passkey, already 1234. Press the tick again and you are connected.
The two failures, every class, every time. The Brick has gone to sleep while you were building — press the centre button to wake it. Or you have paired with the group at the next table, which is why the name matters.
The long version, including Port View and how to read the port tiles, is in the Brick & Bluetooth guide.
Three motors moving at once draw a lot of current. A weak battery makes them all slower, but not by the same fraction, so a coordinated move quietly stops being coordinated. Check the battery before you judge the timing.
Confirm the connection 2 min
Check the Brick icon: connected, or not.
Three motor tiles — A, B and D.
One sensor tile — 1.
Run each motor alone at 20% for two seconds and see whether it actually turns. Then try 10%, then 5%. The lowest percentage that still moves the joint is your speed floor, and it is different for each joint.
Stuck? The long version, with a photograph of every screen, is in the Brick & Bluetooth guide.
Change it and test 8 min
One change at a time. Predict, then run, then look. Film step 1 and step 3 on a phone and play them side by side — the argument is visual.
Change one target angle — make the curl 250° instead of 150. The speeds should all change by themselves. If you had to edit a speed, it was not coordinated.
Make the twist the longest move and everything else short. Now the twist sets the pace and the big head motor crawls. Same arithmetic, different answer.
Remove the floor and give one joint a two-degree move. Listen for the buzz of a motor asked to turn at 1%.
Add ramps: run the first fifth of the movement at half speed and the last fifth at half speed. Compare the two films again.
Wrap it in a My Block called REACH TO taking three angles, then write a four-gesture routine with four calls. The arithmetic is now written once and the elephant has a vocabulary.
Sequential joints look like a machine. Co-terminating joints look like an animal. Same hardware.
Where this goes 3 min
The Elephant repeats a gesture and assumes each one worked. On a table that is fine.
The next model climbs stairs, and there an assumption is fatal. Each step must be checked before the next begins — the machine has to know it is actually up before it tries again.
A loop that repeats blindly and a loop that verifies each repetition are the same four blocks apart — and only one of them survives a step that is slightly too tall.
Today the machine moved as one thing. Next it has to check that the move worked before doing it again.
This is what you are building: the Elephant.
Build it 15 min
Build the model before you read any further. Everything after this is about making it do something, and none of it will make much sense with nothing on the table in front of you.
Use the viewer's own controls to zoom and turn pages. Fullscreen makes it big enough to build from.
Check the finished build against the picture before you switch anything on. A motor mounted the wrong way round is far easier to spot now than it is to debug later, when it looks like a program fault.
Make it move 10 min
Three versions of one reach. Watch all three — the difference is visible.
Step 1 — one joint at a time
when program starts :: events hat
[B v] run to position (300) [degrees v] at (50) % speed :: motors
[A v] run to position (150) [degrees v] at (50) % speed :: motors
[D v] run to position (60) [degrees v] at (50) % speed :: motors
Correct, slow, and unmistakably a machine. Three separate movements with a pause between each.
Step 2 — together, but not coordinated
when program starts :: events hat
[B v] start motor [clockwise v] at (50) % speed :: motors
[A v] start motor [clockwise v] at (50) % speed :: motors
[D v] start motor [clockwise v] at (50) % speed :: motors
wait until <([B v] degrees counted) > (300)>
[B v] stop motor :: motors
[A v] stop motor :: motors
[D v] stop motor :: motors
All three start together at the same speed. The twist finishes almost immediately and then sits there — the movement dies in pieces.
Step 3 — arriving together
when program starts :: events hat
set [top speed v] to (60) :: variables
set [floor v] to (12) :: variables
[A v] reset degrees counted :: motors
[B v] reset degrees counted :: motors
[D v] reset degrees counted :: motors

// ---- where we want each joint to end up ----
set [head to v] to (300) :: variables
set [curl to v] to (150) :: variables
set [twist to v] to (60) :: variables

// ---- how far each has to travel from where it is now ----
set [head go v] to ([abs v] of ((head to) - ([B v] degrees counted))) :: variables
set [curl go v] to ([abs v] of ((curl to) - ([A v] degrees counted))) :: variables
set [twist go v] to ([abs v] of ((twist to) - ([D v] degrees counted))) :: variables

// ---- the longest one sets the pace ----
set [longest v] to (head go) :: variables
if <(curl go) > (longest)> then
  set [longest v] to (curl go) :: variables
end
if <(twist go) > (longest)> then
  set [longest v] to (twist go) :: variables
end

// ---- scale, with a floor so nothing is asked to crawl ----
set [head sp v] to (((head go) / (longest)) * (top speed)) :: variables
set [curl sp v] to (((curl go) / (longest)) * (top speed)) :: variables
set [twist sp v] to (((twist go) / (longest)) * (top speed)) :: variables
if <(head sp) < (floor)> then
  set [head sp v] to (floor) :: variables
end
if <(curl sp) < (floor)> then
  set [curl sp v] to (floor) :: variables
end
if <(twist sp) < (floor)> then
  set [twist sp v] to (floor) :: variables
end

// ---- all three away at once, nothing waiting for anything ----
[B v] start motor to position (head to) [degrees v] at (head sp) % speed :: motors
[A v] start motor to position (curl to) [degrees v] at (curl sp) % speed :: motors
[D v] start motor to position (twist to) [degrees v] at (twist sp) % speed :: motors

// ---- and stop early if the trunk actually touches something ----
wait until <<[1 v] is pressed? :: sensors> or <([B v] degrees counted) > ((head to) - (5))>>
[A v] stop motor :: motors
[B v] stop motor :: motors
[D v] stop motor :: motors
play sound [Communication / Okay v] :: sound
Distance, then the longest, then three scaled speeds, then three starts that do not wait. The touch check means contact ends the reach early — an elephant stops when it has the branch.
Distance is measured from where the joint is now, not from zero. Coordinate a second move from a half-finished position and the difference matters.
Nothing in the launch waits. Three start-motor blocks in a row, then one wait for all of them.
The floor is per-joint in principle, and one number here for simplicity. If a joint buzzes, its floor is higher than 12.
Touch beats the plan. Reaching the object matters more than reaching the angle.
What success looks like: the head, curl and twist all stop within a moment of each other, and the whole reach reads as one gesture rather than three.
If one joint still finishes early, it hit the speed floor — say which one and what its floor actually is, from step 8.
Challenges 27 min
Work through them in order — each is harder than the last. The extra challenge comes after all three, and it is meant to make you plan before you build.
Challenge 1
Measure the three travels.
Move each joint by hand from one end of its range to the other and read the motor degrees. Write all three down.
Then work out on paper what the three speeds should be for a reach to the middle of each range. Do the arithmetic before you run anything.
Challenge 2
Find each joint's speed floor.
Run each motor alone at 20 percent, then 10, then 5, and note the lowest percentage that still moves the joint.
Report all three. Then say which joint in your coordinated reach hits its floor first, and what that means for arriving together.
Challenge 3
Change one target and prove nothing else needed editing.
Make the curl travel much further than before. All three speeds should change by themselves.
If you had to edit a speed by hand, the movement was not coordinated — it was three numbers that happened to work.
Extra challenge
Give the elephant a vocabulary.
Build a REACH TO My Block that takes three target angles, and use it to perform a sequence of at least five gestures — reach, lift, offer, greet, rest — that reads as one animal rather than five programs.
Requirements:
1. The scaling arithmetic written once, inside the My Block, and nowhere else.
2. Distance measured from where each joint IS, so a gesture starting half-way still coordinates.
3. A speed floor, with the joints that hit it identified.
4. Ramping in and out, so nothing starts or stops abruptly.
5. The touch sensor ending a reach early when the trunk actually makes contact.
Then film the sequential version and the coordinated version and play them side by side to somebody who has not seen either.
Write down which one they said looked alive, and what they pointed at. The hardware is identical in both films — the only difference is three divisions, and that is the whole claim of this lesson.