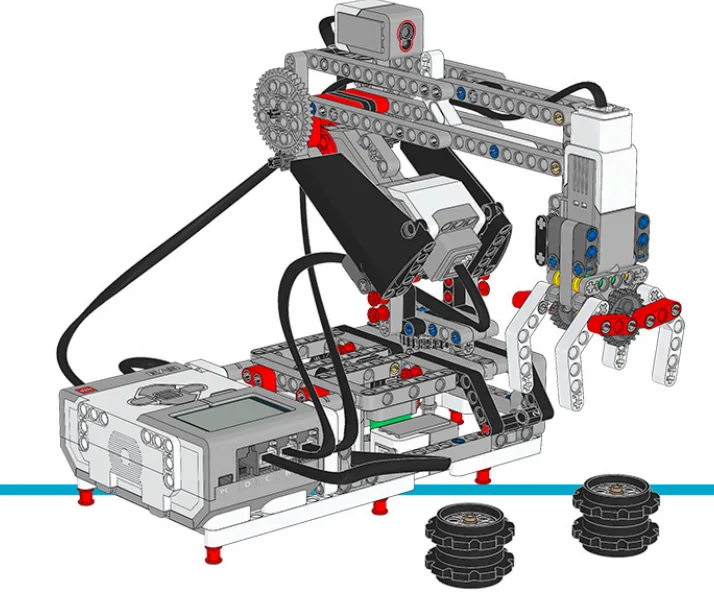
The Robot Arm H25: a shoulder, an elbow and a gripper — a machine that has to pick up objects whose size it was never told.
There is no sensor in the gripper. Close it to a fixed angle and it either crushes a small object or misses a large one, and it has no way of knowing which it just did.
By the end of the lesson your arm will know it has hold of something by noticing that the gripper stopped closing while it was still being told to close — and it will then ease off instead of squeezing harder.
In the real world 5 min
Where you have seen it
Pick up an egg with your eyes shut. You close your fingers until they stop moving, and that is how you know the egg is there — not by measuring it, but by noticing you have met resistance.
Steve Robinson on Canadarm2 during STS-114. Photo: NASA / Wikimedia Commons (public domain).
Machines do the same thing everywhere. A car window stops and reverses if something is in the way. A washing machine detects a jammed drum. A cobot on a factory line stops the instant a person leans into it — no camera, just a motor working harder than expected.
Why it is built that way
Because the alternative is measuring everything in advance, and the world will not hold still for that. Objects vary, they slip, they are put down at slightly the wrong angle. Sensing by effort works on things nobody measured.
It is also nearly free. The motor is already there and already reports its position, so the sensing costs no extra hardware — which is exactly why safety systems use it: fewer parts, fewer things to fail.
What would go wrong without it
Two failures, both bad. Close to a fixed angle and small objects are crushed. Stop short and large ones are dropped. And a motor left pushing against something it cannot move gets hot — it does not fail immediately, it fails ten minutes later, somewhere else.
Told to move and not moving means something is in the way. The motor is the sensor.
The main concept — the stall 6 min
A stall is two facts at the same moment: power is being applied and the position is not changing. Either alone is normal. Together they mean contact.
// remember where it was, wait a moment, and see whether it moved
set [before v] to ([A v] degrees counted) :: variables
wait (0.1) seconds :: control
set [moved v] to ([abs v] of (([A v] degrees counted) - (before))) :: variables
if <(moved) < (3)> then
  set [gripping v] to (1) :: variables
end
Four blocks. Everything else in this lesson is choosing the two numbers in it — the interval and the movement threshold.
Number
Too small
Too large
The interval
Not enough movement in the window to distinguish moving from stopped. False stalls.
Slow to notice; the gripper squeezes for longer before easing off.
The threshold
Normal wobble looks like a stall. It grips at nothing.
A slow crawl against an object counts as movement. It never notices.
Both numbers come from measurement. Run the gripper freely and record how many degrees it covers in 0.1 s; that is the movement to expect. Your threshold goes well below it, above the wobble of a stopped motor.
The first moment is always a false stall
A motor commanded from rest has not moved yet. Check for a stall immediately and every grip reports success before the gripper has begun to close.
Ignore the first fraction of a second, measured — not a number picked because it felt about right. This is Lesson 40’s lag arriving in a different costume: a machine that does not allow for its own start-up will misread it as an event.
Detecting is half the job
// WRONG - holds full power against the object
[A v] start motor [clockwise v] at (75) % speed :: motors
wait until <(stalled) = (1)>

// RIGHT - detect, then ease back to a gentle hold
[A v] start motor [clockwise v] at (75) % speed :: motors
wait until <(stalled) = (1)>
[A v] start motor [clockwise v] at (20) % speed :: motors
A grip is not “push until it stops and keep pushing”. It is push, notice, then hold gently.
The eased-back power still holds the object — the gripper is geared, so a little power resists a lot of force — and it stops the motor cooking. On a real machine this is the difference between a gripper that works all day and one that fails after an hour.
What the stall position tells you
The angle at which it stopped is the object’s width. Record it and the arm knows what it is holding — a wide reading is a big object, and a gripper that closed all the way grabbed nothing at all. A grip that reaches its fully-closed angle is a failed grip, and the arm should say so rather than carrying air across the table.
Unknown module “motor-rotation”. It is not in the registry — check the id against app/lego_ev3/_modules/registry.ts.
ComponentData6 min
Variables
Why anybody needs one
Long before there were computers, people had exactly this problem. A shepherd counting sheep through a gate, a trader counting sacks of grain, a builder counting days — none of them can hold the number in their head while they get on with the work. So they scratched a mark on a wall, cut a notch in a stick, or wrote a number on a piece of paper. The number lived outside the person, in a place they had agreed on, and they could go back to it, read it, and change it.
Better still, once the number is written down somebody else can use it. Watch these two: one of them counts and writes, the other never sees a single animal and simply reads the wall.
Abby never remembers the numberBen never sees a henThe wall holds it for both
Abby has a gate and a wall. Before a single hen comes through she chalks 0 on the wall — that is where the number is going to live.A hen goes through. Abby rubs out the 0 and chalks 1. Another goes through, and she does it again.Three hens have been through, and the wall says 3. Abby is not remembering the number — she is reading her own wall each time and writing the next one.Ben has been at the market all morning. He has not seen one hen. He walks up, reads the wall, and knows the answer — without asking Abby anything.That is a variable. Not a number in somebody's head, but a place both of them agreed on: one writes to it, the other reads from it, and it keeps the number in between.Finished. Abby wrote, Ben read, and the wall is what joined them up.
the wall holds it
Notice what never happens: Ben never asks Abby. He does not need to — the number is not in her head, it is on the wall, and the wall is there for anyone who needs it.
Neither Abby nor Ben is holding the number — the wall is. And notice what never happens: Ben does not ask Abby. He does not need to, because the count is not in her head. It is in a place they both agreed on, which is what makes it useful to more than one of them.
That is all a variable is. The robot cannot hold a number in its head either, so you give it a wall of its own, write a name at the top so everyone knows which wall is which — score, count, degree_turn — and the program can read what is on it and write something new. One part of the program writes; another part reads. Exactly Abby and Ben.
The paper, and the two things you can do to it
Say we are counting rotations of a motor. Before we start we write 0 on the paper. Every time the motor completes a turn we cross out what is there and write one more: 0 becomes 1, then 2, then 3. That is change — it has to read the old number to work out the new one.
set is the other thing you can do, and it is completely different: rub the whole paper out and write the number you want. It does not care what was there. Press the buttons and watch what happens to the crossings-out.
score
0
The paper starts blank, so we write 0 on it. That is what a variable is: a place to keep a number while the robot works.
change leaves a trail — every value follows from the one before it. This is what counting is.
set wipes the sheet. Use it to start a count, never to continue one.
Press set score to 0 after counting up a few times and watch the whole history vanish. That is what happens to a count when a set block ends up in the wrong place — and it is the commonest variable bug there is.
Blocks reference
Block
What it does
set [count v] to (0)
Puts a value in, replacing whatever was there.
change [count v] by (1)
Adds to what is already there.
(count)
Reports the current value, for use in a comparison or on the display.
Set, or change?
set replaces; change adds. Counting things needs change. Starting a count needs set. Both programs below have both blocks — the only difference is whether the set block is inside the loop or above it.
set before the loop
when program starts
set count to 0
repeat 4
A run clockwise for 1rotations
change count by 1
set inside it
repeat 4
set count to 0
A run clockwise for 1rotations
change count by 1
Before the loop: counted 0Inside the loop: stuck at 0
Both programs count the turns of a motor. The left sets the count to zero before the loop; the right sets it inside.Turn 1. Both counters read 1, and so far the two programs agree.Turn 2. The left count is 2. The right was set back to zero at the top of the loop, so it is 1 again.Turn 3. The left reads 3. The right still reads 1.Turn 4. The motor turned four times on both robots — only one of them counted them.Finished. Four turns, and one of the two counts is fiction.
stopped
Both programs contain both blocks. Only the position of set [count] to 0 is different.
The count on the right is not broken; it is being told to start again on every pass. Each time round the loop it is wiped back to zero and then changed by one, so the honest answer is always 1 — while the motor cheerfully turns four times. A counter stuck at 1 almost always means a set block that has slipped inside the loop.
Anything oval is a number you can pick up
EV3 Classroom tells you what a block does by its shape, and once you have noticed that, a whole set of questions answers itself:
Oval — reports a number. The blue degrees counted, the timer, a distance, your own variable.
Pointed — reports true or false. These go in an if or a wait until, not in a variable.
Block-shaped — does something. These stack up; they do not fit inside anything.
So when a slot is oval, any oval fits it — and it does not matter in the least where that number came from. You can take the motor’s own A degrees counted and keep it in a variable you named degree_turn, then compare that with a number later. Pick an oval below and watch the same one drop into all three kinds of slot.
pick an oval
the same oval fits all three
set degree_turn to A degrees countedkeep it in a variable of your own
A degrees counted+10do arithmetic with it
A degrees counted>50compare it with a number
Every one of those slots is oval-shaped, and A degrees counted is an oval — so it drops in. Nothing about where the number came from matters.
This is what makes a variable more than a counter. A sensor reading is true only at the instant you read it; copying it into a variable freezes it, so the robot can compare where it is now against where it was when something happened:
when program starts :: events hat
[A v] reset degrees counted :: motors
set [degree_turn v] to ([A v] degrees counted :: sensors)
start moving [right: 30] :: movement
wait until <(([A v] degrees counted :: sensors) - (degree_turn)) > (400)>
stop moving :: movement
Read the condition aloud: how far the motor has gone now, minus where it was when we started, is more than 400. Both are ovals, so both can go into a subtraction, and the subtraction is an oval too — which is why it can go into a comparison. Ovals nest inside ovals as deep as you need.
Reset at the start, every time
A variable keeps its value after the program ends. Run the program again without setting it back and the second run begins where the first left off — the count starts at 14, the robot thinks it has already done the job. Every variable a program changes must be set to its starting value at the top.
Why it matters
A variable is the difference between a machine that repeats a fixed routine and one that responds to how things have gone — counting parts, tracking a score, remembering where it started.
ComponentControl4 min
The Timer
A wait pauses for a length of time. The timer is different: it runs in the background and can be read at any moment, so the robot can know how long something has taken while it is still happening.
Blocks reference
Block
What it does
(timer)
Reports the seconds since the timer was last reset.
reset timer
Sets it back to zero, so the next reading counts from here.
The timeout — a safety net
The most valuable use of a timer is escaping a wait that might never end. A robot told to drive until it sees a wall will drive for ever if the wall is not there. Combined with a timer, it can give up:
Repeat until the wall is close or five seconds have passed. That one change turns a program that can hang into one that always finishes. Both robots below are looking for a wall that is not there.
no way out
repeat until distance < 15
start moving straight: 0
with a timeout
reset timer
repeat until distance < 15 or timer> 5
start moving straight: 0
write GAVE UP at line 1
1.2stimer212cm · distance
Both robots are told to drive until something is within 15 cm. The room ahead is empty.Three seconds. No wall. Both are still driving — and the right-hand program is also watching its timer.The timer passes 5. The right-hand robot gives up, stops, and says so.The left robot is still going. Its condition can never become true, so that block will hold the program for ever.The right-hand program finished. The left one has not, and there is nothing to say why.
timer 1.2 s
The sensor is not faulty and the program is not wrong. There is simply no wall, and only one of these two programs has a way of noticing that.
The left-hand robot is not broken, and neither is its sensor. Its condition is simply one that will never come true, so the program sits on that block for ever — with nothing on the Brick to say so. The right-hand program asks the same question with an escape route bolted on, and finishes every time.
Why it matters
Real systems time themselves out constantly — a lift that cannot close its doors eventually gives up and beeps rather than trying for ever. A robot with no timeout simply stops responding, and there is nothing on screen to say why.
Commanded and not moving means contact. Then ease off — and record where it stopped.
▶Lead time and lagFrom Lesson 40 — a machine that ignores its own start-up delay misreads it as an event. Here that mistake reports a grip before the gripper has moved.Show meHide
ComponentControl4 min
The Timer
A wait pauses for a length of time. The timer is different: it runs in the background and can be read at any moment, so the robot can know how long something has taken while it is still happening.
Blocks reference
Block
What it does
(timer)
Reports the seconds since the timer was last reset.
reset timer
Sets it back to zero, so the next reading counts from here.
The timeout — a safety net
The most valuable use of a timer is escaping a wait that might never end. A robot told to drive until it sees a wall will drive for ever if the wall is not there. Combined with a timer, it can give up:
Repeat until the wall is close or five seconds have passed. That one change turns a program that can hang into one that always finishes. Both robots below are looking for a wall that is not there.
no way out
repeat until distance < 15
start moving straight: 0
with a timeout
reset timer
repeat until distance < 15 or timer> 5
start moving straight: 0
write GAVE UP at line 1
1.2stimer212cm · distance
Both robots are told to drive until something is within 15 cm. The room ahead is empty.Three seconds. No wall. Both are still driving — and the right-hand program is also watching its timer.The timer passes 5. The right-hand robot gives up, stops, and says so.The left robot is still going. Its condition can never become true, so that block will hold the program for ever.The right-hand program finished. The left one has not, and there is nothing to say why.
timer 1.2 s
The sensor is not faulty and the program is not wrong. There is simply no wall, and only one of these two programs has a way of noticing that.
The left-hand robot is not broken, and neither is its sensor. Its condition is simply one that will never come true, so the program sits on that block for ever — with nothing on the Brick to say so. The right-hand program asks the same question with an escape route bolted on, and finishes every time.
Why it matters
Real systems time themselves out constantly — a lift that cannot close its doors eventually gives up and beeps rather than trying for ever. A robot with no timeout simply stops responding, and there is nothing on screen to say why.
Say this back before moving on: “Am I telling it to move, and is it moving?”
What’s in this build 4 min
Close the gripper by hand onto three objects of different sizes and note the motor degrees for each. Those three numbers are what the arm should be able to work out for itself by the end of the lesson.
Part
What it is doing here
EV3 Intelligent Brick
Reads the motor positions that are doing the sensing. There is no sensor in this lesson except the motors themselves.
Medium Motor — the gripper
The sensor. Its degree count is the only evidence the arm has about what it is holding.
Large Motor — the shoulder
Lifts the arm. Stall detection here means “the arm has hit something”, which needs a different response from a grip — stop, do not hold.
Large Motor — the elbow
Reaches. Its own limits can be found by stalling gently against them instead of being typed in.
Touch Sensor — home
A definite zero for the shoulder. Everything else is measured from it.
Gearing decides whether this works at all. A gripper geared for speed will strip or slip before the encoder shows a clean stop; one geared for torque stalls crisply and holds. If your stalls are mushy, the fix is mechanical, not in the program.
Ports — and the rule 4 min
Sensors go in ports 1, 2, 3, 4. Motors go in ports A, B, C, D. They are not interchangeable, and nothing will tell you politely if you swap them.
Part
Port
Why this one
Gripper (Medium)
A
The precise motor — and today, the sensor.
Shoulder (Large)
B
The strong one — it lifts the whole arm.
Elbow (Large)
C
The other heavy joint.
Home (Touch)
1
Touch stays on 1 across the course.
Check your own build now:
Gripper in A, shoulder in B, elbow in C, home in 1.
Open the gripper fully, reset its degree count to zero, and note the fully-closed angle. Reaching that angle means an empty grip.
Collect three objects of clearly different widths. You will be testing on all three throughout.
Check nothing in the arm binds through its travel — a tight joint will stall and be reported as an object.
Connect the Brick 4 min
Two routes, and either is fine. USB is the reliable one and the one to fall back on when a room’s Bluetooth is busy; Bluetooth leaves the robot free to move, which some models need.
▶How to connect the BrickUSB and Bluetooth, step by step, with a photograph of every screen. Open it if you have not done this before — or if pairing is not working.Show meHide
USB — the reliable one
Switch the Brick on with the dark grey centre button.
Cable into the Brick’s PC port — the small square socket beside the numbered ports, not one of the numbered ones.
Other end into the computer.
Bluetooth — name it first
Do these in order. Naming the Brick after you go looking for it in the list is how groups end up driving each other’s robots.
Name your Brick. On the Brick: Settings (the spanner) → Brick Name. Type something nobody else will pick, then press the tick. Every Brick is called EV3 until somebody changes it.
Turn Bluetooth on. Settings → Bluetooth. Tick Bluetooth and Visibility. Leave iPhone/iPad/iPod unticked.
Connect from EV3 Classroom. Click the Brick icon at the top of the programming area, find your Brick by name, and click Connect.
Say yes on the Brick. It asks “Connect?” with the computer’s name — choose the tick, then accept the passkey, which is already 1234.
Where to read it. The name sits in the bar across the very top of the screen, on every screen — so you can check which Brick you are holding at any moment without going into a menu. This one is EV3VE. A Brick nobody has renamed says EV3.Step 3, and the reason step 1 exists. Three Bricks in range — read the name before you click Connect. Pairing with the wrong one is not an error: it works perfectly, on somebody else’s robot.
Step 2.Bluetooth switches the radio on; Visibility is what lets the computer find you. With Visibility off your Brick works perfectly and simply never appears in the list.Step 4. Look at the Brick. It asks whether to accept and names the computer. Choose the tick.Then the passkey, already 1234. Press the tick again and you are connected.
The two failures, every class, every time. The Brick has gone to sleep while you were building — press the centre button to wake it. Or you have paired with the group at the next table, which is why the name matters.
The long version, including Port View and how to read the port tiles, is in the Brick & Bluetooth guide.
Battery level changes stall behaviour. A tired battery makes a motor slow down under load, which looks like an early stall — so a threshold calibrated at full charge will grip at nothing by the end of a session. Check the battery before you trust the numbers.
Confirm the connection 2 min
Check the Brick icon: connected, or not.
Three motor tiles — A, B and C.
One sensor tile — 1.
Run the gripper closed with nothing in it and watch tile A count. Then hold the jaws with your fingers and watch the count stop. Note roughly how many degrees pass in a tenth of a second when free, and how few when held. Your threshold lives between them — and this is the one measurement the whole lesson rests on.
Stuck? The long version, with a photograph of every screen, is in the Brick & Bluetooth guide.
Change it and test 8 min
One change at a time. Predict, then run, then look. Test every version on all three objects and on empty air.
Set the threshold to 15. Now normal movement counts as a stall and it grips at nothing. Then set it to 1 and watch it crush the soft object.
Remove the start-up delay. Every grip succeeds instantly and reports a width of about zero. Name the number on screen that gives it away.
Remove the ease-off. Hold an object for thirty seconds and then feel the motor. That warmth is the failure mode.
Use the same detection on the shoulder to find its upper limit by stalling gently against it, then use that as the travel limit. The arm has now measured its own body.
Sort by width — grip an object, read the width, and put it in one of two places depending on the number. Sensing by effort has become measurement.
A motor that is told to move and is not moving is a sensor. Free, already fitted, and working on things nobody measured.
Where this goes 3 min
The arm reacts once. It notices contact, responds, and the job is done.
The last model of the course cannot ever stop reacting. Gyro Boy balances on two wheels, and if it stops correcting for a fifth of a second it falls over.
It needs all three: how far it is leaning, how fast that is changing, and how long it has been drifting — the closed loop from Lesson 5, the rate from Lesson 31, and one new term, put together for the first time.
Today the machine felt its own effort. Next it keeps itself upright — the hardest thing an EV3 can do.
Make it move 10 min
Step 1 — a fixed angle, and two ways to fail
when program starts :: events hat
[A v] run to position (0) [degrees v] at (40) % speed :: motors
[A v] run to position (200) [degrees v] at (50) % speed :: motors
Try it on all three objects. The small one is crushed or the large one is missed — there is no single angle that works, which is the point.
Step 2 — grip by feel
when program starts :: events hat
set [free move v] to (18) :: variables     // degrees per 0.1s when unloaded - measure yours
set [stall below v] to (4) :: variables     // well under free move, over the wobble
set [ignore start v] to (0.3) :: variables  // motor start-up, measured
set [closed at v] to (250) :: variables     // the fully-shut angle - an empty grip
clear display :: display

[A v] run to position (0) [degrees v] at (40) % speed :: motors
[A v] reset degrees counted :: motors

// ---- close, and watch for the moment it stops moving ----
[A v] start motor [clockwise v] at (60) % speed :: motors
reset timer :: control
wait (ignore start) seconds :: control

set [gripping v] to (0) :: variables
repeat until <<(gripping) = (1)> or <([A v] degrees counted) > (closed at)>>
  set [before v] to ([A v] degrees counted) :: variables
  wait (0.1) seconds :: control
  set [moved v] to ([abs v] of (([A v] degrees counted) - (before))) :: variables
  write (moved) at line (5) :: display
  if <(moved) < (stall below)> then
    set [gripping v] to (1) :: variables
  end
end

if <(gripping) = (1)> then
  // ---- ease off: hold, do not crush ----
  [A v] start motor [clockwise v] at (20) % speed :: motors
  set [width v] to ([A v] degrees counted) :: variables
  write [HOLDING] at line (1) :: display
  write (width) at line (3) :: display
  play sound [Communication / Okay v] :: sound

  // ---- carry it ----
  [B v] run to position (120) [degrees v] at (30) % speed :: motors
  [C v] run to position (90) [degrees v] at (30) % speed :: motors
  wait (1) seconds :: control
  [B v] run to position (0) [degrees v] at (30) % speed :: motors
  [A v] run to position (0) [degrees v] at (40) % speed :: motors
else
  // ---- fully closed means there was nothing there ----
  [A v] stop motor :: motors
  write [NOTHING TO GRIP] at line (1) :: display
  play sound [Mechanical / Error v] :: sound
  [A v] run to position (0) [degrees v] at (40) % speed :: motors
end
Ignore the start-up, watch for the stop, then ease back to a holding power — and if it closed all the way, say there was nothing there instead of carrying air.
The start-up delay comes first. Without it every grip reports success instantly.
The power drops the moment contact is detected. Detecting and then holding full power is the mistake that damages motors.
Reaching the fully-closed angle is a failure, and it is reported. An arm that cannot tell an empty grip from a full one will drop things all day.
The stall angle is the object’s width, recorded and shown. The arm now knows something about what it picked up.
What success looks like: all three objects picked up and carried, with three different widths on screen — and a clear “nothing to grip” when it closes on empty air.
If it reports a grip immediately, raise the start-up delay. If it crushes small objects, your threshold is too low — it is treating a slow crawl as movement.
This is what you are building: the Robot Arm H25.
Build it 15 min
Build the model before you read any further. Everything after this is about making it do something, and none of it will make much sense with nothing on the table in front of you.
Use the viewer's own controls to zoom and turn pages. Fullscreen makes it big enough to build from.
Check the finished build against the picture before you switch anything on. A motor mounted the wrong way round is far easier to spot now than it is to debug later, when it looks like a program fault.
Challenges 27 min
Work through them in order — each is harder than the last. The extra challenge comes after all three, and it is meant to make you plan before you build.
Challenge 1
Measure the two numbers the detection rests on.
Run the gripper freely and record how many degrees it covers in a tenth of a second. Then hold the jaws and record how few.
Report both, and the threshold you put between them. Then measure how long the motor takes to get going from rest — that is your start-up delay, and it is not a number you may guess.
Challenge 2
Break it in both directions.
Set the threshold far too high, then far too low, and test each on a soft object and on empty air.
Report what each version does. One grips at nothing; the other crushes. Name which number causes which.
Challenge 3
Remove the ease-off.
Hold an object at full gripping power for thirty seconds, then carefully feel the motor.
Write down what you noticed. Detecting a stall and then leaning on it is the failure that kills real hardware, and it does not announce itself at the time.
Extra challenge
Handle objects nobody measured.
Have another group hand you five objects of different sizes and stiffnesses, without telling you anything about them. Pick up and move all five.
Requirements:
1. Contact detected from the gripper motor alone — no extra sensor.
2. A start-up delay from your own measurement, so no grip is reported before the gripper has moved.
3. Power eased back to a gentle hold the moment contact is detected.
4. The stall angle recorded and shown as the object's width.
5. Reaching the fully-closed angle reported as NOTHING TO GRIP, not carried across the table.
6. Nothing crushed and nothing dropped.
Then use the same detection on the shoulder to find its own upper limit by stalling gently against it, and use that instead of a typed-in travel limit.
Write down the five widths and the shoulder limit. Every one of those numbers came from a motor doing a job it was not sold to do — and a machine that can measure its own body is a machine that survives being rebuilt.