Quick Learn — the model, the instructions, the program and the challenges. The theory is in Full Lesson.
The mission 4 min
Design the robot for this set — and justify every choice against the scoring sheet.
Every build lesson so far handed you a constraint. Build a quick-swap arm. Build a sorter. One attachment, two missions. A modular mount. Today there is no constraint at all, except that everything has to earn its place.
You may keep the robot you have. But you have to defend it item by item against yesterday’s requirements list, exactly as if you were proposing it new. A robot that survives that audit is a good robot and you now know why. A robot kept because taking it apart feels wasteful is one nobody can defend to a judge.
What the mat demands physically 5 min
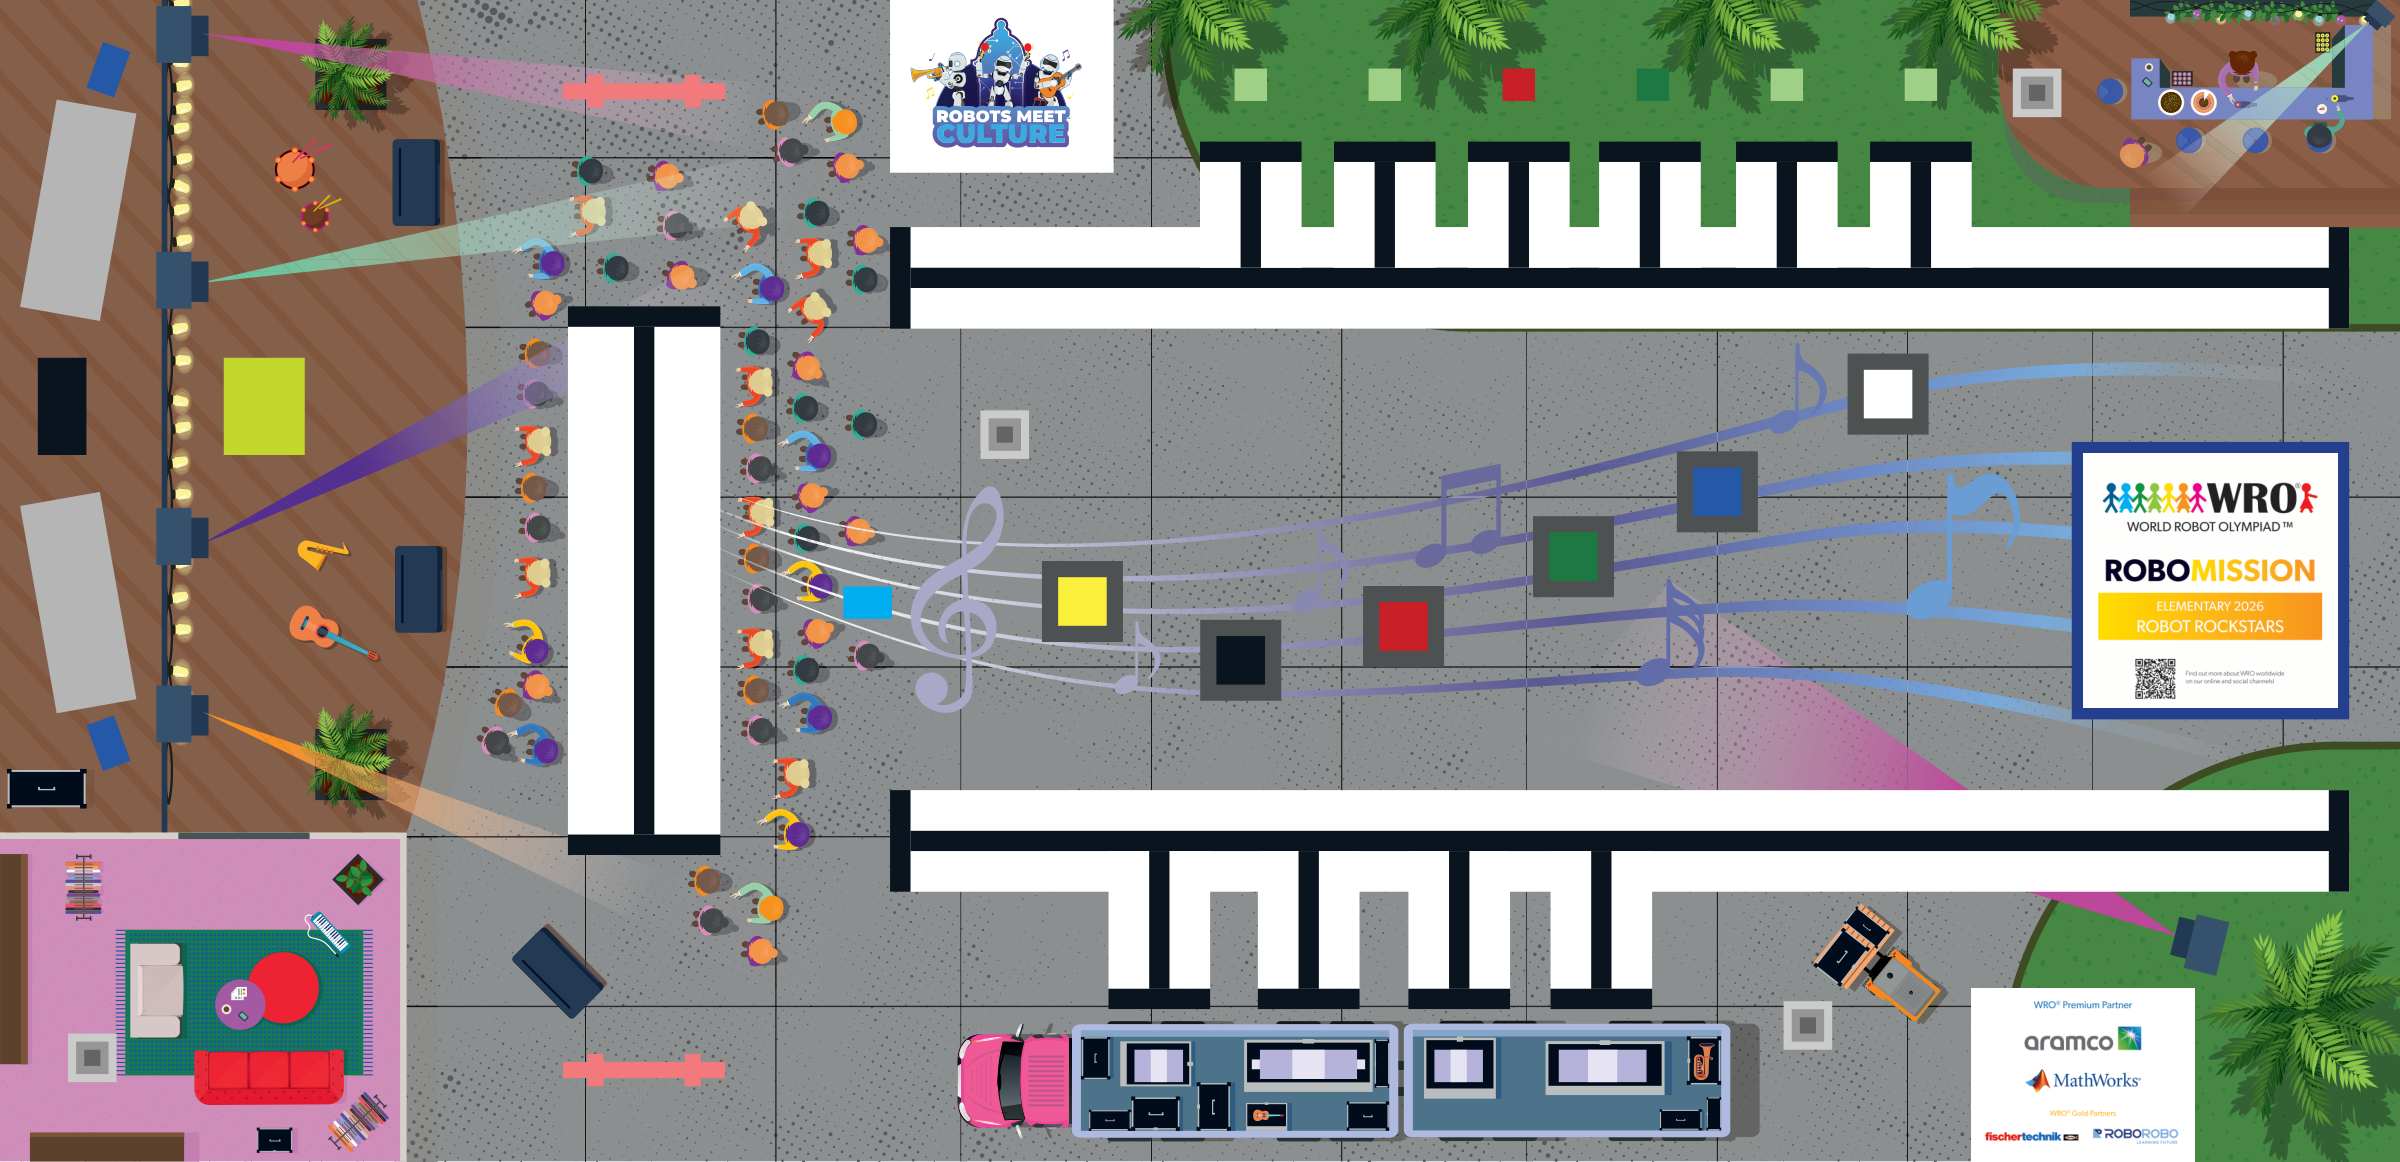
Read the requirements list from lesson 41 aloud — the verbs, not the attachment ideas. Then walk the mat with it and check nothing was missed.
- The concert stage at A — straight up the left edge from HOME. An easy approach, so whatever happens there can be the fiddly mechanism.
- The tour trucks at B — bottom middle, approached along the bottom.
- The main plaza at E — dead centre, so the robot passes it constantly. Anything protruding sideways will meet it.
- The park strip at D and the café at C — top right, close together. Whatever works at one should work at the other without a swap, or that corner costs double.
That last point is the strongest design lead on this mat. Two neighbouring stations that need two different mechanisms turn a cheap corner into an expensive one.
The technique — five blocks of evidence 12 min
You are not starting from nothing, whatever the lesson title says. You are starting from five blocks of measurements. These are not opinions and they are not up for rediscovery:
- Weight belongs over the drive wheels. Lesson 26 — mass hung off the front lightens the wheels and the robot slips on exactly the leg you wanted to be fast on.
- Narrow beats clever. Lesson 26 again. Width is what catches on things, and on this mat the plaza sits dead centre.
- The gyro must not move relative to the frame. Lesson 19. A gyro on a flexing beam reports the flex.
- Colour sensor height is part of the calibration. Lesson 4. Change the height and every threshold you own is wrong.
- One keyed mounting position. Lesson 34. If a module can go on two ways, one day it will.
The audit question for every part: which line of the scoring table does this earn? If a component cannot be traced to points, it is weight. That includes decorative bracing, a sensor nothing reads, and the mechanism for a mission you cut yesterday.
Then check the port budget from lesson 41 against what you have drawn. If the design fits one Brick — four motors, four sensors — it is finished. If it does not, lessons 43 and 44 add a second Brick, and you should know the price first: another set of batteries, real weight, and slower commands to anything on it.
Build it 10 min
Draw before you build. Side and above, with the widest point, the furthest forward point, and where each port’s cable runs. Ten minutes of drawing saves an hour of rebuilding, and the drawing goes in the journal that lesson 48 submits.
Then build in this order, which is the order things become expensive to change:
- Drive base and wheels — everything else is measured from these.
- Sensors — colour at its calibrated height, gyro rigid, ultrasonic where it can see.
- The Brick, positioned so its weight sits over the wheels and its screen is readable while the robot is on the mat — you built a menu, and somebody has to read it during setup.
- The mounting point, keyed.
- Modules, last.
Keep the ports as they have been all course unless you have a reason to change: drive on B and C, gyro on 2, colour on 3, ultrasonic on 4. Every My Block you own assumes it, and re-plugging is a whole evening of confusing faults.
Program it — what the rebuild broke 12 min
A changed robot invalidates numbers, and the numbers do not announce themselves. Work through this list honestly.
- Wheel size or track width changed? Every distance and every turn is wrong. Re-measure both, as in lesson 20.
- Colour sensor height changed? Re-run the calibration. The mid value is shared by all three followers.
- Weight distribution changed? Your PID gains were tuned for the old balance. Expect to re-check them.
- Anything re-plugged? Every My Block that names a port is now wrong.
Re-tune in the order from lesson 29. P to the edge and back off, D to damp, P again, I last and only if a steady gap remains. You are not starting over — you own the procedure, and that is exactly what it was for.
Then run your menu once on the bench and confirm every entry still dispatches to a mission that exists. A redesign that dropped a mechanism leaves a menu entry pointing at nothing.
Tune it — the defence 9 min
Swap robots with another team. They audit yours, you audit theirs, and neither team gets to explain first.
Three questions each, answered from the design and not from memory:
- Point at any part and ask what it earns. Which line of the scoring table? “It makes it stronger” is only an answer if something was breaking.
- What is the widest point, and what will it hit? Then check it against the plaza at E.
- What happens if this mission is not in the round? Is that mechanism still carried? What does it cost to carry?
Write down every question you could not answer. That list is more useful than the ones you could, and it is what lesson 47’s judge will ask.
Run it — one leg of everything 6 min
Do not attempt the whole route today. Prove the rebuild is sound first, one piece at a time:
- Follow a line for a couple of metres — is the colour calibration right?
- Turn ninety degrees each way — is the gyro rigid and the track width right?
- Drive HOME to the concert stage at A, the easy vertical, and do the job there.
- Drive past the plaza at E loaded, and check nothing catches.
Four short tests. Each one isolates something the rebuild could have broken, which is why they are worth more today than one long run that fails for an unknown reason.
The journal 4 min
This entry is scored by a judge in lesson 48, so write it for one:
- the drawings, side and above, with the widest and furthest-forward points marked
- the justification table — every major component against the line of the scoring sheet it earns
- what you kept from the old robot, and the reason it survived audit
- what you removed, and what it was costing you
- the numbers the rebuild invalidated, and the ones you re-measured
- the questions the other team asked that you could not answer
Last build lesson of the course. Lessons 43 and 44 are wiring, 45 is software, and 46, 47 and 48 are rounds. From here the robot is what it is — so anything you know is wrong today stays wrong.