Learning Goals 3 min
By the end of this lesson you will be able to:
- Build the six-legged Hexapod with its Large Motor in port B.
- Use the Brick's own buttons as an input with wait until <is [center v] button pressed?>.
- Make the Hexapod wait for a button press, then walk forward.
Meet the Model — the Hexapod 6 min
What is a hexapod?
A hexapod is a robot that walks on six legs. The word means "six feet". It moves a bit like an ant or a beetle.
The science behind it
Six legs make walking very stable. Three legs touch the ground at once — a "tripod gait" — so the robot never topples. The idea is borrowed from insects, which walk the same way. With one leg lifting, the other three always hold it up.
Where you meet it
Hexapods are used as search-and-rescue and exploration robots. Their many legs let them cross rocky, uneven ground that wheels cannot.
What we'll build
We'll build a Hexapod driven by a Large Motor on port B that walks all six legs. Then the Brick buttons let you trigger it to start walking.
Warm-Up 4 min
So far your programs ran the moment you pressed start. Today the robot waits for you to press a button before it moves.
Quick-fire puzzle
Kavya runs this. What happens right after she presses the centre button on the Brick?
when program starts :: events hat
wait until <is [center v] button pressed? :: sensors>
[B v] run [clockwise v] for (3) [rotations v] :: motors
Reveal the answer
Nothing happens at first — the program waits. The legs only move once Kavya presses the centre button. wait until pauses the program until the thing inside the hexagon becomes true.
New Concept — buttons as input 10 min
Until now the robot only had outputs — motors, screen, sound. A button is an input: a way for the robot to sense something from the outside world. The Brick's five buttons are built-in sensors.
Blocks reference
| Block | Category | What it does |
|---|---|---|
wait until <> | Control | Pauses the program until the boolean inside the hexagon becomes true. |
<is [center v] button pressed? :: sensors> | Sensors | A yes/no reporter: true while that Brick button is held down. |
when [center v] button [pressed v] :: events hat | Events | A hat block: starts its own stack when that button is pressed. |
The Brick buttons: up, down, left, right and centre. Today we use the centre button as the "go" button.
Wait until — a smarter pause
Earlier you used wait (3) seconds — a pause of a fixed length. wait until is different: it waits as long as it needs to, until something becomes true. The robot can now wait for you.
Why it matters
A lift waits for you to press a floor button. A microwave waits for Start. Buttons let a robot do nothing until a human says go — the start of real interaction.
Build & Program — the Hexapod 17 min
Part A — Build
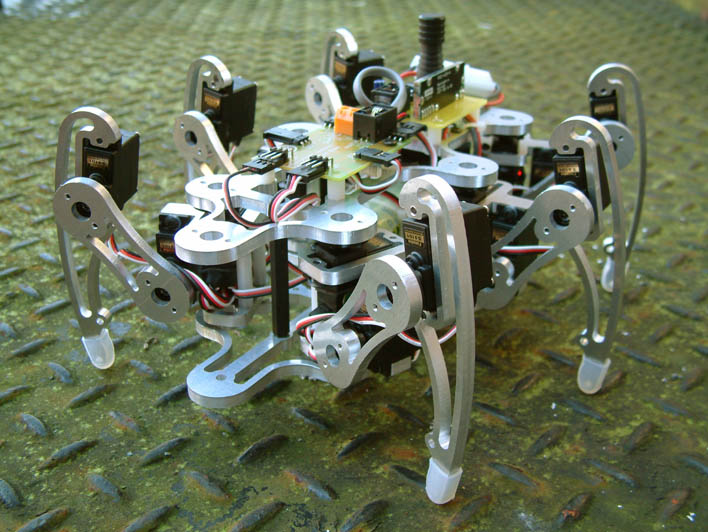
Build the Hexapod Walking Robot. A Large Motor drives a leg linkage that moves all six legs to walk forward.
Components & ports: EV3 Brick · Large Motor → port B.
- Build the body and attach three legs on each side to the linkage.
- Drive the linkage with the Large Motor through gears; plug it into port B.
- Check all six legs move together as the axle turns.
- Turn the motor by hand to confirm the robot walks forward, not sideways.
Part B — Program
Show "PRESS GO", wait for the centre button, then walk.
- Start the program and show PRESS GO on screen:
when program starts :: events hat
write [PRESS GO] at line (1) :: display
- Wait for the centre button press:
wait until <is [center v] button pressed? :: sensors>
- Set the speed, then walk five rotations:
[B v] set speed to (40) % :: motors
[B v] run [clockwise v] for (5) [rotations v] :: motors
when program starts :: events hat
write [PRESS GO] at line (1) :: display
wait until <is [center v] button pressed? :: sensors>
[B v] set speed to (40) % :: motors
[B v] run [clockwise v] for (5) [rotations v] :: motors
Expected behaviour: the screen reads PRESS GO and the robot stands still. The moment you press the centre button, all six legs start walking forward for five rotations.
What changed: for the first time the robot waits for an input before it acts.
Try It Yourself — three small builds 11 min
Goal: Beep to confirm the press, then walk.
when program starts :: events hat
wait until <is [center v] button pressed? :: sensors>
play beep (60) for (0.2) seconds :: sound
[B v] run [clockwise v] for (5) [rotations v] :: motors
Goal: Wait for the press, walk forward, then wait again before walking back (reverse).
when program starts :: events hat
wait until <is [center v] button pressed? :: sensors>
[B v] run [clockwise v] for (5) [rotations v] :: motors
wait until <is [center v] button pressed? :: sensors>
[B v] run [counterclockwise v] for (5) [rotations v] :: motors
Goal: Jun Kai wants a different button to start it. Use the when [up v] button [pressed v] hat block so pressing up makes it walk — no start press needed.
when [up v] button [pressed v] :: events hat
[B v] run [clockwise v] for (5) [rotations v] :: motors
Mini-Challenge — the patient hexapod 6 min
Combine today's button input with the status light from earlier. Show a green light while waiting for the press, then a red light while walking.
It works if:
- The light is green and the robot is still until you press the button.
- The light turns red and the robot walks once pressed.
Recap 2 min
You used the Brick buttons as an input. wait until <...> pauses the program until a boolean becomes true, and <is [center v] button pressed?> is true while the button is held. The robot can now wait for a human.
- Input
- Something the robot senses from outside — a button press, a sensor reading.
- wait until (block)
- Pauses the program until the boolean inside it becomes true.
- Boolean (hexagon)
- A yes/no value, like "button pressed?". It fits hexagon-shaped slots.
Where this came from: adapted from EV3Lessons (Beginner tab) — ev3lessons.com.
Homework 1 min
Two-button robot. Make the up button walk forward and the down button walk backward, using two hat blocks.
Bring back next class: a screenshot of your two stacks.
Heads up for next class: EV3-L1-12 builds the Biped and uses the Ultrasonic sensor to keep its distance from a wall.